Why Does My RV Converter Buzzing? Causes and Fixes
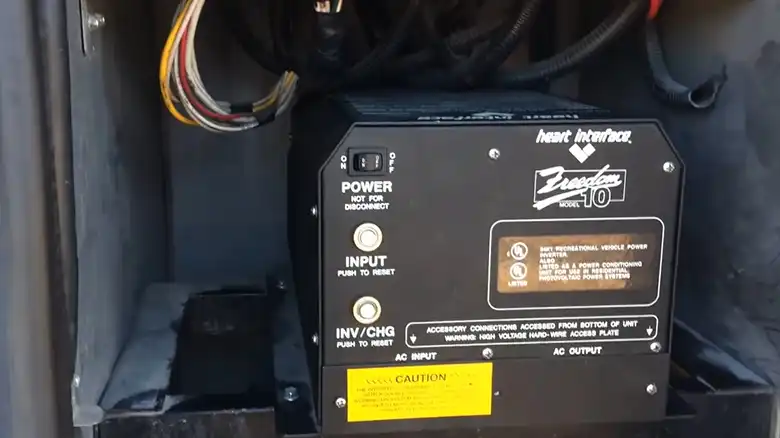
The buzzing sound coming from your recreational vehicle’s converter can be worrying. The converter is a crucial device that transforms AC power from external electric hookups into 12-volt DC power to charge the batteries and operate the RV’s various appliances and accessories when not plugged in.
A buzzing noise likely indicates a problem with the converter that should be addressed promptly to avoid further issues.
What Causes the Buzzing Noise in RV Converters
The first step is to understand where exactly the buzzing is coming from and what type of sound it is. A loud humming or squealing noise may be caused by faulty capacitors or an overloaded converter. Loose wiring connections can also create buzzing or humming. And if the buzzing is coming from the small cooling fan inside the converter, the fan itself might be failing.
There are several common culprits for a buzzing RV converter:
Damaged or old capacitors – These parts regulate and filter the power conversion process. When they wear out or fail, you may hear squealing, buzzing, or humming noises along with overheating problems.
An overloaded converter – Running too many appliances at once or trying to charge badly depleted batteries strains the converter. This leads to excess noise from electrical and fan components working on overdrive.
Corroded or loose wiring – Faulty contacts at battery terminals, DC outlets, and other connection points interrupt proper power flow, potentially causing intermittent buzzing sounds.
Broken cooling fan – These small fans are essential for ventilation and preventing overheating. Excess noise, vibration, or clogged vents can all cause fan failure and loud buzzing.
Problematic batteries – Weak batteries with damaged cells or insufficient voltage place severe stress on converters. This creates noise, electrical spikes, and eventual converter burnout.
How to Fix the Buzzing or Humming Noise in RV Converters
Pinpointing the root of the buzzing requires thorough inspection and testing. Carefully listen to identify the location and type of buzzing. Look for damaged wires, loose connections, and capacitors showing swelling, cracks, or leaks. Inspect battery electrolyte levels and all contacts. Use a multimeter to check voltage. Test the converter fan by disconnecting and manually spinning – seized, grinding fans need replacement.
Simple issues like loose wiring can often be fixed with proper connections. For blown capacitors, fan failures, and severe electrical problems, professional RV converter replacement may be necessary. Make sure to select an equal or upgraded model rated for your RV’s size and electrical demands.
How to Prevent the Buzzing Noise
Prevention is critical to avoid converter buzzing issues. Regularly inspect and clean the converter, clear all vents and fans of dust buildup, and ensure wiring contacts are corrosion-free. Check your battery health at least annually, and recharge depleted batteries promptly. Avoid overloading the converter by managing appliance use, and consider electrical upgrades for added capacity if needed.
How to Determine If Your RV Converter is Bad
Determining if the actual converter itself is faulty amidst wider electrical issues can be challenging. Signs of a failing converter include overheating with hot surfaces or burning smells, persistent buzzing noises, blown fuses, unstable voltage readings (too high, too low, or fluctuating DC voltage), visibly damaged components like bulging or leaky capacitors, and cracked casings.
To properly test converter health, use a multimeter to check both input AC shore power match expected voltages around 110-120V, while output DC voltage should read steady at 12-13V. If voltages are outside normal ranges, fuses blow repeatedly or connections are loose, the converter requires replacement.
How to Replace a Faulty RV Converter
When testing proves the converter is no longer working, installing a replacement matched to your existing converter’s capacity, voltage, circuit number, and dimensions is necessary. Replacing an RV converter begins with disconnecting all power – switch offshore power, disconnecting battery terminals, and unplugging all wiring from the faulty converter. Then remove the converter box from its wall mounting using screwdrivers.
Mount the new converter in the same location and reconnect the wiring, before testing operation by powering up appliances and checking recharge voltages. As RV converter installation involves both AC and DC systems, replacement should be performed by qualified electrical technicians unless you have training and certification, at shop labor rates around $85-$125 per hour.

![[Explained] How Much Gas Does an RV Generator Use?](https://www.exploringthelocallife.com/wp-content/uploads/2023/09/How-Much-Gas-Does-an-RV-Generator-Use-768x431.webp)