RV converters are complex devices with multiple wires and terminals, and instructions from manufacturers can be confusing. A poor connection can result in no charging, drained batteries, damaged converters, or even electrical fires. So, how to connect the battery to the RV converter correctly?
The good news is that with a basic understanding of the converter and battery, and by following RV converter battery wiring diagrams, nearly anyone can learn how to connect their RV battery to the converter safely and correctly. Choosing compatible batteries, locating the right terminals, ensuring proper polarity, and wiring everything securely require knowledge many RV owners lack.
In just a few simple steps, you can have your batteries charging and power flowing reliably.
Don’t worry, I will demystify RV converters and batteries, provide wiring diagrams for common configurations, and give step-by-step instructions for connecting your RV battery to the converter.
Understanding RV Converters and Batteries
Before jumping into the specifics of how to connect a battery to an RV converter, it’s helpful to understand what these devices are and how they operate in recreational vehicles. Grasping the basics makes the wiring process much simpler.
What is an RV Converter?
The RV converter is the device that converts 120-volt AC power from a shore power hookup or generator into 12-volt DC power that can charge batteries and run 12-volt devices and appliances in the RV.
Converters are equipped with circuit boards, transformers, and regulators that deliver smooth, reliable 12-volt power. They have a 120-volt AC input and 12-volt DC outputs to connect batteries and other RV components.
When plugged in to shore power or running the generator, the converter uses the 120-volt AC to supply 12-volt DC power and simultaneously charge the RV battery bank. Some converters also have a battery charging section that functions only when shore power is present.
RV Battery Function and Types
The RV battery (or battery bank) provides power when shore power or a generator is not available. It also stabilizes voltage from the converter and can run more robust 12-volt loads.
Deep cycle lead-acid and absorbent glass mat (AGM) RV batteries are the most common types. They are designed to provide steady power over long periods and withstand deep discharge.
Flooded lead-acid batteries require maintenance while AGM batteries are sealed and maintenance-free. RV batteries are rated by amp hours for storage capacity and use terminals marked positive and negative for connections.
How Converters Charge RV Batteries
When the converter receives 120-volt AC power, it uses some of that power to supply 12-volt DC current to appliances and lights. Any excess current gets channeled to the battery to recharge it in a process called bulk charging.
Once the battery charge reaches around 80%, the converter will switch to absorption charging at a lower voltage. Finally float charging maintains the charge. Proper converter settings ensure maximum battery life.
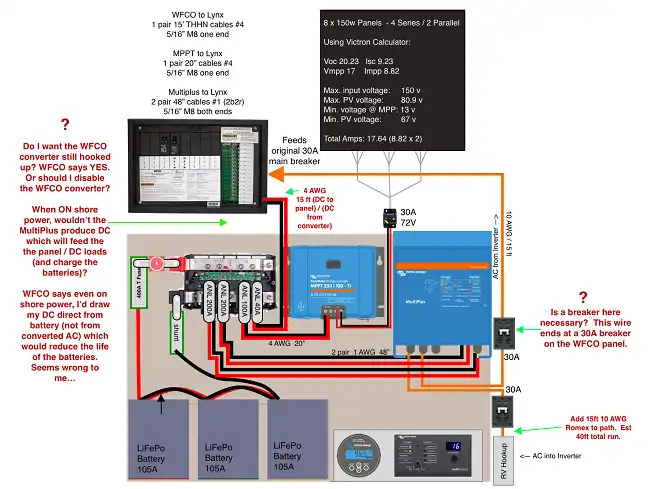
RV Converter Battery Wiring Diagrams
Wiring diagrams provide valuable visual references for connecting converters and batteries in RVs. While diagrams vary between RV makes, models, and converter types, they share common points.
Referring to a wiring diagram as you connect prevents errors. We will cover the standard configurations.
Standard 3-Stage Diagram
Most converters use a 3-stage charge profile – bulk, absorption, and float. The diagram shows input from shore power, distribution of 12V DC, and wiring of battery terminals.
4-Stage Diagram
Newer converters may add an equalization stage that fully replenishes the battery. The 4-stage diagram is similar but includes the EQ connections.
Dual Battery Wiring
For RVs with an auxiliary battery dedicated to certain loads, the diagram shows the splitter charging both banks.

Common RV Converter and Battery Configurations
With an understanding of the converter and battery plus the wiring diagrams, you have the knowledge to connect your RV battery to the converter. Follow these steps:
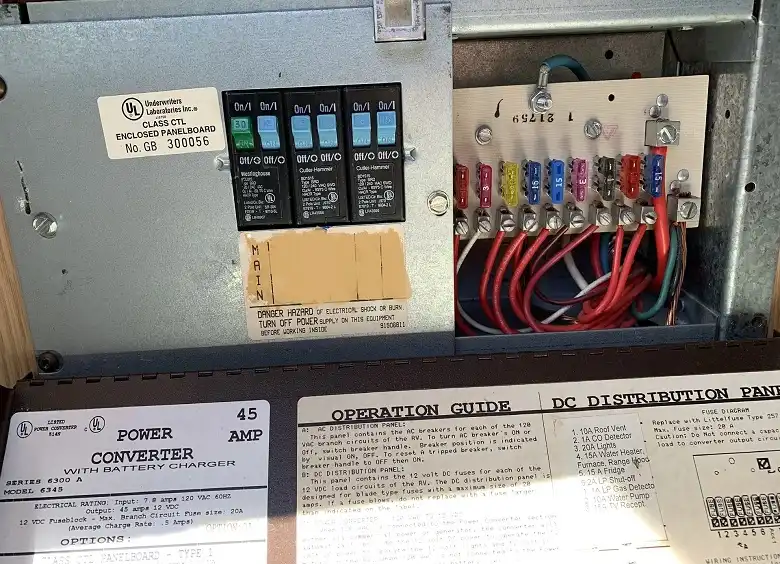
Step 1: Inspect the Converter and Battery
- Locate the RV converter, usually a metal box mounted in an accessible bay. Remove the cover to expose the wiring terminals.
- Examine the existing battery bank. Check for damage, corrosion, and cracks. Determine age and capacity.
- Decide if you need new batteries. Also, consider upgrading to lithium batteries.
Step 2: Disconnect and Remove the Existing Battery
- Switch off the converter and shore power. Disconnect the battery cables.
- Clean any corrosion on terminals and cables. Remove the old battery if replacing it.
Step 3: Prep the New Battery Bank
- For flooded lead-acid batteries, fill cells with distilled water if needed.
- Clean all terminals. Secure batteries in mounting trays.
Step 4: Connect the Positive Cable
- Attach the positive (red) cable from the battery bank positive terminal to the converter output marked Battery Positive, Batt +, or 12V+.
- Ensure a tight, clean connection. Add dielectric grease if desired.
Step 5: Connect the Negative Cable
- Attach the negative (black) cable from the battery bank negative terminal to the Battery Negative, Batt -, 12V- terminal on the converter.
- Verify the connection is tight and free of corrosion.
Step 6: Confirm Polarity
- Double-check that the battery connections match the polarity of the converter battery terminals.
- Positive to Positive. Negative to Negative. Reverse polarity will severely damage the converter.
Step 7: Reinstall the Converter Cover
- With all wiring complete and connections checked, reinstall the converter cover.
- Secure all screws and access panels. The converter is now ready for service.
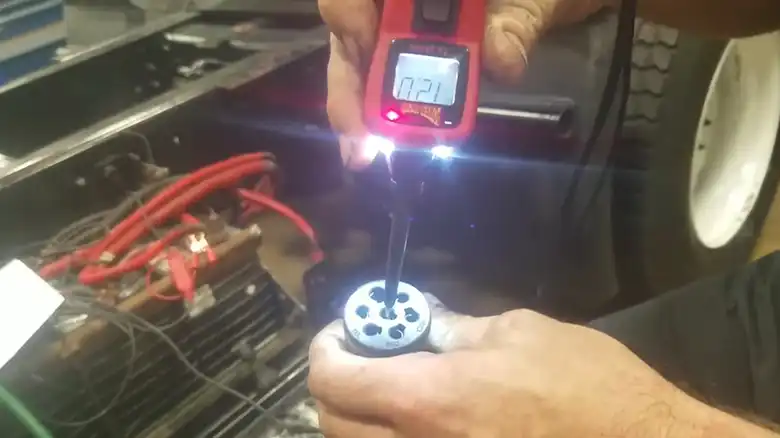
Step 8: Test Operation and Charging
- With shore power or generator on, test converter operation.
- Use a multimeter to confirm the charging voltage at the battery terminals.
- Start with a low charge to activate the batteries if needed.
Following the proper wiring diagrams and installation steps will ensure your RV converter and new batteries work seamlessly together. Take it slow, check connections twice, and you’ll have reliable power for all your adventures.
Troubleshooting RV Electrical Issues Simplified
Even with proper installation, problems can arise with converters, batteries, and connections. Here are some common problems and solutions:
No or low charge at the battery:
- Check shore power/generator is delivering power to the converter.
- Inspect all wiring for loose, corroded, or improper connections.
- Test converter for proper operation and output.
- The battery may be worn out or have bad cells.
Battery not holding a charge:
- Battery plates may be sulfated. Equalization may help.
- Old battery at end of the lifespan. Replace battery.
- Possible short draining battery. Disconnect to isolate.
Converter not powering 12-volt appliances:
- No input power to the converter. Check shoreline and generator power.
- Faulty converter not outputting 12-volt DC. Test or replace converter.
- Loose wiring connection to appliances.
Converter overheating, shutting off:
- Excessive load for converter size. Reduce 12-volt loads.
- Improper ventilation. Ensure converter cooling vents are clear.
- Internal failure. May need converter repair/replacement.
RV electrical spikes, uneven power:
- Battery is unstable due to age, damaged or unbalanced cells. Replace.
- Converter failure. Repair or change out the converter.
- Install power conditioner to smooth electrical delivery.
Careful installation matched with proper converter settings, sufficient battery capacity, and good ventilation will avoid many electrical headaches. But when problems pop up, methodically isolate the issue and correct it.
Commonly Asked Questions
How Many Batteries Can I Connect To My Rv Converter?
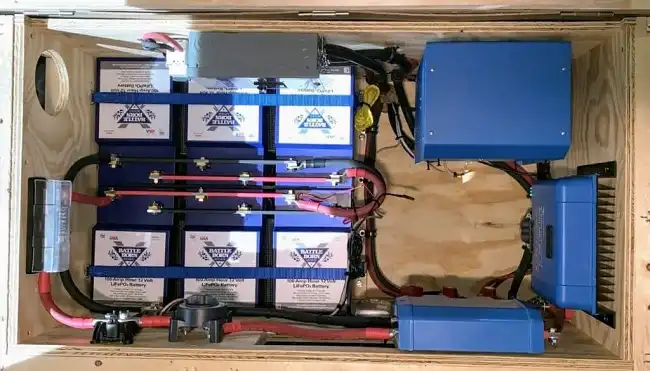
Most RV converters can safely manage dual 6-volt or dual 12-volt batteries wired in a series/parallel configuration to create a 12-volt battery bank. Large inverter-charger converters can handle up to 4 batteries. Too many batteries can overload the converter.
Where Is The Rv Converter Located?
The most common spot is a bay compartment, often under the bed or sofa. But they can be mounted anywhere with access – under the RV, exterior compartments, the tongue box. Check all bay access doors.
Should I Disconnect My Rv Battery When Plugged Into Shore Power?
No need to disconnect. The converter will automatically charge the connected battery when shore power is available. Disconnecting the battery would disable the 12v system.
Can I Charge My Lithium Rv Battery With A Standard Converter?
Yes, but an adjustable, multistage converter matched with a compatible lithium battery management system is recommended to properly charge and avoid damaging lithium batteries.
Do I Need A Fuse For My Rv Battery Connection?
Yes, to protect the converter from current spikes or accidental reverse polarity you should have an inline ANL fuse rated for your converter on the positive lead.
Conclusion
I hope this detailed walkthrough demystifies RV converters and provides the knowledge you need to safely connect your RV battery. While it may seem complicated, taking it step-by-step and referring to the diagrams will ensure your electrical setup operates reliably for years to come. Don’t hesitate to consult an expert electrician if you have any doubts. Happy travels and enjoy having fully charged batteries powering your adventures! Please leave a comment below if you have any additional questions.
Thanks for reading – safe travels and happy camping!