
Ever tried deciphering an RV wiring diagram? I did, and I won’t lie; at first glance, I thought I’d discovered an ancient treasure map. But my curiosity wouldn’t let me walk away, and soon enough, I had unraveled the 50 amp RV wiring puzzle.
The 50 amp RV setup is often found in larger RVs, supporting a range of high-power appliances and systems. Unlike the more common 30 amp system, a 50 amp offers more juice for those additional comforts.
If you’ve ever taken a glance at the wiring diagram of a 50 amp RV setup, you’d be forgiven for thinking you’ve stumbled upon an alien communication chart. Yet, for those enthusiastic RV enthusiasts looking to get a firmer grip on their vehicle’s operations, understanding the 50 amp RV wiring diagram can be invaluable. Let’s light up this topic, shall we?

50 Amp RV Wiring Overview

Let’s break down each term and explain it:
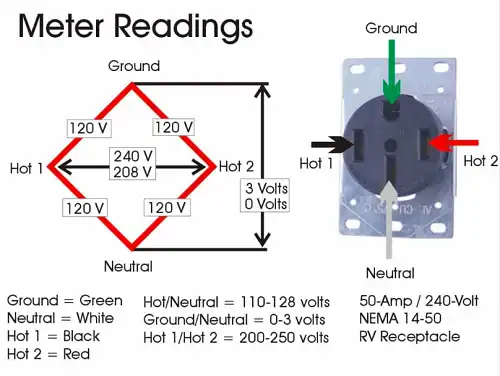
- System ground (neutral): This refers to the neutral wire in an electrical system. It is typically white or gray and acts as a return path for current to the source in standard 120V circuits.
- 120V: This is a standard voltage for most household appliances in the United States. When people refer to “household current,” they’re often talking about 120V.
- Equipment ground: This is a safety feature, often a green or bare wire, designed to protect people from electrical shocks by providing a path for fault current to travel to the ground.
- 240V: This is a higher voltage commonly used for large household appliances like dryers or ovens. It’s essentially two 120V circuits combined.
- 240V/50A “RV” receptacle & plug: This refers to the specific plug and receptacle used in RVs that can handle 240 volts and 50 amperes of current. It’s designed to provide sufficient power to larger RVs with multiple appliances.
- G, W, X, Y: These are often abbreviations or symbols used in electrical diagrams:
- G: Ground
- W: White wire (neutral)
- X and Y: These usually refer to the hot wires. In a 240V circuit, there are two hot wires, one connected to each of the X and Y terminals.
- 14-50R & 14-50P: These are specific designations for receptacles and plugs:
- 14-50R: A 50-amp, 125/250-volt receptacle.
- 14-50P: The matching plug that connects to the 14-50R receptacle.
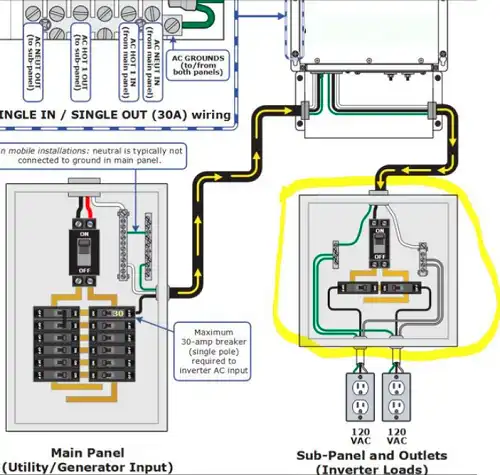
- A 30A dual circuit breaker on each hot leg protects the circuit: This means that each hot wire (or “leg”) in a 240V circuit is protected by its own 30-ampere circuit breaker. It ensures that if there’s an overload on either leg, the breaker will trip, stopping the flow of electricity and protecting the equipment.
- 240V/30A Locking receptacle (L6-30R): This is a specific type of receptacle that can handle 240 volts and 30 amperes of current. The “locking” part means that the plug twists and locks in place when plugged into the receptacle, ensuring a secure connection.
Understanding the 50 Amp RV Wiring Diagram
The 50 amp RV wiring system might look complex, but it’s methodical once understood:
Power Source Details
Your RV can get its power from a variety of sources:
- Shore Power: When you’re docked at an RV park.
- Generators: Useful when you’re off the grid.
- Solar Panels: An eco-friendly, albeit slower, option for the environmentally-conscious traveler.

Power Distribution Breakdown
Main Breaker: Think of this as the main gate through which all electricity must pass. It ensures that your RV doesn’t draw more current than safe.
Sub Breakers: These breakers distribute power to various parts of your RV, like the kitchen, bathroom, or living room. Each has its own limit, ensuring specific areas or appliances don’t overload.
Neutral and Grounding System Insights
This is your safety net:
- Neutral Wires: These are the return paths for the current. If the hot wire supplies the electricity, the neutral takes it back, balancing the system.

- Grounding: In cases of faults, the grounding system ensures electricity has an exit path, safeguarding you from potential shocks.

Step-by-Step Guide to Wiring a 50 Amp RV Plug
While it might sound challenging, with the right tools and precautions, you can tackle this:
Safety First: Always disconnect from any power source before starting. And if you’re ever in doubt, it’s best to consult or hire a professional.
Required Tools & Materials
- 50 amp RV plug
- Wire strippers
- Screwdrivers
- 6/3 + 8/1 AWG wire
Wire Preparation Process
- Strip the wire to expose around half an inch of the copper wire.

Connecting the Wires Safely
- Red & Black Wires (Hot wires): Attach to the gold terminals.
- White Wire (Neutral): Connect to the silver terminal.
- Green or Bare Wire (Ground): Attach to the green terminal.
Securing the Connections Properly
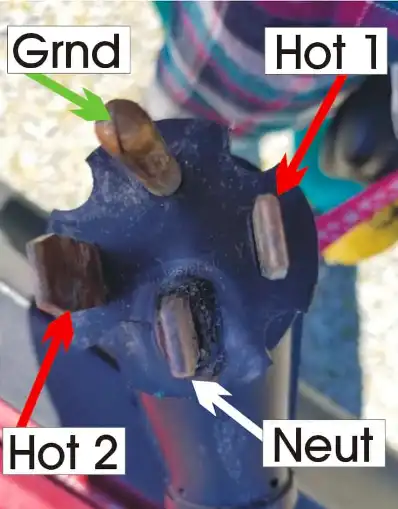
The U-shaped or half-round is the ground wire.
Right below it, you have the WHITE or neutral wire.
The two black wires, which are 180 degrees out of phase with each other, carry the HOT 120-volt current. Essentially, your RV is receiving TWO separate 120-volt services.
The X & Y positions can be swapped. The red and black wires (or two black wires) are the hot (live) wires: one connects to X and the other to Y. It’s essential to ensure that the neutral (white) and the exposed ground wire are correctly connected to their designated spots.
Finally, Tighten all the screws to ensure a firm connection and secure the cord in place.
Testing the Setup
After everything’s connected, turn on the power and test the plug with a voltmeter or plug in your RV to see if everything’s working smoothly.
Why Choose 50 Amp for Your RV?
Having decided to go all out with my RV, I wanted a system that didn’t force me to choose between the microwave or the AC. The 50 amp setup seemed perfect for my luxurious nomadic ambitions. Here is why I think this setup is perfect for me:
Dual Air Conditioning Units: Larger RVs often have multiple AC units for consistent cooling throughout.
Larger Fridges: Those full-size refrigerators require a significant power boost.
Additional Appliances: Fancy a washer and dryer in your RV? The 50 amp system can handle it.
Expert Tips for Wiring & Usage
- Don’t mix up the 50-amp 4-wire 120/240-volt (14-50R) service with the older APPLIANCE 50-amp (10-50R) 3-wire 120/240-volt service.
- The 50-amp service comes with four wires, including two 120-volt HOT feeds. Contrary to some beliefs, the 50-amp RV service isn’t a unique system. Instead, it’s a standard 120/240 50-amp connection with three poles and four prongs, which is used in many different applications.
- ALWAYS check out new Installation before you plug in the RV.
Conclusion
Understanding the 50 amp RV wiring diagram is akin to gaining a new superpower: you’ll be better equipped to handle minor faults, set up efficiently at campsites, and converse with fellow RV aficionados.
Wondering More?
Why Not Just Stick To A 30 Amp System?
It’s all about power needs. Larger RVs, with more appliances and luxuries, require a 50 amp setup for a seamless experience.
Can I Connect My 50 Amp RV To A 30 Amp Source?
With the help of an adapter, yes. However, you’ll be limited to the power capabilities of the 30 amp source, so you might not be able to run everything at once.
Is There A Significant Price Difference In Maintaining A 50 Amp System Compared To A 30 Amp?
Generally, 50 amp systems, given their larger capacity and complexity, can be costlier to maintain or repair. However, with regular checks and careful usage, unexpected expenses can be minimized.

