
If you’re new to the RV world, or even a seasoned traveler, the spiderweb that appears to be your RV’s wiring diagram might seem a little daunting. Fear not! The 30-amp RV system is simpler than it appears, and I’m here to guide you through it.
It’s a common struggle many of us face – how does one keep everything powered up efficiently without tripping over cords or, worse, causing a mini electrical blackout?
Enter the 30 Amp RV System. A godsend for many, this system promises a seamless flow of electricity to all your essential gadgets and appliances. Think of it as the unsung hero quietly ensuring your AC runs smoothly, your lights shine brightly, and your favorite tunes play uninterrupted.

Understanding the 30 Amp RV Electrical Diagram
When we talk about a 30 amp RV electrical setup, envision it as the circulatory system of your RV, a crucial lifeline distributing vital power throughout. Much like how our heart pumps blood to various organs, this system ensures every nook and cranny of your RV gets the power it requires.
Why would an electrician need guidance from this article to set up something as straightforward as a 30-amp RV outlet in a home? Here’s the answer:
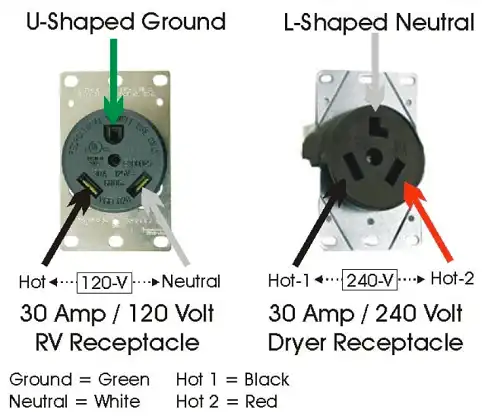
An RV’s 30-amp/120-volt power outlet might look like a home dryer’s 30-amp/240-volt outlet, but their wiring is vastly different.
Many residential electricians might not have come across a TT-30 RV outlet. It’s specifically wired as single-pole 120 volts, which is not the same as double-pole 240 volts. The TT-30 RV outlet looks strikingly similar to the home dryer outlet depicted in graphics. However, appearances can be deceiving.
Let’s dive deeper:
1. Power Source: The Starting Point of Your RV’s Electrical System
Every electrical journey begins with a source:
- Shore Power: Often, while parked at a campsite, you’ll be hooking your RV up to an external electrical source. This is referred to as shore power. Most campsites are equipped with power pedestals offering different amperage outlets, and for us, the 30 amp outlet is our target.
- Generators: When campgrounds or shore power are out of reach, generators step in. They’re particularly useful in remote locations, ensuring you never have to compromise on comfort. But remember, depending on your generator’s capacity, there might be a limit to how many appliances you can run simultaneously.
- Solar Panels: For the green-hearted, solar panels offer an eco-friendly way to generate power. They charge the RV batteries during the day, which then powers your RV. Though it’s a sustainable source, the power output is often less compared to the other two, so efficient power management is crucial.
2. Power Distribution: How Power Flows Through Your RV
This is where the magic happens:
Main Breaker: Picture this as the primary gateway. Every bit of electricity that flows into your RV passes through the main breaker. It’s designed to trip and cut off power if there’s an overload, thereby protecting your appliances and, more importantly, ensuring your safety.
Sub Breakers: Think of these as the lieutenants or smaller gatekeepers, each responsible for a particular section or appliance in your RV. They manage the distribution of power, ensuring that each section gets its required electricity without overwhelming the system.
3. Proper Wiring for Your 30 Amp RV Setup
To wire this service, follow these steps:
- Color Coding: Ensure you adhere to color coding for connections if markings are present and use the appropriate wire size.
- BLACK Wire (HOT):
- Connect to the breaker.
- If screws are color-coded, connect to the BRASS colored screw.
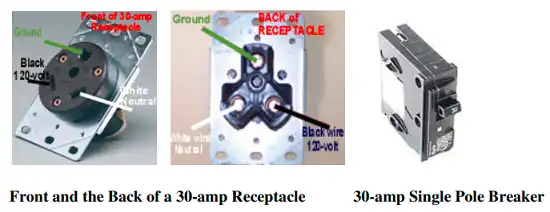
- If screws aren’t color-coded:
- When looking at the BACK of the receptacle, connect to the 5 o’clock position (or the 7 o’clock position from the front).
- WHITE Wire (NEUTRAL):
- Connect to the silver screw, which is on the opposite side of the black wire.
- Also, connect to the neutral bar in the panel.
- BARE or GREEN Wire:
- Connect to the “G” screw or the U-shaped prong.
- Additionally, connect to the ground bar in the electrical panel.
- Power Capacity: This 30-amp 120-volt service can handle up to 3,600 watts.

4. The Importance of Neutral and Ground Systems in RVs
Every hero needs a sidekick, and in our electrical narrative, the grounding system is ours:
- Neutral Wires: In simple terms, these wires play the balancing act. If the hot wires supply the power to your appliances, the neutral ones are responsible for taking any unused electricity back, ensuring a balanced and safe system.
- Grounding Wires: This is our safety backup. If there’s any fault or unwanted surge, the grounding system provides the stray electricity a safe passage out, protecting you from potential shocks.
Armed with this understanding, the 30 amp RV diagram doesn’t seem too complex, does it? It’s an organized system ensuring your RV experience remains electrifying, in all the right ways.
Pro Tips for Working with RV Electrical Systems
- The service is 120-volt with three wires: 1 HOT, 1 NEUTRAL, and 1 GROUND.
- It uses a SINGLE POLE Breaker.
- Do not utilize the DOUBLE POLE 30-amp Breaker that has 2 HOT wires for installation.
- Avoid confusing the 3 wire 30-amp 120-volt (TT-30R) Service with the OLD APPLIANCE 30-amp (10-30R) 3 wire 120/240-volt service.
- Making this mistake can be very costly.
- Such confusion can lead to severe damages, potentially costing thousands of dollars.
- Incorrect wiring can result in your RV producing smoke.
Why Choose a 30 Amp System for Your RV?
Just Right for Smaller RVs: It provides ample power for your basic needs without overcomplicating things.
Power Management: Juggle between your lights, a kitchen appliance, and maybe an AC unit without tripping anything.
Compatibility: Most campgrounds are equipped with 30 amp outlets, making it hassle-free.
Advantages of the 30 Amp RV Electrical System
- Economical: It’s generally cheaper to install, maintain, and repair.
- Simplicity: Fewer circuits mean there’s less that can go wrong, making DIY fixes more accessible.
- Availability: Replacement parts or upgrades are widely available given its popularity.
Key Takeaways for 30 Amp RV Wiring
Understanding the 30 amp RV wiring diagram is your ticket to a seamless and comfortable RV experience. You can now confidently tackle minor issues, set up efficiently at campsites, or simply impress friends with your newfound RV electrical knowledge.
Common Questions About 30 Amp RV Wiring
- Can I Upgrade My Rv From A 30 Amp To A 50 Amp System?
Yes, but it’s a bit involved. It requires rewiring and potentially upgrading your appliances and circuits. Always consult an expert.
- What If My Campsite Only Has A 50 Amp Outlet?
No worries! With a 50-to-30 amp adapter, you can connect seamlessly.
- How Do I Know If There’s An Issue With My Rv’s Electrical System?
Regular inspections are key. Look out for flickering lights, appliances not running at full power, or breakers that trip frequently.

