
Testing a 30-amp RV outlet with a multimeter was a challenge I had to tackle personally. It’s not always as straightforward as it seems. I realized the importance of ensuring my RV’s electrical system is safe and in good working order.
Minor electrical issues in my RV had the potential to lead to significant road complications. The solution? I learned the skill to test the 30-amp RV outlet with a multimeter, which allowed me to spot and rectify these issues promptly.
Luckily, practical solutions exist. By gaining the know-how to use a multimeter to test my RV outlet, I could diagnose problems and ensure a hassle-free journey. In this article, I’ll share the firsthand, step-by-step knowledge I’ve learned through personal experience, so you can keep your RV’s electrical system in top shape. to keep your RV’s electrical system optimal.
If you’re eager to avoid electrical mishaps during your RV adventures and have the confidence that your power source is reliable, read on. The insights I’ll provide will help you enjoy a smoother and safer road trip on your next adventure.
Preparing for Safe Testing: Tools and Gear You Need
When testing your 30-amp RV outlet with a multimeter, thorough preparation is essential. Before beginning, gather all necessary tools and prioritize your safety. Here’s what you’ll need:
Multimeter
Choosing the right multimeter is crucial. Opt for a digital model that can measure both AC and DC voltage for precise readings. Look for features such as a sturdy build, a clear display, and user-friendly controls. A backlight is particularly useful in dimly lit areas.
Insulated Screwdriver
An insulated screwdriver is necessary for removing the outlet cover. It helps prevent accidental electrical shocks while accessing the outlet.
Safety Gear
Safety is paramount when dealing with electricity. Ensure you have the following safety gear:
- Safety Glasses: Protect your eyes from potential sparks or debris.
- Insulated Gloves: Guard against electrical shocks while handling the outlet and multimeter.
- Rubber-Soled Shoes: Wear rubber-soled shoes to reduce the risk of electrical shock by providing insulation from the ground.
Additional Tools
- Outlet Tester: Before using the multimeter, an outlet tester can quickly verify if the outlet is properly wired and safe to test.
- Non-Contact Voltage Tester: This tool helps you confirm that the outlet is not live before proceeding with further testing.
By selecting the appropriate multimeter and gathering these tools and safety gear, you can accurately and safely test your 30-amp RV outlet.
Testing a 30-amp RV outlet with a multimeter is a valuable skill for any RV owner. It ensures that your RV’s electrical system is working properly and helps prevent potential issues while traveling. Here’s a step-by-step guide to help you perform this essential test:
Step-by-Step Process for Testing Your 30-amp RV Outlet
Step 1: Safety First
Before you start, ensure your safety. Turn off the power supply to your RV and unplug it from the shore power connection. Always wear appropriate safety gear, like gloves and safety glasses.
Step 2: Gather Your Tools
You’ll need a digital multimeter for this task. Set it to the AC voltage setting. Make sure the multimeter’s probes are in good condition.
Step 3: Access the RV Outlet
Locate your RV’s electrical hookup, which houses the 30-amp outlet. Open the access panel to expose the outlet and its wiring.
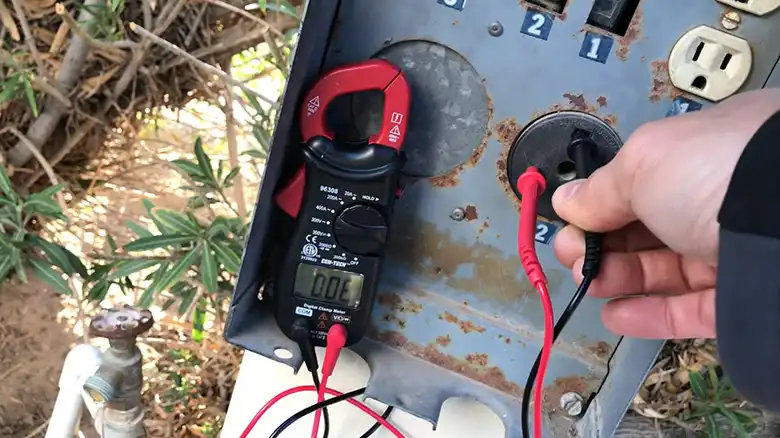
Step 4: Measure Voltage
Insert the multimeter’s probes into the outlet slots. The two hot wires should read 120V each, while the ground should read 0V. If the readings are different or nonexistent, it’s a sign of a wiring issue.
Step 5: Test Continuity
Check for continuity in the wiring by setting your multimeter to the continuity setting. Touch one probe to a hot wire and the other to the ground wire. If there’s no continuity, you may have a loose connection.
Step 6: Measure Amperage
For amperage testing, switch to the AC current setting. Connect the multimeter in series with one of the hot wires. Turn on a high-amperage appliance inside your RV to measure the current flow. Ensure it’s within the 30-amp limit.
Step 7: Troubleshoot Issues
If any of your readings are outside the expected range or if you detect loose connections, it’s time to troubleshoot. Tighten connections or seek professional help for more complex problems.
By following these steps, you can confidently test your 30-amp RV outlet with a multimeter. Regular testing ensures your RV’s electrical system remains safe and reliable, providing peace of mind during your travels.
Understanding the 30-amp RV Outlet and Its Components
When it comes to RVing, understanding the 30-Amp RV outlet is fundamental. To test the outlet effectively, you need to understand how the 30-amp RV outlet works and its components:
- What Is a 30-amp RV Outlet?
Understanding the Amperage: “30-Amp” signifies the outlet’s 30-amp capacity, ideal for safely powering most RV appliances and devices without circuit overloads.
Differentiating Between 30-Amp and 50-Amp Outlets: Differentiate 30-Amp and 50-Amp outlets: 30-Amp for most RVs, 50-Amp for larger, power-hungry vehicles. Match your RV’s needs to the outlet.
- Components of the RV Outlet
Understanding the components of the RV outlet further aids in comprehending its functionality. The 30-amp RV outlet consists of three main parts:
Breaker Panel: Inside your RV, the breaker panel acts as a safety guardian, cutting power when needed to prevent overloads and electrical faults.
Receptacle: The receptacle, your RV’s exterior connection point, performs electrical magic, transferring power from the campground source to your vehicle.
Wiring: The wiring is the hidden hero, connecting the breaker panel to the receptacle. Ensuring your RV’s internal wiring is in good condition is vital for a smooth power supply.
Understanding these components will help you make the most of your 30-amp RV outlet and ensure a worry-free journey.
Top Safety Tips for Testing Your RV Outlet
Safety is top priority while testing a 30-amp RV outlet with a multimeter. Follow these steps for a secure testing process:
- Turning off the Power
Switching off the RV’s Main Power: Prior to testing, switch off your RV’s main power to cut off electricity and prevent potential shocks. Safety first.
Unplugging the Shore Power: Turn off your RV’s main power and unplug from the shore source. This double safety step ensures no incoming power during outlet testing.
- Personal Safety Measures
Wearing Appropriate Gear: Safety gear is essential: safety glasses shield your eyes, and insulated gloves protect you from electrical shocks, averting accidents.
Avoiding Wet Conditions: Keep water away from electrical tests. Ensure a dry test area. This simple step eliminates electrical accident risks.
By following these safety precautions ensures a safe testing environment, providing peace of mind during the process. Safety always comes first.
Common FAQs About RV Electrical Testing
What is the difference between a 30-amp and a 50-amp RV outlet?
The key difference is the amperage they can handle. A 30-amp outlet is designed for less power, while a 50-amp outlet can handle more appliances simultaneously.
Can I use a multimeter for other electrical testing in my RV?
Yes, a multimeter is a versatile tool for testing various electrical components and circuits in your RV.
How often should I test my 30-amp RV outlet?
It’s a good practice to test your RV outlet at least once a year or after any significant electrical issues.
What should I do if my multimeter readings are inconsistent?
If you notice inconsistent readings, check your connections, and ensure your multimeter is functioning correctly. If the issue persists, consult a professional electrician.
Can I test my RV outlet while it’s connected to shore power?
It’s safer to disconnect from shore power before testing your RV outlet to avoid any potential electrical mishaps.
Is it possible to upgrade my RV from a 30-amp to a 50-amp system?
It’s possible, but it may require rewiring and upgrading your RV’s electrical infrastructure. Consult a professional for this kind of modification.
What should I do if I find loose connections during the testing?
Tighten the loose connections carefully. If you’re unsure how to do it, seek help from a qualified electrician.
How can I protect my RV’s electrical system during storms?
To protect your RV from power surges during storms, consider using a surge protector and unplugging from shore power when not in use.
What’s the optimal voltage range for a 30-amp RV outlet?
The ideal voltage range for a 30-amp RV outlet is between 110-130 volts.
What are the most common electrical issues in RVs, and how can I prevent them?
Common issues include loose connections, tripped breakers, and voltage fluctuations. Regular maintenance and testing can help prevent these problems.
Conclusion
Testing your 30-amp RV outlet with a multimeter is a straightforward yet vital task for all RV owners. By following the steps outlined in this guide, you can ensure the safety and reliability of your RV’s electrical system. Regular testing not only prevents potential issues but also offers peace of mind during your travels. Remember, your RV’s electrical health is the key to an enjoyable and hassle-free journey. So, stay safe, stay informed, and hit the road with confidence. Happy travels!

