
A hot shower in the middle of a forest or atop a mountain? The luxury of warm water in an RV is all thanks to the intricacies of its water heater plumbing system. But, just how does this system ensure you get that steaming bath after a long hike? Let’s explore the plumbing diagram and demystify the magic.
Key Components of an RV Water Heater
Before we get into the details, it’s essential to identify the system’s primary components:
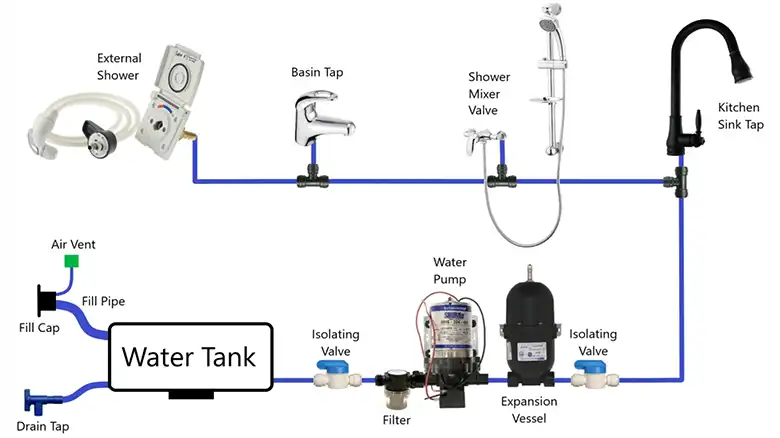
- Water Heater Tank: This is where the water gets heated. Typical RV tanks can hold 6-10 gallons, but sizes may vary.
- Cold Water Inlet: Directs cold water from the RV’s main water system into the heater.
- Hot Water Outlet: This is where the heated water exits and travels to your faucets and shower.
- Pressure Relief Valve: A safety feature to release excess pressure should the water get too hot.
- Bypass Valve: Used during winterizing, this valve allows you to bypass the heater, so it doesn’t fill with antifreeze.
Mapping the Plumbing Pathways
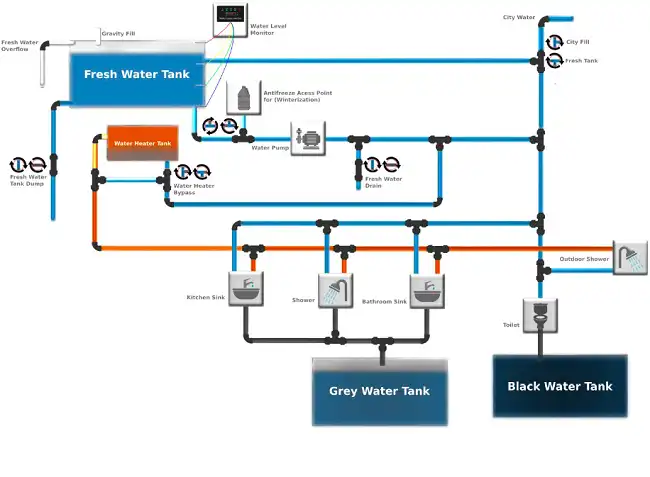
The RV water heater’s plumbing pathways ensure that water flows efficiently through the system, gets heated, and is delivered as needed. Here’s a more detailed breakdown of these crucial pathways:
1. Cold Water Entry
Source: Depending on where your RV is connected, the cold water could come from your RV’s dedicated freshwater tank or directly from a city water connection.
Flow Path: This water, which is yet to be heated, is directed into the water heater through the cold water inlet valve. From there, it fills up the main chamber of the heater, awaiting its transformation into warm, usable water.
Regulating Mechanisms: Some systems come with a one-way check valve at the cold water inlet to prevent backflow of hot water. This ensures that the cold and hot water pathways remain distinct.
2. Hot Water Flow
Heating Process: Once inside the heater, the cold water is heated by either an electric element or a propane burner, depending on the heater type. This process might be quick, providing hot water in as little as 20 minutes.
Distribution Channels: The now heated water rises (since hot water is less dense than cold) and exits through the hot water outlet. The system ensures even distribution, so the water is channeled to wherever it’s needed, from the kitchen sink to the shower.
On-Demand Systems: Some modern RVs utilize tankless or on-demand water heaters. These systems heat water instantaneously as it flows through, rather than storing it. The hot water distribution in such systems is super-fast, providing almost immediate hot water at the turn of a faucet.
3. Essential Safety Mechanisms
Pressure Dynamics: As water heats up, it expands, which can increase the pressure inside the tank.
Pressure Relief Valve: This is a vital safety feature. If the water temperature or pressure gets too high, this valve opens, allowing some water (and pressure) to escape. This prevents potential damage or even an explosion. Regularly testing this valve ensures it operates correctly when needed.
Temperature and Pressure (T&P) Valve: Some advanced systems have a combined valve that checks both temperature and pressure, releasing water if either parameter exceeds safety levels.
Step-by-Step: How the Water Heating Process Works
During colder months, the risk of water freezing in the heater is real. Here’s where the bypass system comes into play:
- Cold Water Inflow: When you turn on a hot water tap, cold water enters the heater through the inlet pipe. This cold water is pushed into the bottom of the water heater tank.
- Heating Begins: The water heater’s heating element (whether gas or electric) warms the water inside the tank.
- Hot Water Outflow: The hot water, now lighter, rises to the top of the tank and exits through the outlet pipe.
- Temperature Regulation (Mixing Valve): If your RV has a mixing valve, it allows you to control the temperature of the hot water by blending it with cold water.
- Pressure Release: If the pressure inside the tank exceeds safe levels, the pressure relief valve opens briefly to release excess pressure.
- Bypass Mode: In cases like winterization, you can switch the bypass valve system, directing water around the water heater rather than into it.
Maintenance Tips to Keep Your Heater Running Smoothly
To ensure a steady supply of hot water:
- Inspect Regularly: Check for leaks, rust, or mineral buildup.
- Drain & Flush: Periodically, especially after long trips, drain the tank and flush out any sediments.
- Check the Anode Rod: If your heater has one, this rod attracts corrosive elements. Replace if worn out.
- Winterize Properly: Before cold sets in, ensure you bypass the system and use RV-grade antifreeze.
Final Thoughts
Understanding the RV water heater plumbing diagram is like having a roadmap to comfortable and luxurious travel. The next time you’re enveloped in the warmth of your RV shower, you’ll know precisely how that comfort was engineered. And should you face any issues, your newfound knowledge might just be the first step to a solution!

