How to Repair Water Damage in RV Ceiling (Easy Method)
Water damage is a common issue in RV ceilings that requires timely repair. The lightweight construction and exposure to outdoor elements makes RV ceilings prone to leaks and moisture intrusion. This can lead to water stains, mold growth, damaged insulation and eventually costly structural repairs. Catching and fixing ceiling leaks quickly is crucial before major damage occurs.
Neglecting small leaks and moisture buildup inevitably leads to sagging panels, rotting rafters and potentially dangerous mold infestation. Damage will spread and repairs become much more extensive and expensive if not addressed promptly. But fixing issues early on can prevent thousands in repair costs down the road.
In this article, I’ll cover the critical steps for identifying, diagnosing and repairing water damage in your RV ceiling. You’ll learn how to spot leak signs, find the source, safely remove and replace waterlogged materials, and implement preventive measures. With some diligence and the right techniques, you can tackle RV ceiling water damage successfully. Read on to gain the knowledge needed to restore your ceiling and prevent future issues.
Identification of Water Damage of RV Ceiling
Diagnose-01. Inspection
Completely inspecting the entire ceiling is the priority when identifying potential water damage. Methodically scan the entire ceiling surface, looking for common signs of water intrusion like:
– Discoloration or dark stains
– Sagging areas or soft, spongy spots
– Peeling surfaces or bubbles under exterior coatings
– Evidence of mold or mildew growth
– Actual drips or moisture during rain or AC use
Inspect under furniture, lighting fixtures or racks that may hide ceiling damage. Use a bright flashlight beam angled across the ceiling to reveal stains or variations. Delaminated or cracked ceiling panels will have distinct shadows at the edges when illuminated side-on.
Pay extra attention around roof seams, joints, penetrations and transitions by vents, skylights and AC units. Water almost always enters from compromised seals or connections in these areas. Check windows, sidewalls and corner moldings for any dripping down onto the ceiling. Don’t forget to look for leaked water spreading out 6 feet or more past the actual leak location due to capillary action in porous paneling.
Diagnose-02. Moisture Detection
Following a thorough visual inspection, use moisture detection tools to uncover concealed moisture in sections that look fine. Handheld moisture meters with long, penetrating pins are highly useful for finding soaked areas underneath seemingly sound ceiling panels. Check even far away from visible stains, as moisture travels laterally along materials. Take readings every few inches across all ceiling sections.
More advanced diagnostics like thermal imaging cameras can also aid moisture detection through identifying temperature variations from wet areas. Thermal imaging will show soaked sections as markedly cooler than dry surrounding areas when scanning the ceiling interior on cold days.
These tools confirm if moisture has spread under visually sound areas and determines how much of the ceiling needs replacement for a full repair. Pinpointing all affected areas is crucial before ripping out damaged sections.
Locating Leak Sources
Finding the originating source of the water leak is equally important in the diagnosis stage. All active leaks must be fully stopped and sealed before repairing water damaged areas, or else the problem will continue.
Inspect roof seams, joints around vents/AC units, cracks in sealants, sidewall/corner connections and windows for openings or gaps allowing water intrusion. Confirm ceiling damage aligns with these potential leak points. For stubborn leaks, a water spray test on the roof may reveal the source.
Use roof repair sealants, caulking, expanding foam or elastomeric coatings to immediately stop identified leaks affecting the ceiling below. Completely halting water intrusion is the first step toward lasting ceiling repairs.
Assessing Mold and Structural Damage
Carefully inspect for any mold, mildew or rotting in water damaged ceiling areas. Soft, spongy or delaminating wall panels signal potentially extensive hidden mold growth. Discoloration and musty odors also indicate mold spread.
Pay attention to any sagging or drooping areas that suggest structural wood framing or joints may be compromised by moisture or leaks. Check for spongy flooring or soft areas underfoot indicating soaked roof decking. Knocking on the ceiling can help find hollow or deteriorating patches.
This thorough diagnosis determines the repair scope. Now let’s discuss essential preparations needed before starting the ceiling repair process.
Preparation for Repairing the Water Damage of RV Ceiling
Prep-01. Safety Precautions
Several precautions need implementation prior to repairing a water damaged RV ceiling:
– Use protective goggles, masks and gloves when handling contaminated materials to avoid mold and fiberglass exposure. A full body suit is even better for complete protection.
– Ventilate working areas extremely well with exhaust fans, as respiratory hazards are much higher with mold, dust and chemical coatings present.
– Check for electrical wiring in damaged locations which presents a shock risk. Turn off all ceiling lights and circuits before starting.
– Contain lead paint chips for safe disposal if peeling lead-based paints are present. Follow lead-safe containment guidelines.
– Use secure ladders, scaffolding or lift platforms for overhead ceiling access. Work with an assistant for safety.
– Rope off and post warning signs around below repair areas to prevent injury from falling debris.
Taking proper safety steps is vital when repairing water damaged RV ceilings.
Prep-02. Gathering Materials
Assembling all the necessary materials before starting repairs is crucial for smooth workflow. Recommended materials include:
– Matching replacement ceiling panels, such as luan plywood, aluminum sheeting, vinyl laminates or fiberglass reinforced plastic (FRP). Know ceiling panel thickness and construction.
– Closed cell spray foam insulation with a high R-value and vapor barrier properties, for moisture resistance.
– Tube or sheet adhesive sealants made specifically for RVs like Dicor, Flex Seal, Miracle Sealants, etc.
– Shear-resistant tape like Resisto Self-Sealing Flashing Tape, for taping over joints and seams.
– 5/8″ drywall screws, trim head screws or aluminum pop rivets to install new ceiling panels, depending on material.
– Lumber for replacing any water damaged roof framing, ideally pressure treated.
– 1-2 dehumidifiers for drying out interior air during repairs.
– Heavy plastic sheeting, tarps and drop cloths to contain debris below work areas.
– Personal protective gear – goggles, respirators, gloves, disposable coveralls, knee pads.
– Power tools like circular saws, jigsaws, drills, oscillating multi-tools.
– Ladders/scaffolding for overhead access.
– Ventilation fans, portable heater.
Gather all equipment and materials beforehand to make repairs move efficiently.
Repair Process of Water Damage in RV Ceiling
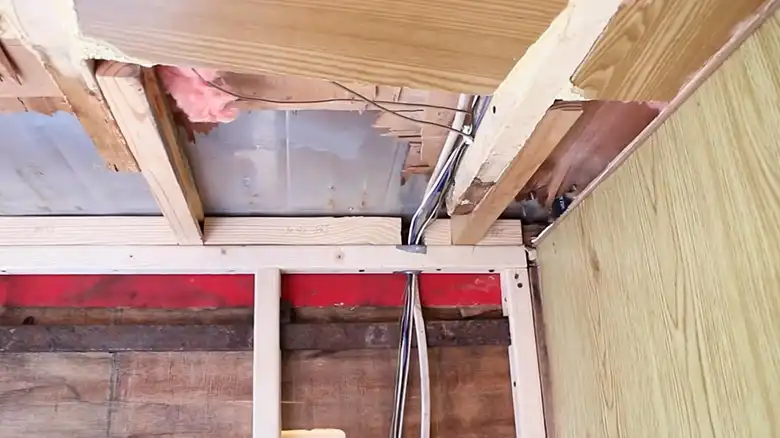
Step-01. Removing Damaged Ceiling Material
Start repairs by using a straightedge and utility knife to cut away any sagging, delaminating, moldy or rotted ceiling panel sections. Remove damaged areas at least 6-12 inches past the actual stained edges, as moisture spreads outward in materials. Carefully scrape away old adhesives.
Cut around ceiling fixtures, lights, vents and trim to detach entire damaged panels for removal. Wear goggles, gloves, masks and coveralls when handling contaminated materials to limit mold and fiberglass exposure. Bag and seal removed sections before discarding to minimize spores and debris.
A circular saw with a fine tooth paneling blade works well for straight cuts. Use an oscillating multi-tool for detail cuts around corners and fixtures. Go slow and steady to avoid tearing good sections. Removing all affected areas is necessary for proper repairs.
Step-02. Drying the Area
Before installing any new ceiling materials, existing wood roof framing and joints must fully dry out if moisture was present. Use portable heaters directed upwards and dehumidifiers running continuously to facilitate drying. Keep air circulating.
Check moisture content in wood members with a meter. They should be bone dry with similar readings to unaffected framing before covering over. Allow 1-2 weeks for thorough drying, longer in humid climates. Preventing future mold begins with fully dried framing.
Step-03. Repairing Structural Damage
Inspect wood roof framing, joints and rafters after removing water damaged ceiling coverings. Probe any spongy or deteriorating members. Replace any sections showing major compromise from rot and moisture damage. Use pressure treated lumber sized exactly to the existing framing.
Sister new rafters alongside damaged ones using overlapping double studs and water-resistant adhesives. Reinforce weakened ceiling joints with additional framing secured using Simpson strong ties and waterproof wood glues. Solid structural repairs provide a sound base for new ceiling materials.
Step-04. Patching and Sealing
a. Sealing Roof Openings & Seams: Before installing new ceiling panels, seal over framing gaps using closed cell spray foam or rubber sheeting to prevent moisture penetration. Apply RV-specific sealants made by Dicor or Flex Seal around roof joints, seams, openings and penetrations like vents.
Tape over any plywood joints using self-adhering flashing tape able to bridge gaps and resist shearing, such as Protecto Wrap Resisto Waterproof Flashing Tape. This comprehensive sealing isolates the roof framing from moisture sources above.
b. Patching Holes & Minor Leaks: For small damaged spots or pinhole leaks in ceiling panels, apply elastomeric patch sealants to patch holes and slow leaks from the exterior. Ensure the surrounding area is clean before applying. Hold a collecting container inside to monitor leakage. Seal edges completely using a caulking gun, and spread sealant 2-3 inches past damaged areas.
Lightly abrade blistered or delaminated panel coatings before sealing to improve adhesion. Follow manufacturer cure times before recoating patched areas. For large holes, fiberglass panel patches with sealants work better than liquid sealants alone.
Step-05. Replacement of Ceiling Material
a. Replacing Damaged Insulation: If ceiling insulation becomes drenched, soaked or exhibits mold growth from water damage, complete replacement is required. Remove and discard all affected insulation, wearing PPE to avoid fiberglass and mold exposure.
Replace removed sections with new closed cell spray foam insulation that resists moisture absorption and provides structural reinforcement. Follow manufacturer specified installation thicknesses for proper insulation R-value and condensation prevention. This prevents future issues in repaired areas.
b. Installing New Ceiling Panels: Cut replacement ceiling panels to size from moisture-resistant materials matching the originals, such as luan or marine plywood, aluminum sheets or FRP panels. Seal all edges with RV sealant before fastening in place. Follow manufacturer specs for fastener sizing and spacing.
For wood panels, use 5/8″ drywall screws spaced at 6 inches. Pre-drill holes to prevent cracking thinner panels. Stagger screw lines for best hold. For aluminum panels, use aluminum rivets with seal washers spaced at 4 inch intervals. Avoid over-tightening fasteners.
Make certain new panels are flush, level, and securely attached. Verify joints are aligned and seams maximized for proper sealing. Replace any trim or molding also affected by water damage using moisture resistant materials.
c. Sealing All Seams and Gaps: Once new ceiling panels are installed, thoroughly seal all seams, joints, screw/rivet holes and perimeter edges using RV-specific adhesive/sealants. Follow sealant manufacturer guidelines for application and recoating times.
Use a caulking gun to fully fill any cracks and gaps so no openings remain for future moisture ingress. Apply 2-3″ wide strips of self-sealing flashing tape over every seam and joint for extra waterproofing. Vigilant sealing prevents recurrence of leaks.
Step-06. Finish the Job
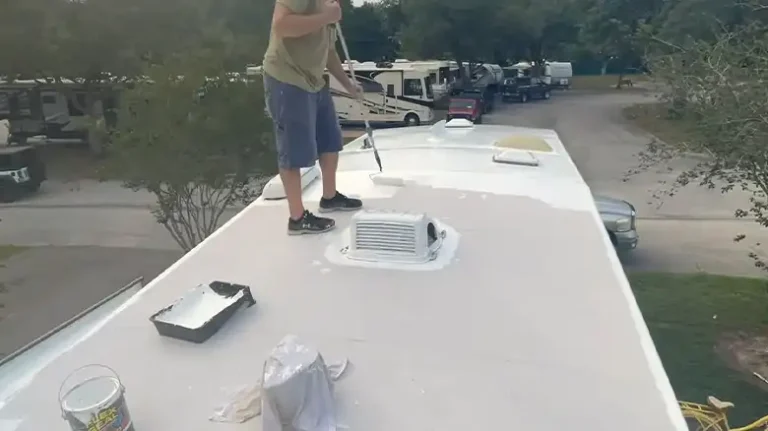
a. Finish Coat Application: Sand any uneven areas on replaced ceiling sections to prep for finish coatings. Wipe sanded areas clean before painting. Apply two finish coats of RV-compatible ceiling paint to match the sheen and texture of the original ceiling finish.
For bare aluminum panels, use spray-on truck bedliner coatings like Raptor or Monstaliner to add durable, waterproof protection with a textured finish matching adjacent areas. Allow proper coating cure times before use. Matching the appearance helps new sections blend in.
b. Final Leak Checks: Do final checks for full waterproofing after repairs by spraying down the ceiling exterior once sealants have cured. Place absorbing pads inside to detect any persistent leaks during the leak test. Alternatively, observe the first heavy rainfall on the roof.
Mark any drips or moisture showing up below repaired areas. Then seal leaks through targeted exterior application of RV sealants. The repair process may need tweaking to eliminate all traces of leakage inside the RV ceiling. Persistence ensures water damage will not return.
Prevention Tips for Future Water Damage in RV Ceiling
Tips-01: Regular Maintenance & Inspection
Diligent maintenance is vital to prevent water damage recurrence after repairs. Follow these tips:
– Visually inspect ceiling interior at least monthly for any new discoloration or surface issues needing touch-up.
– Check RV roof seals yearly before the wet season arrives. Reseal gaps, joints, cracks around penetrations immediately.
– Keep the roof clear of debris that can clog drains and cause water pooling. Trim back overhanging tree branches too.
– Wipe down the roof after snowfall or heavy rain to prevent standing moisture and ice dams which lead to leaks.
– Periodically reapply elastomeric roof coatings or spray polyurethane foam to the roof for added waterproofing.
– When washing the RV, avoid excessive water stream pressure on the roof areas to prevent sealant damage.
Proactive maintenance and inspection saves the hassle of major ceiling repairs down the road.
Tips-02: Preventing Interior Moisture Buildup
Moisture and condensation inside the RV can also lead to ceiling water damage over time. Follow these interior moisture prevention tips:
– Ventilate bathrooms and cooking areas fully during and after use to remove humid air, using vents or exhaust fans.
– Avoid interior drying of wet gear which releases moisture into the indoor air.
– Use portable dehumidifiers to maintain indoor Relative Humidity below 50%, measured by a hygrometer. Lower during colder months when condensation potential is higher.
– Insulate or heat trace vulnerable pipes and tanks to reduce sweating and condensate formation.
– Ventilate sufficiently during sleep hours by opening roof vents to allow moisture escape.
Controlling interior moisture levels will help minimize condensation related ceiling damage.
Tips-03: Promptly Replacing Damaged Roofing Materials
Neglecting damaged roofing materials like membrane, vents, sealants or screw fasteners is asking for major ceiling water damage. Follow this replacement advice:
– Replace any loose, cracking or damaged roof sealants, coatings or treatments immediately before openings form.
– Reseal around any fastener holes or penetrations exhibiting surface rust or leakage potential.
– Switch out any roof vents or AC gaskets showing wear, drying, gaps or leakage. Use compatible RV replacement parts.
– Repair or replace any punctured, lifted or delamination roof membrane sections, boots or transition strips.
– Adjust or tighten any loose roofing fasteners that vibrate loose over time. Fill associated holes.
Promptly switching out compromised roof materials is inexpensive roof insurance
People Also Ask (PAA)
Q1. What are signs my RV ceiling has water damage?
– Visible signs include dark/yellowing stains, sagging panels, peeling or bubbled surfaces, mold growth, soft spongy areas and actual moisture dripping through. Even far from the leak, moisture spreads under materials.
Q2. How much of the water damaged ceiling needs replacement?
– Remove all visibly damaged sections, then use moisture meters to determine how far moisture spreads underneath into seemingly good areas. Remove at least 6-12 inches past any readings showing higher moisture levels.
Q3. Does homeowner’s insurance cover RV ceiling water damage?
– Usually not, as standard policies exclude RVs. You need endorsements like replacement cost or purchase separate RV insurance with expanded water damage coverage to cover ceiling leak repairs. Read policies closely.
Q4. Should I hire a professional for ceiling water damage repairs?
– For extensive damage or if structural framing, electrical or complex roofing work is involved, hiring an experienced RV repair technician is best. They have specialized tools and skills. But DIY repairs are feasible for smaller leaks with basic ceiling panel replacement.
Q5. How do I find leak sources originating from the ceiling water damage?
– Thoroughly inspect roof seams, seals and penetrations above damaged areas. Leaks typically originate from gaps or cracks in aged sealant, joints, around vents or AC units. A water spray test on the roof can pinpoint stubborn leaks.
Q6. What insulation works best when replacing water damaged ceiling insulation?
– Closed cell spray foam insulation provides excellent resistance to moisture absorption. It also insulates effectively and fills gaps as it expands. Fiberglass insulation easily soaks up moisture.
Q7. Can I completely prevent future water damage in my RV ceiling?
– While unlikely to fully prevent it, diligent maintenance, frequent inspection, generous sealing and prompt roof repairs will provide the best protection against ceiling water damage recurrence. But damage can still happen over time.
Q8. What RV ceiling panel material works best to resist moisture damage?
– Marine grade plywood, fiberglass reinforced plastic (FRP), aluminum sheeting, and luan panels made specifically for RV ceiling application are good options that resist moisture and avoid warping or delamination from leaks better than standard drywall.
Q9. How often should I inspect my RV’s roof for potential leaks that could damage the ceiling?
– Inspect your RV roof 2-3 times per year minimum, most importantly before the wet season and after winter. Reseal any deteriorated areas immediately to avoid major ceiling repairs later. Prevention is far easier than ceiling repair.
To Conclude
Acting quickly to fix RV ceiling leaks prevents major deterioration. Identify and seal all water sources. Remove and replace damaged sections thoroughly. Seek pro help for extensive repairs. Staying vigilant with maintenance and immediate leak response protects your RV interior. Prompt repairs stop minor issues becoming costly ceiling damage.