
Hard-piping your RV sewer offers a convenient and permanent alternative to the traditional hose system. It provides a cleaner, more aesthetic solution, reduces the risk of leaks and spills, and even enhances the value of your RV. While it may seem daunting, with careful planning and proper execution, hard-piping your RV sewer is a project you can tackle yourself.
What Does a Hard Piped RV Sewer Mean?
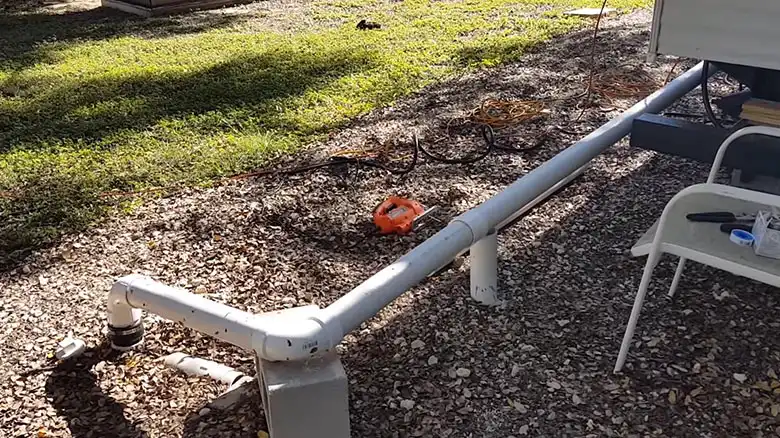
An RV hard-piped sewer system uses rigid PVC pipes and fittings that are secured under the RV, running from the RV black tank outlet to a sewer access connection outside of the RV. This replaces having to use a flexible sewer hose. The pipes offer a permanent solution for neatly routing waste from the black tank to the dumping station inlet.
Pros and Cons of a Hard-Piped RV Sewer System
Before diving into hard-piping your RV sewer, consider both the advantages and disadvantages.
With hard piping, the solution is more permanent and thus has a greater convenience. It also reduces the risk of leaks and spills. Overall it increased the aesthetic value as well.
However, there are several drawbacks as well, which you need to consider before deciding upon hard piping. It takes a bit of plumbing knowledge to get the job done properly Also, it can potentially void your warranty if your RV is under one anyway. Most importantly, it limits the mobility of your RV, which can be a deal breaker for some.
Step-by-Step Instructions for Hard Piping Your RV Sewer
Now that you’ve weighed the pros and cons, let’s get started with the planning and preparation phase:
Evaluate Your RV and Setup
Determine if your RV is at a permanent site or frequently moved. Check local regulations and permits required for installing a sewer connection. Locate your RV’s sewer outlet and existing sewer connections. This will help plan the pipe route. Plan the pipe route considering the slope (1/4 inch per foot), distance, and any obstacles.
Essential Materials Checklist
Choose the appropriate size and schedule (e.g., Schedule 40) PVC pipes and fittings for your RV’s waste line. Select a compatible adapter for connecting your sewer hose to the hard-piped system. Install traps to prevent sewer gases and vents to allow proper ventilation. Securely fasten the pipes to prevent sagging and damage. Use appropriate sealant and primer for a leak-free installation. Gather essential tools like a saw, drill, wrenches, and pipe cutters.
The Installation Process
Step 1: Prepare the Pipe Route
Clear the path for your pipes, excavating a trench with the correct slope. Ensure proper drainage by maintaining a 1/4 inch drop per foot.
Step 2: Install the Pipes
Cut and assemble the PVC pipes using solvent cement, following the manufacturer’s instructions. Install fittings and connect the pipes to the RV’s existing sewer outlet, ensuring secure connections. Securely fasten the pipes to hangers and supports along the trench.
Step 3: Install the Sewer Hose Connection Adapter
Choose a convenient and accessible location for the adapter. Install the adapter according to the manufacturer’s instructions, ensuring a tight and leak-proof connection.
Step 4: Install Traps and Vents
Install traps as close as possible to the RV’s drain point to prevent sewer gases from entering. Follow local regulations and building codes for vent installation.
Step 5: Test and Inspect
Perform a pressure test to check for leaks in the system. Thoroughly inspect all connections and ensure everything is properly sealed and secure.
Maintenance and Winterization
Regularly flush the system with clean water and a mild RV sewer cleaner to prevent clogs. Insulate exposed pipes in colder climates to prevent freezing during winter. Disconnect and drain the system properly before winter storage to avoid damage.
Final Words
Hard-piping your RV sewer provides a convenient, secure, and aesthetically pleasing solution. By carefully planning your installation and following the steps outlined above, you can enjoy the benefits of a permanent sewer connection
FAQs and Answers
Should I insulate exposed PVC pipes?
Insulating exterior pipes can help avoid freezing in very cold climates. Use foam pipe insulation secured with tape or clamps.
Can this be done while dry camping or boondocking?
Yes, hard piping the system does not require hooking up to RV park sewage inlet. Ensure all joints have been cured before attempting to dump tanks.
How difficult is it to modify or extend the pipes in the future?
The benefit of a PVC system is the ability to remove joints, cut, add fittings, and reconnect the piping fairly easily to make changes when needed.
Do I need to hire a plumber or technician to install this?
If you have basic DIY skills and PVC knowledge, this is a project most RVers can tackle themselves by following the instructions. The connections use simple push-fittings.

