How to Level a Camper Without Moving It? I Picked 1 Within 5 Methods
Leveling a camper is a crucial step in ensuring a comfortable and safe camping experience. It’s not just about avoiding that awkward slant when you’re sleeping, but it also helps with the proper functioning of appliances, prevents water from pooling, and ensures your overall comfort. But what if you find yourself in a situation where moving the camper is not an option?
In this article, I will share my hands-on experience and guide you through various methods for leveling your camper without moving it. We’ll explore each method in detail, highlighting their pros and cons, and address some frequently asked questions along the way.
Method 1: Using RV Leveling Blocks
RV leveling blocks are a popular choice when it comes to leveling your camper without moving it. These blocks are typically made of sturdy materials like plastic or wood and can be stacked to achieve the desired level. Here’s how you can use them:
Pros:
- Ease of Use: RV leveling blocks are user-friendly and readily available at most camping supply stores.
- Customizable Height: You can stack as many blocks as needed to achieve the desired level, making it suitable for various terrains.
- Non-Slip Surface: Most leveling blocks have a non-slip surface to keep your camper in place.
Cons:
- Cost: High-quality leveling blocks can be a bit pricey, and you may need several of them.
- Storage Space: They can take up valuable storage space in your camper or tow vehicle.
Method 2: Chocks and Wheel Blocks
Chocks and wheel blocks are designed to prevent your camper from rolling while parked and can also assist in leveling your RV.
Pros:
- Affordable: Chocks and wheel blocks are generally more cost-effective than dedicated leveling blocks.
- Dual Functionality: They serve both as leveling tools and safety devices.
- Space-Efficient: These tools are compact and easy to store.
Cons:
- Limited Height Adjustment: You may need additional leveling blocks or other methods to achieve a level surface on uneven terrain.
- Time-Consuming: The process of placing chocks and wheel blocks can be more time-consuming than using leveling blocks.
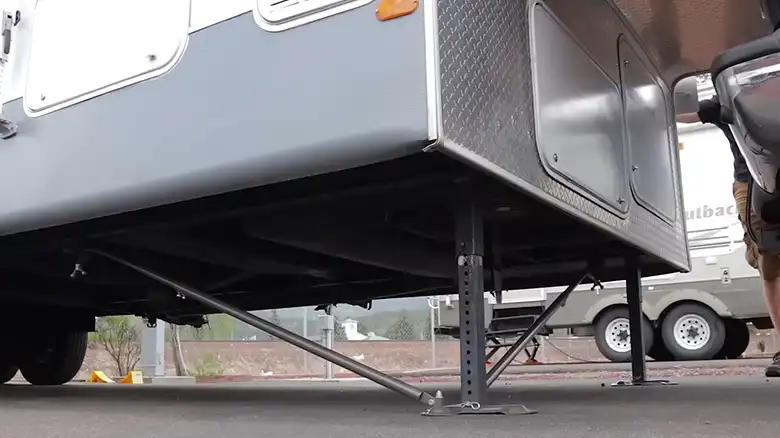
Method 3: Scissor Jacks and Stabilizers
Scissor jacks and stabilizers are commonly used to stabilize your camper and can also assist in leveling it.
Pros:
- Excellent Stability: Scissor jacks provide excellent stability once your camper is leveled.
- Durable: They are built to withstand heavy loads and long-term use.
- Dual Functionality: Like chocks and wheel blocks, scissor jacks serve both leveling and stabilization purposes.
Cons:
- Manual Operation: They require manual cranking, which can be physically demanding.
- Additional Tools: You may need to combine them with leveling blocks to achieve a level surface.
- Initial Setup Time: The setup process can be time-consuming, especially if you’re new to using scissor jacks.
Method 4: Adjustable RV Jacks
Adjustable RV jacks are a robust solution for leveling and stabilizing your camper.
Pros:
- High Weight Capacity: These jacks can handle a significant amount of weight.
- Electric or Hydraulic Options: You can choose between electric or hydraulic jacks for more convenient leveling.
- Precision Leveling: They provide precise control over the leveling process.
Cons:
- Cost: Adjustable RV jacks can be quite expensive, especially the electric or hydraulic variants.
- Installation Complexity: Electric or hydraulic jacks may require professional installation, increasing overall costs.
- Power Source: Electric jacks rely on your camper’s electrical system, which could be a drawback in remote locations.
Method 5: The Anderson Leveler
The Anderson Leveler is a popular and innovative tool that simplifies the leveling process.
Pros:
- User-Friendly: The Anderson Leveler is easy to use, with a simple drive-on design.
- Single-Piece Construction: Unlike stacking blocks, this is a single piece, making it more stable.
- Compact Design: It takes up less storage space compared to multiple leveling blocks.
Cons:
- Cost: It’s more expensive than traditional leveling blocks.
- Limited Height Adjustment: Achieving extreme slopes may be challenging with this tool.
Can I use regular wooden blocks to level my camper?
While you can use wooden blocks in a pinch, dedicated leveling blocks are designed to handle the weight and provide better stability.
What’s the most cost-effective method for leveling a camper?
Chocks and wheel blocks are generally the most cost-effective, though they may not be as versatile as leveling blocks or jacks.
Do I need to level my camper perfectly, or is a slight slope acceptable?
While perfect leveling is ideal, a slight slope is generally acceptable, but it should not exceed a few degrees to prevent discomfort or appliance issues.
Are there any safety tips when leveling a camper?
Always follow the manufacturer’s guidelines for your camper and equipment. Use stabilizers in addition to leveling tools for added safety.
End Notes
Leveling your camper without moving it is a skill every camper should master, as you never know when you’ll encounter uneven terrain. Each method has its own set of advantages and disadvantages, so the choice ultimately depends on your specific needs, budget, and comfort with the equipment.
In my experience, I’ve found that a combination of leveling blocks and stabilizers is a reliable and cost-effective solution. It provides stability, precise leveling, and convenience. However, your choice may differ based on your unique circumstances. Remember to always prioritize safety, follow manufacturer guidelines, and practice patience when leveling your camper. Happy camping!