
One of the best inventions for RVs in recent years has been the slide out. These movable room extensions provide extra living space and comfort when parked at a campsite. Slide outs can expand the kitchen, bedroom, bathroom, or living room areas in an RV with the push of a button. However, like any moving part, slide outs require regular maintenance and lubrication to keep operating smoothly. Neglecting to lube your RV’s slide out can lead to costly repairs down the road.
In this guide, we’ll walk through the complete process for properly lubricating the slide out on your RV. Follow these steps to keep your slide out gliding effortlessly and prevent annoying squeaks, strains, and headaches.
Essential Materials and Tools for the Job
Before lubricating the RV slide out, gather the appropriate supplies:
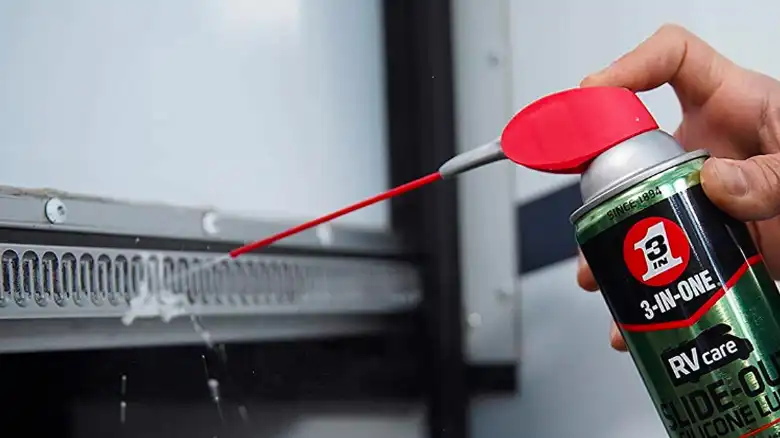
- RV slide-out lubricant – Use a specialty lubricant made for slide outs, such as a silicone-based spray. Do not use WD-40.
- Clean cloths or towels – For wiping down the slide-out tracks and components before lubricating.
- Gloves – Protect your hands from lubricant and dirt. Nitrile gloves work best.
- Eye protection – Safety glasses in case any lubricant sprays or splatters.
- Wheel chocks – The wheel chocks is for stabilizing the RV so it doesn’t roll during the process.
- Flashlight – Helpful for seeing all the slide components and lubrication points.
- Ladder – Useful for reaching the roof of the RV if lubrication is needed there.
- RV owner’s manual – Review for any specific slide-out lubrication instructions.
Step-by-Step Guide to Lubricating RV Slide-Out Components
Before getting started, take a few safety precautions:
- Put on protective gloves and eye wear.
- Make sure the RV is parked on level, stable ground and the wheels are chocked to prevent rolling.
- Fully extend the slide-out and inspect for any overhead obstructions before lubricating.
- Disconnect electrical power to the slide-out room if possible to prevent accidental retraction.
- Follow all manufacturer specifications and warnings in the owner’s manual.
- Work slowly and carefully. Have another person present to assist if needed.
Preparing for Lubrication
To get set up for lubricating the slide out:
- Level and stabilize the RV – Park on flat ground and place wheel chocks in front and behind the tires to prevent rolling.
- Extend the slide-out fully – Use the control switch to extend the slide-out room all the way out. Listen for any unusual noises.
- Inspect components – Visually inspect the gears, rollers, tracks and seals for damage before lubricating.
- Clean thoroughly – Wipe down the outer tracks and all moving components to remove any dirt, debris, or old lubricant.
- Disconnect power – Shut off and disconnect electrical power to the slide-out room if possible. Consult the owner’s manual.
- Review manual – Check for any special lubrication instructions from the manufacturer.
Lubricating the Slide-Out Components
Here are the key components to lubricate on the RV slide-out mechanism:
1. Tracks
The slide-out tracks allow the room to slide in and out on rollers or wheels. Clean all debris from the tracks using a towel and lubricate the full length of the top and bottom tracks on both sides. Use the thin nozzle or straw attachment on the lubricant can to thoroughly coat the inner track grooves. Avoid over-lubricating which can attract dirt and debris over time.
2. Gears
The slide-out gears transfer power to drive the room in and out. Locate the gear assembly and tooth gears in the mechanism. Apply a light coating of lubricant to both sides of the gear teeth so it gets distributed as they turn. Slowly rotate the gears to work the lubricant into all the contact points.
3. Rollers and Bushings
Lubricate any rollers, wheels or bushings along the moveable parts of the slide-out. Look for roller axles inside the track system. Apply lubricant to the bushing ends of any rollers to keep them spinning freely.
4. Seals
Rubber or vinyl seals around the slide-out room keep out dirt and moisture. Apply a thin layer of lubricant along the seals at the top, sides and bottom edges of the slide-out. This keeps seals pliable and prevents cracking or deformation. Avoid over-lubricating seals which could collect dirt.
5. Extension Arms
Check any adjustable extension arms or braces that support the room for lubrication needs. Apply lubricant to the joints or pivot points to prevent squeaking and wear.
Ongoing Maintenance Tips for Slide-Out Longevity
Once fully lubricated, test operation of the slide-out:
- Push in and extend the slide-out room 2-3 times to distribute the lubricant on all the components.
- Listen and watch for any sticking, squeaking or grinding noises.
- Re-lubricate any problem spots.
- Wipe away any excess lubricant with a clean cloth.
- Verify the slide-out extends and retracts smoothly without noise or resistance.
Follow-up Maintenance
To keep your RV slide-out operating properly:
- Lubricate the slides at least once or twice per year, and more frequently with heavy use. Follow your owner’s manual guide.
- Inspect slide components prior to each lubrication for signs of wear or damage.
- Listen for squeaking and grinding noises, which indicate the need for re-lubrication.
- Keep slide-out tracks and seals clear of dirt and debris, which can impede operation.
- Address any leaks around slide seals promptly before further damage occurs.
- Have a professional inspect the slide mechanics annually.
Troubleshooting Common Slide-Out Problems
Squeaking Noise
A squeaking slide-out typically means components need lubrication. Target the problem areas and apply more lubricant to the tracks, gears and rollers.
Grinding Noise
The gears may not be turning smoothly and need more lubricant. Rotate the gears during lubrication to fully coat the teeth. Listen for grinding noises.
Sticking
If the slide-out sticks or hesitates during operation, dirty tracks could be the culprit. Thoroughly clean and re-lubricate the track channels. Check rollers and pivots for movement.
Leaking
Moisture and dirt entering around a slide is a clue the seals need attention. Lubricate seals and inspect for any voids, cracks or defects. Have seal issues fixed promptly.
Summary
Regularly lubricating your RV’s slide-out system keeps everything operating smoothly for years of trouble-free use. While it may seem daunting, the process is straightforward by following your owner’s manual and these tips. Here are the key takeaways:
- Use a specialty lubricant made for RV slide-outs, not just any household oil or lubricant.
- Thoroughly clean all slide components before lubricating.
- Focus lubrication on the tracks, gears, rollers/wheels, bushings, and seals.
- Don’t over-lubricate.
- After lubricating, cycle the slide several times.

