Broken Trailer Leaf Spring | What Should I Do
One fateful day, while hauling my gear for a weekend camping trip, I heard a disturbing clunking sound coming from under the trailer. Initially, I brushed it off as road debris, but the unsettling noise persisted. Upon closer inspection, my heart sank. One of the trailer leaf springs had snapped, leaving the trailer lopsided and distressed.
This unexpected breakdown thrust me into a crash course on trailer leaf springs. From understanding their vital role in suspension and weight distribution to identifying the telltale signs of wear and tear, I did extensive research. And let me tell you, the knowledge I gained proved invaluable in not only fixing my trailer but also preventing future mishaps.
What’s a Trailer Leaf Spring
A trailer leaf spring is a critical component of the suspension system found on trailers. It is comprised of several flexible metal plates called leaves that are stacked on top of each other and connected by a center bolt. The individual leaves can slide against each other to allow the spring to flex up and down.
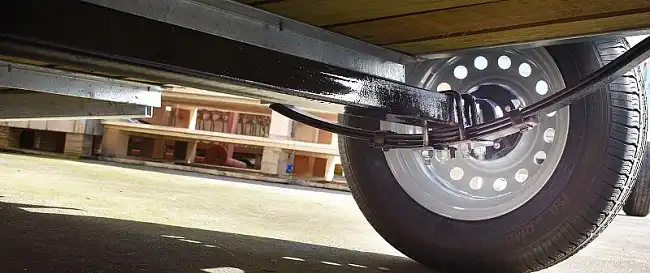
This acts as a cushion for the trailer frame and anything loaded on the trailer. It absorbs bumps in the road the same way a shock absorber does on a vehicle. The leaf spring flexes to dampen the impact of road irregularities. This protects both the trailer itself and the tow vehicle from excessive bounce and sway.
Its Components
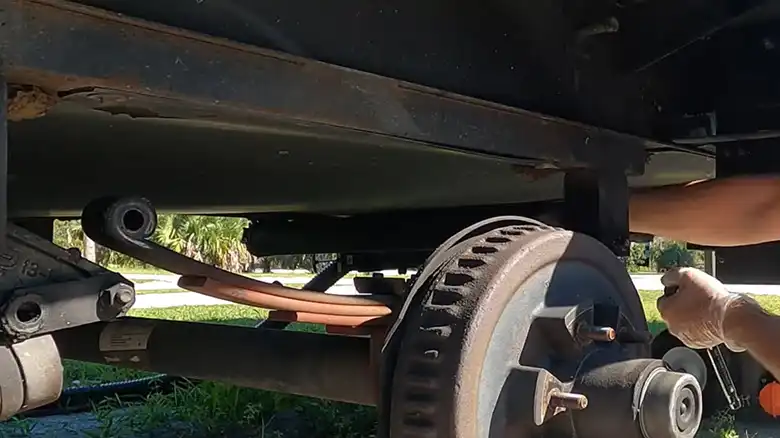
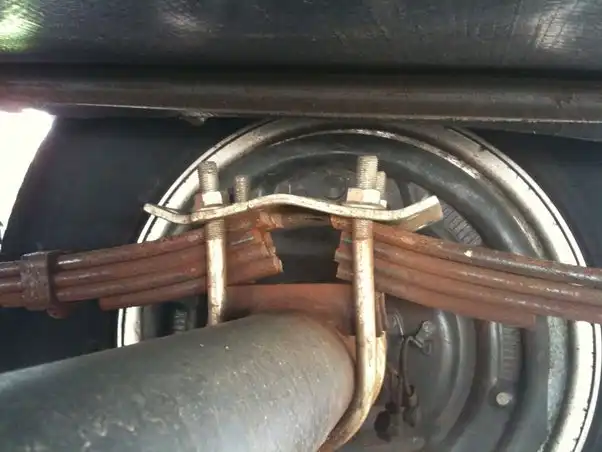
The leaf spring assembly includes the stacked steel leaves, the center bolt that holds them together, and threaded U-bolts on each end that mount the complete spring unit to the trailer’s axle. The U-bolts pass through brackets welded on the central underside of the trailer to align the spring properly within the suspension system.
Where the front and back ends of the leaf spring attach to the trailer frame, shackles with bushings are used. The bushings act like pivots, allowing the leaf spring to flex up and down smoothly without excessive friction wear against the frame. Proper lubrication and torque values for U-bolts at installation ensure optimum operation.
How to Detect a Broken Leaf Spring
There are a few clear signs that indicate a broken leaf spring on your trailer:
Visible cracks or breaks
Carefully inspect the leaf springs on your trailer, especially before planning a towing trip. Peer closely for any cracks extending across the width of any leaf. Tap gently along the length with a wrench to check for fractured spots that have broken all the way through. These will emit a dull, non-resonant sound compared to intact sections. If you discover a crack more than halfway across a spring, it means structural integrity is severely compromised and can no longer safely handle payload weight or shock absorption. The weakened spot will continue worsening each time you tow.
Uneven or sagging trailer
Stand back and assess if the trailer is sitting evenly level both left to right and front to back when hitched and loaded. If one corner droops considerably lower than the rest, it likely indicates a broken leaf that can no longer bear weight on that side.

Without full spring support, axle height drops. If ignored long term, this also causes uneven tire tread wear.
Abnormal noises while towing
Listen closely for any new mechanical noises coming from the trailer suspension as you drive. High-pitched squeaking or rattling noises may signal a cracked leaf spring rubbing or flopping against other chassis components. Metal-on-metal clunking noises over bumps in the road generally mean a fractured spring is no longer connected properly at the U-bolt brackets. Either way, these sounds signify the lost integrity of the spring and the need for replacement.
How to Replace a Broken Leaf Spring
Replacing a broken leaf spring requires some mechanical skill and the right tools, but can be managed at home for most single axle trailers. Here are the steps involved:
Gather the necessary materials
You’ll need a sturdy jack and several jack stands that have a higher weight rating than your loaded trailer. Use these for safely lifting the trailer and securing it at working height. Obtain spring pad spreaders to assist in disassembling the leaf stack later. A U-bolt removal tool suited to your bolt size comes in handy along with standard wrenches. Prepare pry bars, a sledgehammer, gloves, and any chemicals needed to penetrate seized fasteners. Most importantly, have the correct replacement leaf spring assembly for your make and model of trailer ready to install. Match part numbers printed on the old spring to ensure compatibility.
Lift and securely support the trailer
Park the trailer on a level, hard surface — not soft soil that could sink under jack stand weight. Unhitch it from the tow vehicle so all weight is off the suspension you’ll be removing. Position jack stands underneath chassis contact points recommended by your trailer manual.
Lift the trailer with a high-capacity jack just enough to clear the leaf spring area. The wheel on the damaged spring’s axle should have wooden wheel chocks to prevent sudden rolling.
Remove existing U-bolts
With the full chassis weight relieved off the leaf spring, you can now loosen the U-bolts. Use penetrating oil if they resist turning initially. Loosen each U-bolt a little at a time in a crisscross pattern with an impact gun or ratchet torque wrench. Once threads are disengaged, they can be spun completely out by hand along with the plates and nuts on the backside of the axle bracket.
Extract old spring
A spring pad spreader tool can help bow open the old leaf spring enough to pull leaves from their paper liners for removal. You may need pry bars to work the ends loose from the shackle pivot bushings where they’ve worn a groove into the frame brackets. Set the damaged spring aside and sweep out debris around the open axle area.
Install replacement leaf spring
Carefully align the new leaf spring’s holes with the mounting brackets along the axle and shackles. Metal alignment shims tack welded in place assist with this on some spring sets. You may need help lifting the assembly evenly into position as a second pair of hands prevents binding. Ensure centering components fit properly before proceeding.
Replace and torque U-bolts
Pass new U-bolts through the axle bracket holes with tapered washers, plates, then nuts threaded on the backside. Use a calibrated torque wrench to tighten each U-bolt a little at a time, rechecking often. Tighten only to the trailer manufacturer’s specified settings. Overtightening can crush or eventually crack a new spring while under-torque leads to loose hardware.
With everything bolted securely in place, carefully lower the trailer then visually inspect the spring alignment from all sides before taking it on the road. Road test cautiously and listen for any noises pointing to issues with the repair. Annual leaf spring inspection and proper weight limits give the best longevity of new replacement springs.
What Causes a Broken Trailer Leaf Spring
There are a few common causes of leaf spring failure on trailers:
Overload – The most frequent cause of a broken leaf spring is exceeding the recommended load capacity of the trailer regularly. The spring can only withstand so much flex and return to shape before metal fatigue causes cracking and fracture. Steel has definite load limits. Overestimating how much weight your trailer can handle stresses the components past their limits.
Age and wear – Leaf springs continually expand and compress during use. This work hardening of the metal leads to microscopic vulnerabilities that gradually grow with time. Even with ideal usage, simply the repetitive cycles of loading and unloading combined with road impacts take an irreversible toll through metal fatigue. After several years, mechanical deterioration can mean cracked surfaces despite no single overloading incident.
Corrosion – Extended exposure to water, road salt, and some chemicals weakens the structural integrity of the steel through rust. This corrosion hastens the formation of tiny cracks once the protective coating is penetrated. Undetected surface rust also flakes off small bits of metal over time until one bad bounce causes total failure. Proper maintenance combats corrosion issues.
Off-road use – Leaf springs handle vertical impacts well in their intended axis of movement. But when a trailer bounces roughly sideways across deeply rutted terrain, the spring gets twisted from its normal operating plane. These shear forces strain spot welds and metal in ways the spring isn’t designed for. Such irregular stress often fractures weaker areas of the assembly that wouldn’t otherwise fail from highway use.
Incorrect installation – No matter the reason, if your trailer already has a broken leaf spring, incorrect installation techniques would likely mean repeat failure of the new replacement spring. Mechanics must carefully follow the torque specifications of the U-bolts into the spring eyes. Over-tightening crushes and weakens the assembly. Under-tightening results in loose hardware that fatigues the spring through rubbing on brackets.
Why You Should Replace Broken Trailer Leaf Spring ASAP
It may seem harmless to keep towing a loaded trailer after discovering a broken leaf spring, but there are good reasons to replace it promptly:
- Loss of stability and handling
With the spring no longer absorbing bump impacts and cushioning sway forces, the trailer bounces far more not only vertically but sideways behind your vehicle. This makes controlling the combined load much more difficult. A compliant suspension ensures planted traction for stable braking and lets your tow vehicle handle predictably. So driving with a compromised spring is quite risky.
- Uneven tire wear
Alignment and weight-bearing problems caused by a broken spring can accelerate spot wear on your trailer’s tires since force is no longer distributed evenly across the full tread. So you end up replacing tires prematurely when irregular wear leads to tire failures. It also causes the steering to pull to one side.
- Damage to other components
A fractured spring flopping against the trailer frame and axle wears through paint and protective coatings. The flailing edges then accelerate rust and decomposition of the actual steel parts they strike. This leads to exponential deterioration issues and exorbitant repair bills to remedy what prolonged use of a broken spring set into motion. Replacing it quickly localizes wear to just the faulty spring itself.
How Much Does it Cost to Replace a Broken Trailer Leaf Spring?
You can purchase just the replacement leaf spring assembly itself quite affordably if you know the trailer make and model. Prices for a standard 5-leaf spring range between $100 on the low end to around $300 for heavy-duty models. Top-of-the-line 8-10 leaf springs with alignment shims and zinc plating run $500-600. Beyond parts cost, you mainly have labor charges if not DIY’ing the repair. Most truck repair shops charge around $100 per hour. Competent mechanics can swap springs in 2-3 hours. So all in you can expect to pay $300-900 depending on spring type and whether you pay shop fees.
Some Final Words
Leaf springs essential to cushioning trailer loads often get overlooked until there’s an obvious problem. But catching and replacing a broken leaf spring right away drastically improves safety and prevents accelerated costs of damaging adjacent parts. Get in the habit of inspecting springs before each towing trip and after unusually rough roads. Look into adding airbags or extra leaves if hauling maximum loads frequently. With good maintenance, you can enjoy thousands of miles of reliable service from trailer suspension components.
![[ANSWERED] Are Campers 110 or 220 Volt?](https://www.exploringthelocallife.com/wp-content/uploads/2023/09/Are-Campers-110-or-220-Volt-768x431.webp)