
Going for an RV adventure is an exhilarating experience, but it’s essential to keep your home on wheels running smoothly. One crucial aspect of RV maintenance is taking care of your water heater. The RV water heater plays a vital role in providing hot water for your showers, dishes, and general comfort while on the road. To ensure its efficiency and longevity, regular maintenance is key. Here, I will walk you through the essential steps of RV water heater maintenance, including draining, flushing, descaling, and replacing the anode rod. By following these steps, you can enjoy a constant supply of hot water and peace of mind during your travels. So, let’s step in and learn how to keep your RV water heater in top-notch condition.
Things You’ll Need to Flush and Clean the RV Water Heater Tank
Before getting started, gather the following items –
a) Wrench
b) Hose
c) Bucket
d) White vinegar
e) Water heater cleaning/descaling solution
f) New anode rod (if needed)
g) Gloves and eye protection
Please note that you may need to adjust the steps according to the resources available to you.
Step 1: Turn Off the Water and Power
Before you begin any maintenance tasks, it’s important to take some safety precautions. Make sure the water heater is turned off and disconnected from any power or gas sources. Allow it to cool down completely to avoid the risk of burns.
Step 2: Drain the Water Heater
Locate the drain valve on your RV water heater tank. It is usually located near the bottom and can be identified by a small handle or valve. Place a bucket or container beneath the valve to catch the water. Carefully open the valve, allowing the tank to drain completely. This step removes any accumulated sediment and debris.
Step 3: Flush the Water Heater
After draining the tank, it’s time to flush it thoroughly. Close the drain valve and carefully remove the pressure relief valve located on the top of the tank. Attach a hose to the tank’s drain valve and direct it towards a suitable drainage area. Open the valve and turn on the cold water supply, allowing it to run through the tank for several minutes. This process flushes out any remaining debris and sediment.
Step 4: Descale the Water Heater
Over time, mineral deposits like calcium and lime can build up inside your RV water heater tank, affecting its efficiency. To remove these deposits, you can use white vinegar or a specialized descaling solution. In terms of vinegar, using the RV’s winterizing kit, pour 3 to 5 gallons of white vinegar into the water heater tank, depending on its capacity. This vinegar solution helps break down mineral deposits and remove any built-up sediment. Or you can make use of the specialized descaling solution. Fill the tank with the solution, ensuring it covers all the affected areas. Let it sit for a few hours or as recommended by the manufacturer. Then, drain the tank completely and flush it with clean water to remove any residue. Keep flushing and cleaning the tank for 5 to 10 minutes.
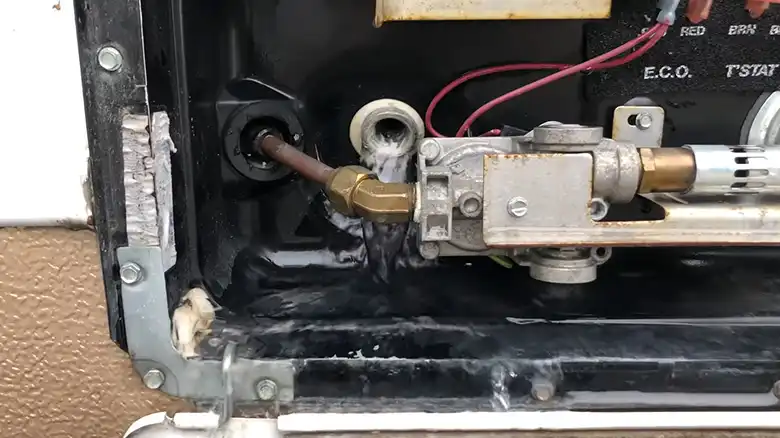
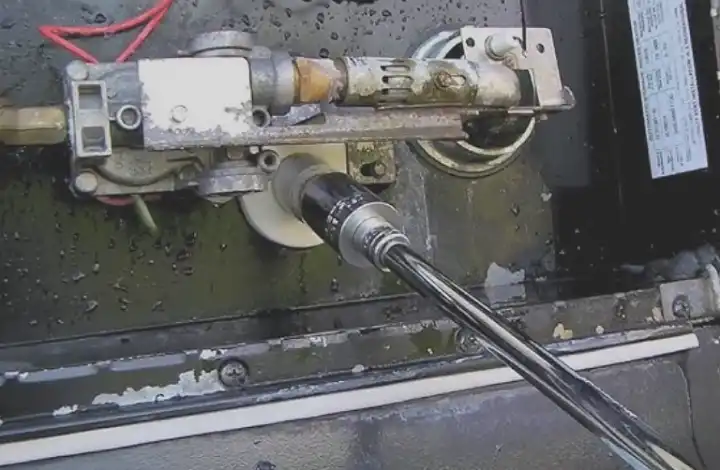
Step 5: Replace the Anode Rod
The anode rod plays a vital role in preventing corrosion within the water heater tank. Over time, it will deteriorate and require replacement. While the tank is draining, take the opportunity to inspect the anode rod if your water heater has one. The anode rod is a sacrificial component that protects the water heater from corrosion. If the anode is severely corroded or depleted, it’s time to replace it. Consult your RV’s owner manual to locate the anode rod. Using a wrench, loosen and remove the old rod. Inspect it for signs of excessive corrosion or wear. If necessary, replace it with a new anode rod of the same size and material. Tighten it securely to prevent leaks.
Step 6: Turn On the Water and Power
Once the tank has drained and the cleaning solution has been properly rinsed out, close the drain valve and remove the hose. Double-check that the drain valve is closed and the pressure relief valve is properly installed. Reconnect the water supply and slowly turn it on. This helps refill the tank and remove any air pockets. Once the tank is full, open a hot water faucet inside your RV to allow the air to escape from the system. Finally, reconnect the power or gas supply, turn on the water heater according to the manufacturer’s instructions, and ensure everything is functioning correctly.
When to Flush the RV Water Heater Tank?
It is recommended to flush the RV water heater tank annually. Additionally, consider flushing the tank if you notice any pressure or temperature changes, after a period of non-use, or if there is visible sediment or buildup in the tank. Regular maintenance and cleaning will help keep your water heater in optimal condition and extend its lifespan.
How Often Should I Replace the Anode Rod in My RV Water Heater?
The anode rod in your RV water heater should be replaced approximately every 1-2 years, depending on usage and water conditions. The anode rod plays a crucial role in preventing corrosion and extending the lifespan of your water heater. Over time, it sacrifices itself to protect the tank, and when it becomes significantly corroded or worn down, it should be replaced. Regularly inspect the anode rod and replace it as needed to ensure the optimal performance and longevity of your RV water heater.
How Can I Clean Out the Inside of My RV Water Heater?
To clean the inside of your RV water heater, start by turning off the power or gas supply and allowing the tank to cool down. Locate the pressure relief valve and open it to release any built-up pressure. Attach a garden hose to the drain valve at the bottom of the tank and place the other end in a suitable drainage area. Open the drain valve and allow the water to completely drain from the tank. Once the tank is empty, close the drain valve and remove any sediment or debris if necessary. Refill the tank with fresh water until it is full, and then turn on the heater to check for any leaks or abnormal behavior.
What Are the Common Issues to Troubleshoot in an RV Water Heater?
Some common issues to troubleshoot in an RV water heater include insufficient hot water, strange odors or tastes in the water, leaks, and pilot light or ignition problems. Insufficient hot water can be caused by a faulty thermostat, sediment buildup, or a worn-out heating element. Strange odors or tastes in the water may indicate a contaminated or deteriorating anode rod. Leaks can occur due to loose connections, damaged valves, or a cracked tank. Pilot light or ignition problems can be caused by issues with the gas supply, thermocouple, or control board. If you encounter any of these issues, it is recommended to consult a professional for proper diagnosis and repair. Regular maintenance and cleaning are essential to prevent these issues and ensure the optimal performance of your RV water heater.
End Note
Regularly flushing and cleaning your RV water heater tank is essential for maintaining its efficiency and longevity. It helps remove sediment, scale, and other deposits that can affect performance and lead to costly repairs. Remember to consult your RV’s owner manual for specific instructions and recommended maintenance schedules. If you encounter any issues or are unsure about any step in the process, it’s always best to seek professional assistance. By following these steps and incorporating regular maintenance into your routine, you can ensure a constant supply of hot water during your RV adventures. Happy travels!

