
RVs come equipped with a water heater bypass valve to allow owners to isolate the water heater during winterization. This prevents antifreeze from entering the water heater when you winterize the RV’s plumbing system. Using the bypass is crucial to avoid damage.
During de-winterization in spring, you’ll need to take the bypass valve out of winterization mode to allow water to flow back into the water heater. This reintegrates the appliance into the RV’s plumbing so it can heat water for use again. There are pros and cons to using the bypass valve for de-winterizing.
Curious to learn more? Discover the ins and outs of operating the bypass valve, how it allows you to safely de-winterize your water heater, and considerations for its use. Understanding this versatile valve will ensure you properly bring your RV’s systems out of winter mode.
What is an RV Water Heater Bypass Valve?
The RV water heater bypass valve is your plumbing superhero when it comes to managing the water flow in your RV’s heating system. In simpler terms, it’s like a switch that directs the water either through or around the water heater, giving you control over how the water circulates. This clever contraption plays a vital role during winterization and de-winterization, saving you from wasting gallons of antifreeze and making the whole process more efficient.
Different Types of RV Water Heater Bypass Valves
There are primarily two types of RV water heater bypass valves: the basic two-valve system and the more advanced three-valve system.
Two-Valve System: This straightforward setup consists of two valves—one on the cold water inlet and the other on the hot water outlet. To bypass the water heater, you close these valves, redirecting the water flow away from the water heater and preventing it from filling up during winterization.
Three-Valve System: In this upgraded version, you’ll find an additional valve, often called a “crossover valve” or “mixing valve.” This valve, situated between the hot and cold lines, allows for more precise control over the water flow, providing a more flexible and efficient bypass system.
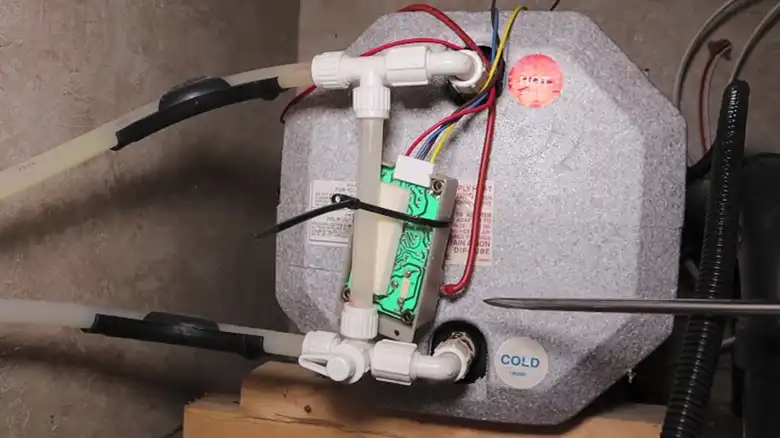
Where to Find the Water Heater Bypass Valve?
Locating the water heater bypass valve is key to unleashing its magic. Typically, you’ll find it near the back of your water heater. Keep an eye out for valves and pipes, as they’re the telltale signs. To bypass the water heater, you’ll need to turn these valves strategically. It’s a bit like rerouting traffic, ensuring water takes the scenic route, bypassing the water heater during winterization, and getting back on track when it’s time for warmer adventures.
A Step-by-Step Guide to Using the Water Heater Bypass Valve for De-Winterization
As spring approaches, campers gear up for travel. Essential prep includes de-winterization and freshwater sanitization. While methods vary, following winterization instructions is essential. Yearly cleaning ensures a ready and safe camper for the open road.
Steps-1. Prepare Fresh Water Tank: Fill the fresh water tank to 50-100% capacity to dilute any RV antifreeze. Allow this water to drain beneath the camper through the fresh tank drain.
Steps-2. Connect Water Hose to Winterization Port: Attach your water hose to the winterization port at the rear of the camper. Turn on the water source and activate the on-board water pump. Open the kitchen faucet on cold until the water runs clear.
Steps-3. Verify and Close Fresh Tank Drain: Confirm that the fresh tank is empty, and then close the Fresh water tank drain. Locate this valve on the curbside of the camper below the bed, accessible through the same panel as the water pump. It’s a silver valve attached to a blue PEX pipe, often obscured by furnace ducts.
Steps-4. Reset Water Pump Valves: Inside the access panel used for the fresh tank drain, reset the water pump valves to their standard configuration. For 2017 and newer models, you’ll find 4 silver valves, while 2016 and prior models have 2 brass valves.
Steps-5. Connect to City Water Connection: Attach your water hose to the City connection and turn on the water supply.
Steps-6. Flush Outside Faucet: Open the outside faucet on cold until the water runs clear, then repeat the process with the hot water.
Steps-7. Open Backflow Preventer: Open the backflow preventer to ensure proper drainage of water into the grey waste water tank.
Steps-8. Flush Bathroom Faucet: Turn on the bathroom faucet on cold until the water runs clear, then open the hot water until it runs clear.
Steps-9. Flush Kitchen Faucet: Run the kitchen faucet on cold until the water runs clear, then open the hot water until it runs clear.
Steps-10. Reset Water Heater Bypass Hose: Return the water heater bypass hose to standard mode to allow water into the tank.
Steps-11. Purge Air from Water Heater: Open the hot side of the kitchen faucet to release any air inside the water heater tank, relieving pressure as the tank fills.
Common Questions and Solutions
Q1: How often should I de-winterize and use the RV water heater bypass valve?
Answer: It’s recommended to de-winterize and use the bypass valve annually before the camping season. This ensures proper functioning and prevents any issues arising from prolonged storage.
Q2: Can I install an RV water heater bypass valve myself?
Answer: Yes, many RV owners can install a water heater bypass valve with basic plumbing knowledge. Refer to your RV’s manual for specific instructions, or consult with a professional if unsure.
Q3: What’s the advantage of a three-valve RV water heater bypass system over a two-valve system?
Answer: A three-valve system, with an additional crossover or mixing valve, provides more precise control over water flow during winterization and de-winterization. This enhances efficiency and flexibility in managing your RV’s plumbing.
Q4: Are there any additives recommended for maintaining the RV water heater bypass valve?
Answer: Yes, adding a food-grade RV antifreeze to the water heater during winterization can prevent valve damage. Additionally, using a tank cleaner during the de-winterization process helps maintain water quality and system performance.
Conclusion
Mastering your RV water heater bypass valve is essential for a seamless de-winterization. This crucial component, situated by the water heater, safeguards against antifreeze issues, ensuring readiness for spring adventures. Whether you have a basic or advanced system, follow these steps for a hassle-free travel season. Safe travels!

