Winterizing Your RV Water Heater For Cold Weather Camping
Camping in an RV during the winter can be a magical experience. However, the freezing temperatures also present some unique challenges when living in an RV, especially for your water heater as it can cause cracks or ruptures in the water lines and tank itself.
So, how do you keep the cold from putting a freeze on your camping fun? The answer lies in effective winterization. Begin by draining the water from your RV’s water heater, ensuring there’s no liquid left to turn into ice, and introduce RV antifreeze into the system, safeguarding it from the harsh winter temperatures.
Properly winterizing your RV water heater is essential to prevent expensive damage and ensure you have access to hot water. With some simple preparation, you can fully protect your unit. This article will explore the winterization process in detail so your water heater is ready for the next adventure, regardless of the mercury reading.
Why Winterizing the Water Heater is Essential
The water heater is among the most vulnerable systems in an RV during freezing weather. It works by heating water stored in an enclosed tank. The cold temperatures can freeze the water inside the pipes and tank which expands and places pressure on the unit. This can lead to ruptured lines, permanent tank damage, and water leaks.
Another common issue is siphoning. Any water left stagnant in the piping will retreat to the lowest point as it freezes. This can draw out the remaining water from the tank causing an empty or underfilled state. When the system thaws, air pockets, and contamination prevent proper heating capability.
Neglecting winterization leads to expensive repairs, replacement costs, and water damage in the RV. It also leaves you without access to hot water for cleaning, bathing, or doing dishes while camping. Preventing these headaches only requires some simple preparation before cold weather sets in.
Supplies Needed for Winterizing an RV Water Heater
Before getting started, ensure you have the necessary supplies on hand:
- RV antifreeze (non-toxic RV/marine grade only)
- Water heater bypass kit
- Garden hose
- Water pump converter
- Empty 1-gallon containers
You likely already have antifreeze if you winterize other systems like the plumbing. The bypass kit allows you to segregate the water heater from the rest of the RV system during the process. This prevents pumping antifreeze into lines and fixtures you don’t intend to winterize. If your RV didn’t come equipped with one, purchase a kit made specifically for your make and model.
Step-by-Step Guide to Winterizing an RV Water Heater
Winterizing your RV water heater involves draining the water from the tank and replacing it with non-toxic RV antifreeze, which protects the plumbing system from freezing. With the proper gear gathered, you’re ready to winterize. Follow these steps to fully prepare your unit:
Step 1: Turn off the Power and Water Supply
Turn off both the electric and LP gas supply to disable the heating capability. Also, disconnect from any external water sources. You want no power or water going to the system.
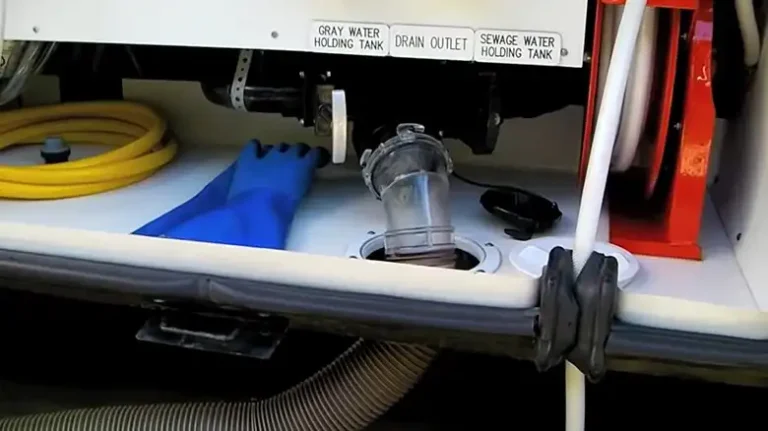
Step 2: Drain the Water Heater
Locate the drain valve or plug at the base of the water heater tank. Place a bucket or pan underneath and open the drain to empty any freshwater from the tank and lines. Expect approximately 6 gallons.
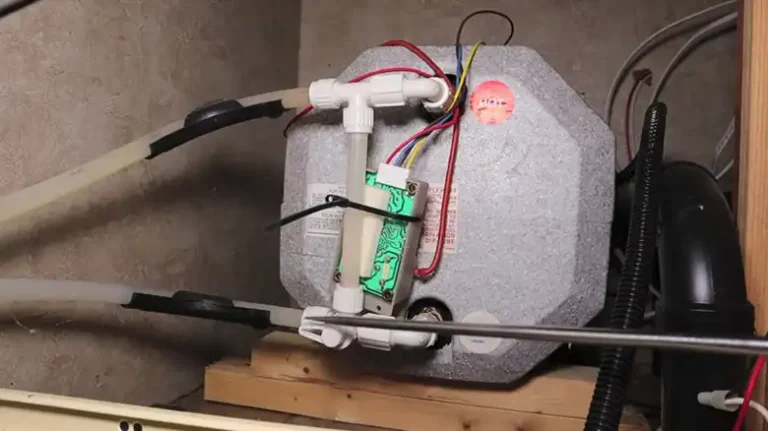
Step 3: Remove the Anode Rod
Use a socket wrench to unscrew the anode rod from the tank opening. This helps water flow out and allows you to inspect the sacrificial rod for replacement needs come spring.
Step 4: Bypass the Water Heater
Consult the manufacturer’s instructions to properly shift the bypass valve into the bypass configuration. This closes input to the water heater and opens a direct channel from supply lines to output lines.
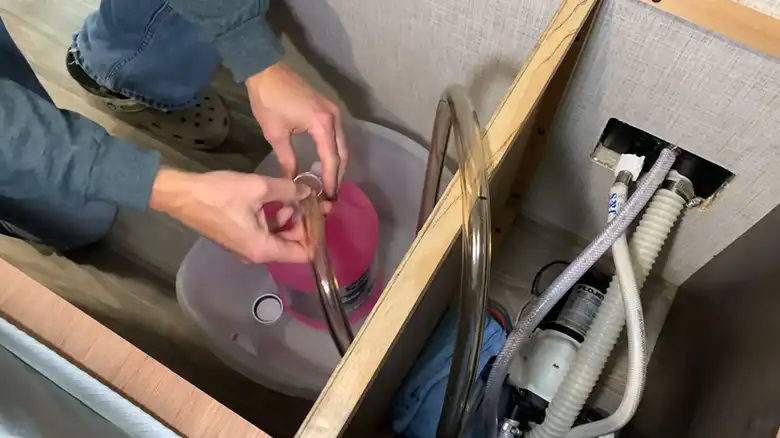
Step 5: Connect a Garden Hose
Attach a garden hose to the inlet valve on the water pump. Drop the opposite end into the RV antifreeze container.
Step 6: Pump Antifreeze into the Water Heater
Connect a hand pump or converter kit to the water heater’s winterizing inlet, typically located near the top of the tank. Attach the antifreeze container to the pump and start pumping.
Step 7: Run Antifreeze Through the Faucets
Switch on the water pump to pull antifreeze from the supply container and push it through the plumbing system. Open the hot and cold faucets inside your RV. Allow the antifreeze to run through the faucets until you see pink or red antifreeze flowing. Close the faucets once the antifreeze color is consistent.
Step 8: Flush the Toilet and Drain Sinks and Tub
Pump antifreeze into the toilet bowl until you see pink or red antifreeze in the bowl. Flush the toilet to circulate antifreeze through the toilet system. Close any remaining drain valves, including the low-point drain valve. Reattach the water pump to its original location. Drain any excess antifreeze from the water pump into a container. Dispose of the antifreeze properly at a designated hazardous waste disposal facility.
Step 9: Fill the Tank
Once antifreeze runs from the taps, close them and disconnect the hose from the pump inlet. Place the free end into the drain valve outlet instead. Turn the pump back on to fill the water heater tank directly with antifreeze. Monitor the storage tank levels and cut power when full.
Step 10: Reinstall Components
Screw the anode rod back in, close the drain, and return the bypass to normal operating mode. Consider covering exterior vents to prevent freezing moisture from entering the ventilation system.
Additional Tips for Winter RV Water Heater Use and Safety
You now have a fully winterized unit prepared for freezing conditions. But proper usage and safety steps also help avoid issues:
- Closely monitor propane supply levels since cold impacts consumption.
- Insulate all exterior pipes and valves vulnerable to freezing.
- Check appliance vents often for snow or ice blockage.
- Never operate the water heater without water; wait until thawed.
- Ration usage to 40-50% capacity to limit freeze risk.
- Maintain adequate heating inside storage compartments.
Exercising caution allows you to safely reap the benefits of hot water while RVing in cold weather. Just take things slow, limit usage, and keep an eye out for potential trouble spots.
Enjoy Your Winter Adventure!
With a few simple steps, your RV water heater is protected and ready to deliver hot showers without issue all winter long. Now you can head out on that dream skiing or snowmobiling adventure with complete peace of mind! Just be sure to schedule water heater de-winterization come springtime so the unit is prepped for the next trip. As you head out to embrace those crisp winter days, exercise sound judgment when enjoying hot water in freezing conditions. But otherwise, relish the opportunity to camp in a winter wonderland. Travel safely and enjoy the spectacular snow-globe views!
Other Queries
What Is An Anode Rod?
An anode rod, or sacrificial anode rod, is an essential component installed in RV water heaters to reduce corrosion in the tank. This metal rod attracts damage instead of the inner tank.
Do I Need A Water Heater Bypass Kit?
A bypass kit allows you to isolate the appliance during winterization. This prevents pumping antifreeze into the entire plumbing system. Units with hot and cold valves do not require one.
How Do I Winterize A Tankless Water Heater?
You drain it fully using compressed air, disconnect all lines and open faucets, introduce antifreeze, and power the unit to circulate the fluid before shutting it down.
Can I Use Automotive Antifreeze?
No, only RV/marine antifreeze designated non-toxic should ever go into an RV water system due to health risks. Automotive coolant is poisonous and corrosive.
How Do I De-Winterize The Water Heater In Spring?
In the spring, open valves, fill the tank with clean water, flush lines until clear, reconnect and power everything to function, then inspect for leaks once heated.