RV wall water damage occurs when water intrudes into the wall cavity, compromising the structural integrity and appearance of interior wall surfaces. Thankfully, with prompt action, the right materials and some DIY skills, minor to moderate wall damage can often be repaired by RV owners themselves.
The key steps include drying out the wall cavity thoroughly, removing and replacing any water-logged insulation or wall panels, sealing the exterior source of the leak, and taking preventative measures to avoid future water intrusion. Addressing issues quickly is vital before mold takes hold and to limit further delaminating or deterioration.
With a little persistence and diligence to fix all affected areas, RV owners can restore damaged wall interiors to a clean, intact state. In this guide, I’ll walk you through the process of identifying, troubleshooting and repairing common RV wall water damage to get your RV looking great again.
Identifying Signs of RV Wall Water Damage
The first step is recognizing the signs of water intrusion in walls. Some of the most common symptoms include:
A. Common Signs and Symptoms
1. Discoloration and Staining
– Look for water marks or stains on interior wall surfaces. Brownish discoloration often indicates prolonged moisture exposure.
– Staining may at first appear only in corners or along trim areas rather than on main wall panels.
– Wallpaper bubbling or peeling away from the wall is a sign of water damage behind the paper.
2. Soft or Spongy Wall Areas
– Apply gentle pressure and check for soft spots or sponginess in the wall. Soft areas indicate saturated insulation or wall framing underneath.
– Delaminating or detached wall panels will flex more under pressure. Knocking on walls can also help detect hollow or damaged areas.
3. Musty Odor
– Lingering musty or moldy smells suggest excess moisture and possible mold growth inside walls.
– Odors are more noticeable when humidity levels rise, like after bathing or cooking.
B. Causes of Water Damage
Pinpointing the source of the water intrusion is key to making proper repairs and preventing recurrence. Common culprits include:
1. Leaks in the Roof
– Roof leaks due to aging sealant, cracks, and damage let in water. It then runs down into wall cavities.
– Water pooled on the roof from rain or melting snow can also seep through seals over time.
2. Window and Door Seal Issues
– Gaskets around windows and doors can degrade or detach, allowing water intrusion during rain or washing.
– Caulking may crack and separate from the wall, compromising the weather seal.
3. Plumbing Leaks
– Slow leaks at supply lines, drainage pipes, fixtures like sinks or showers can saturate wall materials.
– Condensation dripping from cold water pipes may puddle inside walls as well.
How to Assess and Prepare for RV Wall Repairs
Before starting repairs, the damage must be fully assessed and the workspace prepared. This involves gathering tools, materials and taking precautions.
A. Tools and Materials
1. Moisture Meter, putty knife, screwdriver, vacuum, etc.
– A moisture meter is essential for evaluating the extent of water saturation in walls, insulation and framing.
– Basic hand tools like putty knives, screwdrivers, hammers and pry bars help remove affected sections.
– A HEPA filter vacuum cleans up debris and removes mold spores from the air.
2. Replacement Panels
– Matching replacement panels may be needed if the originals are extensively damaged and detach readily.
– Wall repair patches can cover smaller damaged areas.
3. Sealants and Adhesives
– Polyurethane caulk provides a waterproof, flexible exterior seal when replacing trim.
– Panel bonding adhesive securely reattaches any loosened sections.
B. Assess the Damage
– Look for signs of water damage like soft spots, bulges, peeling wallpaper, etc.
– Check inside cabinets and closets for hidden damage.
– Determine how much of the wall is damaged.
C. Prepare the Workspace
– Clear the area around the damaged walls. Remove anything that could get in the way.
– Lay down drop cloths and plastic sheeting to catch fallen debris and dust.
– Have necessary tools and materials nearby to speed up the repair process.
Step-by-Step Process for Repairing RV Wall Water Damage
With assessment and preparation complete, it’s time to start replacing damaged sections, drying out the wall cavity and rebuilding the wall’s surface.
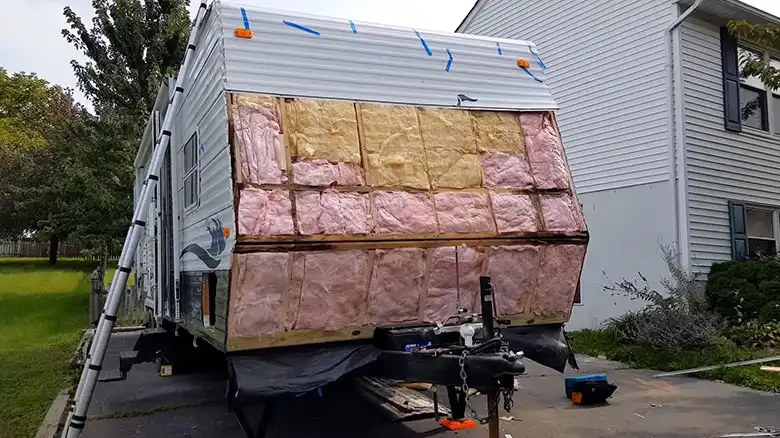
Step-01: Remove Damaged Sections
– Carefully cut and pry away any water-damaged wall panels or wallpaper using a putty knife or pry bar. Take care not to damage framing.
– Detach interior trim pieces to access hidden damaged areas. Label pieces for easy reinstallation later.
– Inspect insulation for mold or excessive dampness. Replace if needed.
– Remove lower wall panels or wainscoting if flooding occurred. Upper panels may be salvageable if drying fast enough.
– Use a moisture meter to assess how far moisture spreads into walls. Remove wall materials at least 6 inches past the visible damage to be sure all affected areas are exposed.
– Removing trim provides access to wall damage hidden behind cabinets, trims and moldings. Cut tile caulk and use a pry bar to detach trim carefully for reuse.
Step-02: Dry Out the Wall Cavity
– Use fans and dehumidifiers blowing directly into the exposed cavity to fully dry out the area.
– It may take 1-2 weeks for wood framing and insulation to completely dry depending on humidity levels.
– Monitor moisture levels using a moisture meter. Drying is complete when readings are the same as unaffected areas.
– Place fans strategically around the RV to maximize cross ventilation. Open windows on opposite sides to create a drying airflow path.
Step-03: Disinfect and Deodorize
– Apply a diluted bleach solution to wood framing to kill any mold and mildew growth. Then rinse and let dry completely.
– Follow with white vinegar as a natural deodorizer to eliminate musty smells. Lavender oil also helps impart a fresh scent.
– Allow the wall cavity to fully dry again before rebuilding. Any lingering moisture will encourage mold recurrence.
– Inspect wood framing for damage and decay. Sand rough areas, fill splits with epoxy and brush on wood hardener to strengthen compromised sections before rebuilding the wall.
– In addition to bleach, removing mold may require sanding, applying hydrogen peroxide or using protective gear when contamination is extensive. Always wear gloves, goggles and an N95 respirator.
Step-04: Repairing or Replacing Damaged Wall Materials
– Identify areas where insulation has remained damp or holds musty odors. Remove and replace with new, dry insulation.
– Fiberglass and closed cell spray foam are suitable insulation materials for RV wall rebuilding. Avoid paper-backed insulation.
– Replace any damaged framing members with equivalent structural supports.
– Reinstall wall panels, boards or graphics over the repaired framing using panel adhesive.
– Choosing Suitable Insulation Material: Closed cell spray foam offers insulation and air sealing but requires professional installation. Faced fiberglass batts provide an economical DIY option.
Step-05: Prevent Future Water Damage
– Identify and thoroughly repair all sources of the original water intrusion based on stains and damage patterns.
– Install water sensors along floor edges to quickly detect any leaks at the first sign of water.
– Check exterior seals around windows, doors, slides, penetrations and the roof for needed repairs or fresh caulk.
Sealing and Repairing the RV Exterior to Prevent Future Damage
Preventing recurrence means making repairs to the RV exterior as well as the damaged interior wall itself. Key areas to address are the roof and weather seals.
A. Checking and Repairing Roof Leaks
1. Inspecting Roof Seals and Caulk: Look for cracking, gaps or deterioration in roof sealant around vents, seams and protrusions allowing water intrusion. Recaulk as needed.
2. Patching or Replacing Roof Materials: Roof leaks may require patching or totally replacing water-damaged roofing. Professionals can best evaluate and remedy roof issues.
B. Window and Door Seals
1. Inspecting and Replacing Gaskets: Examine window and door gaskets for proper fit and condition. Replace any that are loose, cracked, compressed or missing.
2. Applying Waterproof Sealants: Use a flexible, exterior-grade caulk or sealant when reinstalling trimmed pieces around openings. Carefully seal end gaps and joints.
Preventive Measures to Avoid Future Water Damage in RV Walls
Being proactive protects RVs from wall water damage in the first place. Routinely inspecting and maintaining seals prevents leaks before they occur.
A. Regular Inspections
1. Seasonal Checklists: Go through checklists to examine the RV roof, exterior and plumbing systems before extended trips or seasonal storage.
2. Tips for Spotting Early Signs of Damage: Look for rust marks, mildew growth, damp areas, spongy spots and small leaks right away rather than waiting for extensive damage.
B. Maintenance Schedule
1. Roof Maintenance: Inspect the roof at least yearly and recoat/reseal every 2-3 years per manufacturer recommendations. Properly cleaning and conditioning roof material improves longevity.
2. Sealing and Caulking: Check window, door and trim seals and touch up caulk twice yearly. Repair failed seals immediately before openings lead to wall damage.
When to Hire a Professional for RV Water Damage Repair
Some RV wall water damage situations require professional repair services for proper restoration and prevention of recurrence.
A. When to Seek Professional Help
1. Extensive Damage: If wall materials are extensively saturated or framing/insulation damage is severe, professionals have the tools and expertise for proper remediation.
2. Complex Structural Repairs: Serious structural issues like warped framing, damaged load bearing elements or major roof compromise need an expert contractor.
B. Choosing a Qualified RV Repair Service
1. Recommendations and Reviews: Search for providers with consistently positive reviews for water damage repair services specifically. Check third-party rating sites.
2. Certifications and Experience: Look for certified technicians specifically trained in RV repair. Verify state licensing and brands represented. Ask about experience with water damage projects.
More Questions & Answers
Q1: How can I tell if water damage in an RV wall is structural or cosmetic only?
A: Push on walls to feel for softness or excessive flexing which indicates compromised structural integrity. Use a probe to check for wood rot or mold behind wall surfaces. Structural damage requires framing repairs.
Q2: Does homeowner’s insurance cover RV water damage repairs?
A: Most standard homeowner’s policies do not cover RVs. You need a specialty RV insurance plan, which often includes limited water damage coverage, subject to deductibles and dollar limits.
Q3: Is it safe to repair an RV myself if mold is present?
A: Extensive mold may require professional mold remediation. For minor contamination, you can do DIY cleanup using proper protective gear like an N95 mask, goggles and gloves.
Q4: How long does it take an RV wall to dry out after water damage?
A: Depending on humidity, air circulation and the materials affected, drying can take 1 to 2 weeks. Wall cavities should have the same moisture readings as unaffected areas before rebuilding.
Q5: What is the best way to find an RV water damage repair specialist?
A: Search for providers with RV-specific certification and consistently positive reviews related to water damage projects. Personal referrals from other RV owners are also helpful.
Q6: How can I prevent water damage when storing my RV?
A: Store under cover, seal all openings, disconnect appliances, install RV dehumidifiers and schedule periodic walkthrough inspections to spot any leaks immediately. Maintain seals and roof condition.
Final Thoughts
Promptly addressing RV wall water damage by identifying the source, drying thoroughly and rebuilding damaged sections can restore walls to a clean, intact state. Combining repairs with improved maintenance and proactive leak checks will optimize the results. With some persistence and diligence, RV owners can take on wall water damage themselves and prevent costly recurrence in the future.