I’m a seasoned camper owner and I prefer to occasionally detect soft, giving zones underfoot or visible indents along walls from kicked soccer balls signaling lost rigidity somehow from moisture or age. While occasional, even minor camper soft spots give me pause worried about critical frame or floor integrity surrendering to sponginess despite only using gently personally.
Through addressing a few fledgling spongy spots early myself and then researching the causes and repair remedies thoroughly afterward, I’ve gathered extensive knowledge about rectifying these worrisome zones successfully. Here, I’m sharing my tips for locating suspect areas, gauging severity smartly, and executing DIY fixes for stable campers plus seeking professional assistance becomes the wise move before adventure road trips commence!
Basically, you need to identify the damaged area, remove any affected materials, replace the damaged section with new materials, and ensure proper sealing. This restores structural integrity and prevents further damage.
Detecting Soft Spots – What Exactly Does It Mean?
Before assessing solutions, let’s align on the physical telltale signs characteristic of camper soft zones:
Spongy Floors – When you notice indents forming underfoot as you walk across significant floor areas, it’s a sign that something is amiss beneath the surface. This usually points to substructure problems causing the floor to lose its firmness.
Wall Flexing – Gently pushing against the exterior walls can reveal uneven give or bowing, especially when compared to the sturdier areas nearby. This uneven flexibility indicates potential issues with the camper’s structure.
Creaking Noises – Pay attention to sounds that betray movement along the junctions of the ceiling and walls or the emergence of widening gaps when there’s added weight. These creaks hint at the effects of forces at play, causing shifts in the camper’s integrity.
Sagging Moldings – Look for separations appearing around fixtures and fittings, which signal that the underlying support, such as insulation or frame components, is wearing down. The sagging of moldings is a visible manifestation of gradual material deterioration.
Any of these symptoms is a clear indication that the materials in your camper are gradually giving up their alignment and load-bearing duties due to some form of deterioration or force-induced damage. Now, let’s delve into the reasons behind the emergence of softness over the years before repair notices landed in owners’ mailboxes.
Common Causes of Camper Soft Spots
For folks taking good care of their trusty campers, it’s a bummer when soft spots show up. Unfortunately, several things that can’t be avoided lead to these flexible areas over time. Let’s break down the reasons in simpler terms:
Water Troubles
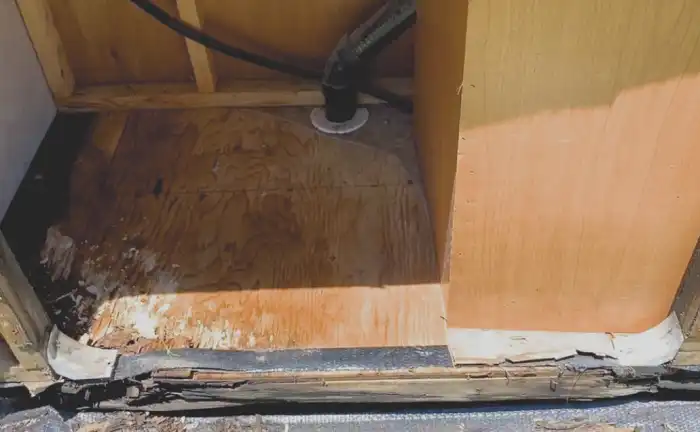
Water damage is a big issue. Leaks from plumbing or coming up from the ground can soak the camper’s wooden parts, like the floor or walls, causing them to slowly break down and become soft.
Bugs and Pests
Unwanted guests like mice, termites, and bugs can quietly nibble away at the camper’s insides. They eat into the softer parts, leaving gaps and holes that make the camper feel less sturdy.
Weather and Decay
As time passes, the camper has to deal with things like sunlight, freezing nights, and humidity. These weather elements gradually wear down the strong structure of the camper, creating soft spots over time.
Shaking Things Up
When driving on uneven roads, the camper gets a good shake. This constant movement can make things like appliances, fixtures, and the camper’s frame loosen up, crack, and lose their toughness, especially after covering a lot of miles.
Too Much Weight
Putting too much stuff in the camper, like heavy gear or water tanks, or loading things at weird angles, can put too much stress on its structure. This makes the camper’s ability to handle weight wear down faster.
Even when campers are well taken care of, they have to face these challenges bit by bit. Regular check-ups help a lot in catching problems early on before soft spots become a big worry. So, by keeping an eye out and taking action, campers can stay strong and ready for more adventures down the road.
Next, let’s explore field techniques for judging severity levels more accurately.
Assessing the Extent of Camper Damage
When trying to figure out how bad things are in your camper, just looking at visible problems or feeling for soft spots isn’t enough. You need to dig a bit deeper to know if a quick fix will do or if you’re in for some major repairs:
Surface Dent Depth
If you see dents on the outside walls, check how deep they are. Anything less than an inch probably means there’s just an issue with the outer layer, not the frame inside.
Repetitive Force Dependence
Test if you need to keep pressing to feel the softness or if it stays flexible without much effort. If it consistently stays soft, the problem might be more serious.
Moisture Readings
Use tools like wood moisture meters and infrared cameras to check around the softened areas. High moisture levels could mean water is getting in and weakening the structure.
Wall Stud Movement
Give the walls a tap. If you hear solid sounds along with the soft spots, it might be a sign that things are shifting inside. If the edges feel loose, that’s a more serious issue.
Cracking Sounds
Listen closely when pressing on soft areas. If you hear creaking, especially when the pressure is released, it could indicate movement in the frame.
While not overly complicated, paying attention to these signs helps you tell the difference between minor surface problems and more serious issues like weakened floorboards or major problems with the walls. This way, you can decide if a quick fix will do or if you need to tackle the repairs right away.
DIY Solutions for Minor Camper Damage
If you’ve got minor dents or spots in your walls that are a bit wobbly, resourceful homeowners can give fixing them a shot. These DIY repairs can help bring back the look and strength of your walls:
Adhesive Injections
Grab a syringe with a nozzle and use it to inject adhesive to stick the loose parts back in place. Tape them temporarily to make sure they stay in position until the adhesive sets.
Backside Splinting
Use sturdy wood strips or metal pieces on the back of the dent to stop it from bending more when there’s pressure. This helps keep the wall firm and prevent further damage.
Filler Injections
Fill up hollow spots with concrete crack fillers or foams. This adds strength to the inside of the wall. Afterward, you can apply a topcoat for a finished look.
Surface Patch Laminates
If the facing material has come off, cut pieces from a matching laminate and glue them onto the dented areas. This creates a smooth and strong replacement, protecting the inner layers of the wall.
While these fixes might take a bit more effort than just pushing a dent back into place, they’re worth it for small issues. They prevent permanent damage and keep your walls looking good. But when it comes to bigger problems, it’s best to leave it to the pros.
Professional Repair Options for Serious Soft Spots
When soft spots keep making an unwelcome appearance or the edges of your camper sound alarmingly loose, it’s time to bring in the experts. Dealing with these issues properly requires specialized knowledge and skills:
Identifying the Source of Moisture
Technicians employ advanced tools like inspection cameras and moisture readers to track down sneaky leaks and worsening conditions. Before fixing the visible problems, they make sure to address the underlying moisture issues to prevent further damage.
Surgical Interventions
Restoring the camper’s framework might involve some surgery. Technicians may need to cut openings in the floor and walls to secure loose support structures or replace severely deteriorated sections. All repairs are done while ensuring compliance with safety codes.
Reinforcement Retrofits
To prevent ongoing bending and fatigue-related issues, additional anchors, robust sister studs, and protective layers for the substructure are strategically installed. These retrofits enhance the camper’s structural integrity and prevent further deterioration.
Alignment of Equipment
Appliances and fixtures that have shifted out of place can contribute to structural problems. Technicians carefully remove and realign these elements, correcting any gradual contortions that may have occurred. This helps in maintaining the camper’s overall stability.
While it’s undoubtedly inconvenient to have your camper in the shop for weeks, a comprehensive rehabilitation by qualified technicians is the only sensible solution for addressing disconcerting structural defects. By partnering with experts, you not only ensure the safety of your camper but also mitigate potential headaches that could worsen over time. Avoid the temptation to delay—act now and entrust your camper’s well-being to those with the expertise to safeguard it for countless adventures ahead.
Preventative Tips to Avoid Camper Damage
While periodic soft zones likely emerge given long enough RV lifespan ownership filled with unpredictable adventures, several proactive preventative measures promise to reduce risks of major structural failures:
- Install humidity sensors in utility compartments as early warning systems highlighting unseen moisture buildup threats
- Wash and detail roofing and perimeter seals twice yearly ensuring no cracking enables water seepage indoors
- Avoid parking angled or sloped excessively to reduce chassis flexing dynamics against stabilizer strengths
- Sacrifice small storage capacity for weight distribution protecting flooring subframes
Letting modern technology act as an early watchdog plus showing camper bodies added caretaking gentle love promises to keep the family chariot firmer longer sustaining cozy road trip living year upon year!
Frequently Asked Questions About Camper Repairs
Should pop-up camper owners worry about soft floor spots forming given their light structures?
Far less likely – pop-up camping trailers utilize strong surface plywood sheathings underneath with limited framing depth needed allowing owners to lift/collapse repeatedly. Their lightness and simple construction better sustain integrity assuming responsible moisture protection.
Aside from obvious softness while walking inside, what inspection methods could identify hidden issues?
Infrared thermography scanning of exterior wall and floor surfaces offers home inspectors views into heat signatures escaping along gaps betraying insulation failures or missing wooden members unable to contain warmth like intact areas do. It predicts developing issues.
At what point should camper owners stop using units if soft zones get identified?
Visually evident dents or sponginess while walking signal structural capacity thresholds lowered already to levels unsafe for road travel at speed or additional loading stresses. Have technicians assess urgently before further use or movement.