Remove Black Streaks From An RV | Causes and Cleaning Tools
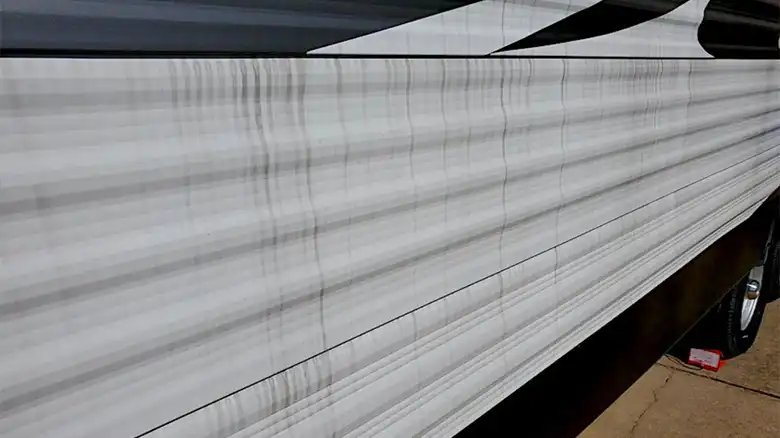
Black streaks on RVs can be an eyesore that detracts from your pride and joy. The streaks come from various sources – dirt accumulation, water leaks, mold, mildew stains, or tire marks. Getting rid of them requires a bit of work, but is doable with the right techniques and tools.
The good news is that with some elbow grease, cleaning solutions, and home remedies like white vinegar and lemon juice, you can make that RV exterior shine like new again. In this comprehensive guide, I will provide tips to identify the streak sources, select the right cleaners, and remove stubborn stains safely without damaging RV surfaces. Equipped with these proven methods, you’ll be ready to revitalize any RV exterior.
So let’s get started and banish those unsightly black streaks for good! Learning how to remove them properly will have you back on the road looking sharp in no time.
What Causes Black Streaks on RVs?
Understanding what causes black streaks in the first place is key to preventing and removing them effectively. Here are the most common culprits of dark stains on RVs:
- Dirt Accumulation: Dirt, dust, and other environmental contaminants cling to the RV’s fiberglass or painted exterior. Over time, the buildup turns into ugly black streaks dripping down the sides. Frequent driving can make the situation worse.
- Water Leaks: Water leaks from vents, air conditioners, or around windows carry dirt downward. As the water evaporates, it leaves behind stubborn black stains. Detecting and fixing leaks early on helps avoid permanent streaking.
- Mold and Mildew Growth: In warm, humid climates, dark mold and mildew flourish, especially in crevices. As spores spread, black spotting and streaks multiply on the siding. Fighting moisture buildup is crucial.
- Tire Marks: Rubber from tires flinging up leaves messy black marks along lower exteriors. Parking on asphalt on hot days exacerbates tire mark transfer.
- Oxidation: Over years of sun exposure, clearcoat paint finishes can oxidize and fade to a dull, streaked appearance. Restoring oxidized finishes requires heavy compounding.
Now that we know where the streaks originate from, let’s explore processes to remove them.
Cleaners and Tools To Remove Black Streaks
Having the right cleaners and tools on hand makes eliminating streaks much simpler. As you develop your arsenal, keep these tips in mind:
Cleaners
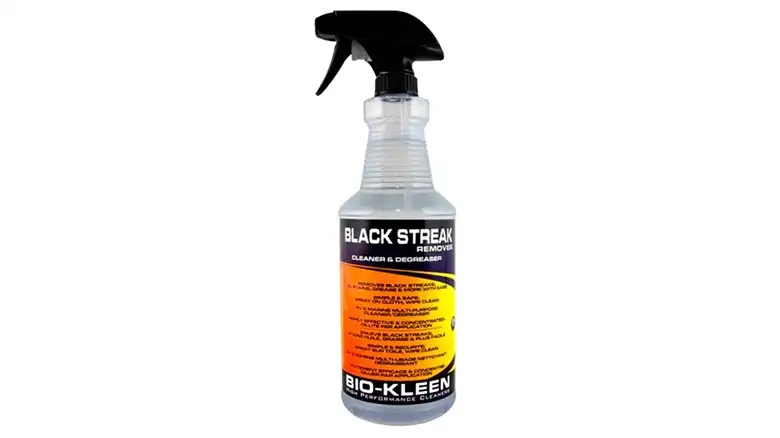
Avoid abrasive products on smooth fiberglass or clearcoats, which can introduce fine scratches and swirls. Harsh chemicals can also yellow or dull surfaces over time. Instead, look to boat or RV exterior cleaners labeled “stain removers” that are safe for finishes.
Consider bleach products carefully. While bleaches like sodium hypochlorite effectively blast away stains, they may discolor or degrade surfaces with repeated use. Bleach alternatives work similarly without harsh downsides.
Acid-based wheel cleaners work wonders dissolving brake dust and dirt from tires but REQUIRE EXTREME CAUTION ON SIDEWALLS to avoid permanent marking or damage to decals. An acrylic restoration product is a less risky choice.
Other Easy-to-Find Alternatives
Besides RV cleaners, regular stuff from your home can get rid of streaks too if you’re willing to scrub more. Try these before using heavy-duty chemicals:
For RV owners wary of using harsh chemicals, some household staples lift stains without nasty fumes or residues. Exercise patience though – natural options take more repetitions.
- Baking Soda and Water Paste
Form a spreadable paste with equal parts baking soda and water. Spread over stains, allowing 15 minutes of dwell time before scrubbing with a soft brush and rinsing. Repeat as needed.
- Lemon Juice
Known for its bleaching abilities, lemon juice helps dissolve some discoloration when applied directly. Let the juice soak before scrubbing it with baking soda. Rinse thoroughly.
- Toothpaste
Mix toothpaste and water. Scrub it onto the black marks. Rinse after 10-15 minutes
- White Vinegar
The slightly acidic nature of white vinegar eats away at dirt and water deposits. Spray or wipe diluted vinegar onto stains and give 10-15 minutes before agitating and rinsing.
- Car Wax
Smooth wax onto the streaks. Let it sit for a few minutes. Buff off completely with a cloth
- Oxygen Bleach
Non-chlorine oxygen bleach acts as a chemical-free alternative to harsher bleaches. Follow product instructions for mixing, applying, and allowing proper activation time before scrubbing.
- WD-40 Spray
Just spray WD-40 directly on the dirty spots. Wipe it off with a rag or paper towel. Rinse leftover WD-40 residue with water.
- Murphy’s Oil Soap
Mix Murphy’s soap with water. Spray it on the areas with streaks. Wait 10-15 minutes before rinsing
- Sunlight + Baking Soda/Lemon Juice
For light stains, try bombarding them with some natural sunlight. Spread baking soda paste or lemon juice onto marks then let the sun work its magic activating ingredients. Rinse after an hour.
Tools
Pressure washers do the hard work for you but improper use risks driving water leaks or delaminating sensitive areas. Adjust to low pressure and test small areas first.
Soft Scrub Pads and Microfiber Cloths give extra cleaning muscle without marring finishes. Bonus Tip – Dampen pads and cloths with cleaners first to make scrubbing easier.
Paint scrapers or razor blades help chip off any chunks of residue buildup but must be wielded gently.
Masking tape, drop cloths and painter’s tape keeps streak removers from drifting onto vulnerable graphics, seals, and trim, saving cleanup hassles.
Step-By-Step Guide To Remove Black Streaks
With the right precautionary measures and cleaning agents, vanishing those blemishes becomes a satisfying DIY project. Follow these proven tips:
Step 1: Prep Surfaces
Pick a dry, cool day without direct sun to begin. Hot surfaces amplify chemical reactions. Use painter’s tape and drop cloths to mask off decals, rubber trims, vents, and crevices vulnerable to overspray.
Step 2: Loosen Debris
Rinse down the unit with a regular garden hose first. This clears dust and cobwebs so cleaners penetrate better. Let the surface dry completely since moisture dilutes chemical potency.
Step 3: Apply Cleaners
Shake your chosen streak remover before applying it generously onto stained areas, allowing it to soak for the product’s recommended duration. Repeat for stubborn zones. Avoid rubbing it dry right away.
Step 4: Let Chemicals Activate
The active ingredient needs 10-20 minutes of dwell time to break down the gunk before scrubbing. As you wait, reapply extra cleaner to thick streaks. This patience pays off for optimized results.
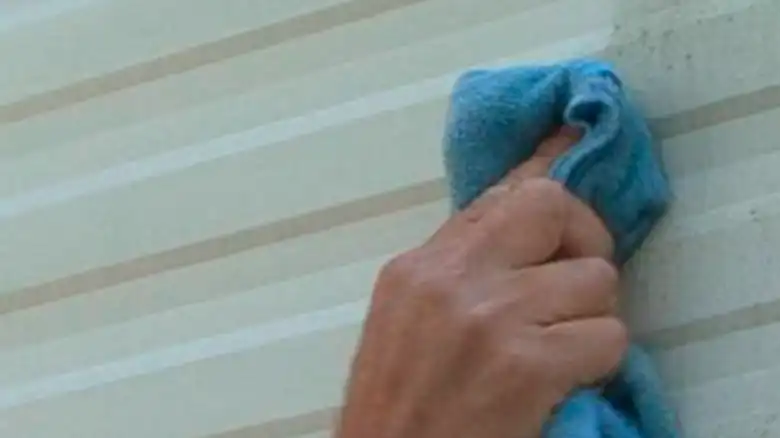
Step 5: Scrub Stains Away
Use a damp soft scrub pad, sponge, or microfiber mitt to gently agitate soaked areas in a circular motion. Adding some elbow grease here prevents having to repeat steps. Take care around graphics.
Step 6: Rinse Thoroughly
Blast away all residual cleaner and lifted stains with a regular garden hose, pressure washer on low setting, or heavy-duty spray nozzle. Let the siding dry fully before reassessing. Still, see streaks? Repeat the process focusing on stubborn zones.
Step 7: Seal And Protect
After achieving a streak-free exterior, apply a layer of automotive or marine wax to restore luster and protect the finish from new stains and UV damage over time. Hi-gloss wax makes colors “pop” again!
Follow these best practices and your coach will sparkle like new! Be ready to field compliments at the next campground on what a sharp-looking rig you have.
Tackling Specific Stain Scenarios
In real life, not all black streaks stem from the same causes. Here is a cheat sheet highlighting the best removers and techniques to combat some common difficult stains specifically:
Oxidation or Fading Clear Coat
If the overall paint has dulled to a streaked, chalky appearance from sun exposure and oxidation, reach for a heavy-duty marine or automotive oxidization remover containing chemical compounds like oxalic acid to dissolve the mess. Follow label directions closely. Finish by sealing with wax.
Mold or Mildew Stains
Mold loves shaded, moist areas on RVs. To inhibit regrowth after removing stains with bleach substitute cleaner, apply an antimicrobial protectant solution to the affected region. Keeping surfaces ultra-dry discourages recurrence.
Tire Marks
Rubber slings from tires stamp oxidized streaks along lower sidings that require a solvent-based cleaner formulated for removing grease, tar, and asphalt. To minimize new tire marks, add splash guards behind the wheels.
Water Stains Under Windows, Roof Vents, etc.
Detecting and repairing the source leak is step one. For the remaining mineral deposits left behind, spray vinegar or calcium-lime-rust remover followed by thorough rinsing. Wax protectant adds an extra water barrier.
10 Pro Tips For Preventing Black Streaks On RVs
Reactivating those cleaning rituals whenever black streaks resurface gets old really quickly. Applying these DIY maintenance habits helps keep your RV gleaming in tip-top shape between deep cleanings:
- Wax at least annually – protects the paint from UV damage, dirt buildup, and water sports
- Inspect seals and roof – fix gaps right away preventing leaks
- Install gutter extensions – carry dripping water away from the siding
- Wash regularly – every 4-6 weeks prevents heavy staining
- Towel dry – wiping down siding after washing avoids watermarks
- Cover tires – shields lower exteriors from flying rubber byproducts
- Park wisely – avoid parking under trees to limit tree sap and bird droppings
- Check mold-prone areas – bleach wipe crevices that tend to grow black mildew spots
- DIY touch-ups – fix paint chips immediately to prevent moisture infiltration
- Add protective film or ceramic coating – guards finish from chemical damage and UV exposure
When To Call In A Professional
Removing homegrown black streaks yourself with a little time and elbow grease is very satisfying. But if faced with these severe scenarios, calling in the experts may be the smartest play:
- Widespread paint oxidation requiring compounding
- Leaks originating from faulty installation or complex roofing jobs
- Breached caulk or seals demand specialty repair skills
- Delicate front masking and graphics at risk
Pinpointing whether DIY fixes disturb complex workmanship warranties is also wise. Technicians bring professional equipment, harsher chemicals, and paint correction abilities exceeding homemade solutions.
Questions You May Frequently Asked
What Is The Easiest Way To Remove Black Streaks From An Rv Exterior?
The easiest method is to use a dedicated RV black streak remover, apply it liberally to stained areas, let it soak for 10-20 minutes, and then scrub gently with a soft brush before rinsing thoroughly. Going the chemical route makes fast work of ugly black stains.
Can I Use A Pressure Washer To Remove Stains From An Rv Exterior?
You can use a pressure washer judiciously on stained areas if careful not to get too close and risk driving water leaks through seals or delaminating decals. Adjust to low pressure, test small areas first, and avoid aiming directly at vulnerable trim pieces or vents.
What Home Remedies Remove Black Streaks From Rvs?
Some homemade solutions like baking soda paste, lemon juice, white vinegar, or oxygen bleach lift stains effectively with some elbow grease and patience. Allow natural solutions longer activation and scrub times since they don’t contain the same powerful chemical agents.
How Do I Maintain My Rv Exterior Between Deep Cleanings?
Washing and waxing regularly, fixing paint chips quickly, installing protections like splash guards, and addressing leaks immediately minimize exterior staining in between intensive stain removal sessions. Following proactive maintenance habits reduces major restorations down the road.
Final Words
Removing unsightly black streaks from RV exteriors admittedly takes some work – but delivers satisfying payoffs preserving your prized investment and memories. Now equipped with the right streak-fighting tools and removal game plan tailored to your exact staining situation, you can confidently restore that RV exterior from grimy to gleaming. As you scrub those blemishes away, imagine the places your newly-refreshed home on wheels may roam once back in tip-top shape. Will it be off navigating dazzling mountain ranges out west or beachside campgrounds along either coast to start making the next set of fond memories? Wherever the open road leads after your restoration journey, the skills you’ve gained retaining your RV’s luster equip you to handle new stains in stride. Here’s to many more stellar, streak-free trips ahead!