
As an avid RV enthusiast, I love being able to access television programming and news channels from the comfort of my motorhome, no matter how remote my campsite is. Nothing beats winding down in front of my TV with a cold drink after a long day of outdoor adventures. However, unreliable reception and fuzzy picture quality can quickly dampen the entertainment experience. Luckily, installing an antenna signal booster provides a simple solution to boost the TV signal inside your RV.
Antenna boosters amplify the incoming signal from your RV’s rooftop antenna to give you access to more channels with increased clarity. But like any electronic component, boosters can malfunction over time. Faulty boosters manifest in frustrating symptoms like choppy pictures, reduced channel availability, or even total signal loss. To avoid these issues, it’s important to periodically test that your booster is functioning as intended.
In this guide, I’ll outline a straightforward process for testing built-in and external RV antenna boosters using common tools. I’ll also provide useful troubleshooting tips to get your booster back up and running if problems are detected. With just a little preventative maintenance, you can continue enjoying crystal-clear TV programming wherever the open road takes you.
Essential Tools for Testing Your Booster
Testing an antenna booster only requires a couple of specialized tools along with following some basic safety best practices.
Gather Necessary Tools
To thoroughly test booster operation, you’ll need –
Multimeter: This tool measures voltage and continuity and allows for checking power supply and cabling. An inexpensive basic digital multimeter is perfect.
Screwdriver: A Phillips or flathead screwdriver can help access built-in boosters or antenna connections as needed.
Replacement coax cable: Handy for troubleshooting and isolating cable faults. Have a 10-20 foot length of RG6 quad-shielded cable on hand.
Safety Tips for Testing Your RV Booster
When working on your RV roof to access antenna components, please keep these safety tips in mind –
- Choose a dry, windless day without thunderstorms or lightning strikes. Moisture and electricity never mix!
- Use extreme caution when climbing on the roof. Wear slip-resistant shoes and consider installing roof grab handles for stability.
- Allow ample clearance from any nearby power lines that could pose shock hazards.
- Don’t work alone – have someone outside who can call for help if needed.
- Use tie-downs or weight your ladder to prevent tipping accidents.
With the right tools and safety preparations complete, you’re ready to start testing!
Step-by-Step Guide to Testing Your Booster
Follow these steps sequentially to fully evaluate your RV antenna booster functionality.
1. Conduct a Visual Inspection
First, directly examine the physical condition of the antenna and connections –
a) Verify the antenna mast is free of dents, cracks, or other damage.
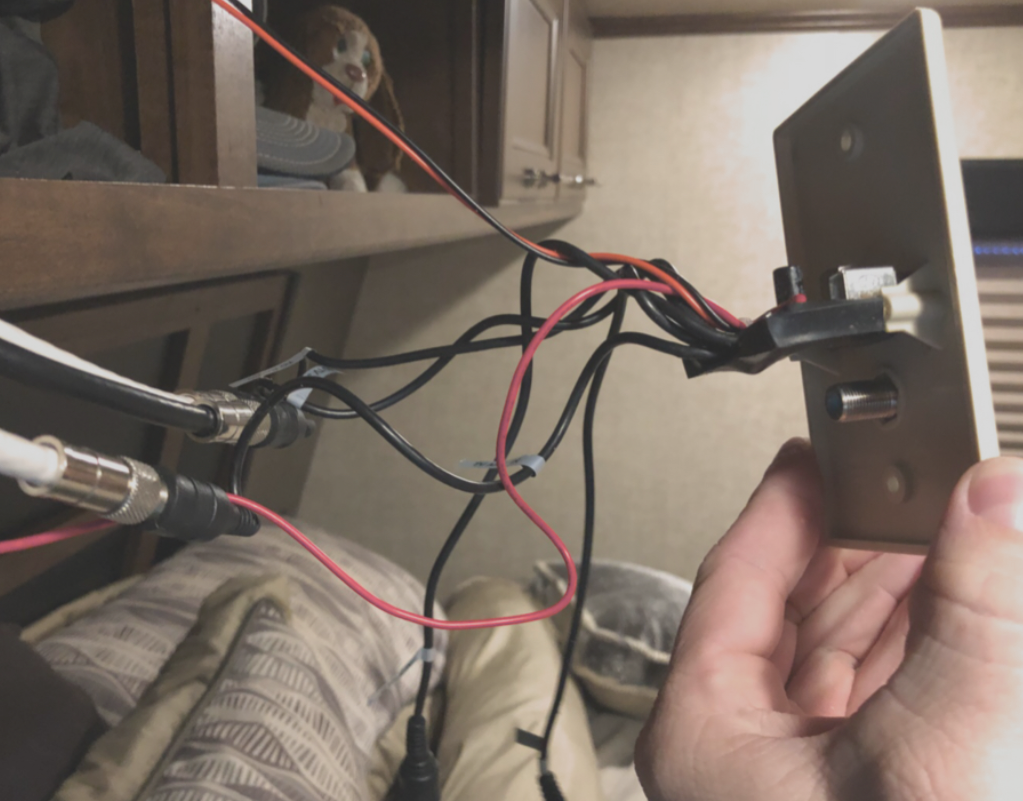
b) Check that all coax cable connections are snug and moisture-free. Look for any cuts, kinks, or corroded ends.
c) Make sure the antenna mast lock nuts are tightened to prevent rotation issues.
Any identified damage needs to be addressed before further troubleshooting.
2. Verify the Power Supply
Next, ensure power is actually reaching your booster –
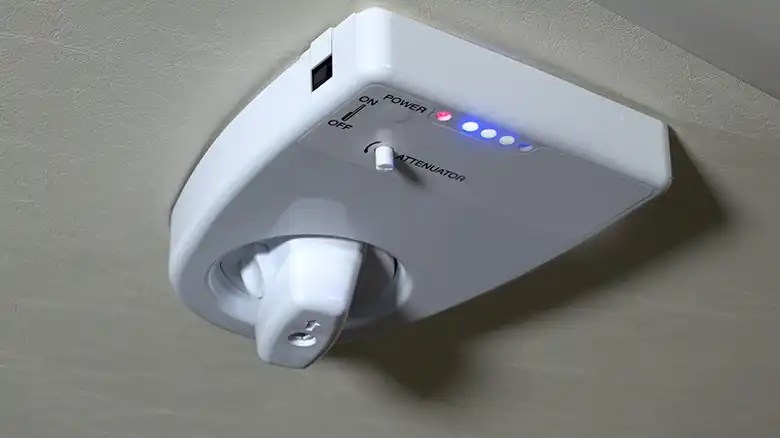
a) For built-in boosters, locate the power switch or indicator light (usually near the TV connection).
b) For external booster models, check for the powered “On” light on the booster body.
c) If no lights illuminate, check fuses and wiring continuity back to the 12V power source.
3. Measure the Voltage
If your antenna comes with built-in boosters –
a) Refer to the manufacturer diagram to locate the power input and output test points.
b) Set your multimeter to DC voltage mode, then touch the test probes to those points.
c) The input voltage should show approximately 12V. Output depends on the booster, but 12-15V is common.
d) A lower reading indicates an issue with the booster or connecting wiring.
4. Test Signal Strength
If your antenna has external boosters –
a) Connect a digital signal strength meter to the coax cable coming from the booster into the TV.
b) Scan through all available channels and note the signal strength readings with the booster on and off.
c) Compare the differences – a properly working booster will show a clear improvement in signal levels.
5. Examine the Coaxial Cable
If signal strength remains low, the last step is checking antenna cabling –
a) Disconnect the coax cable from both the TV and antenna/booster ends.
b) Attach your multimeter to the cable connectors – center pole and outer grounding sheath.
c) The quality cable will show continuity. No reading means the cable is faulty and should be replaced.
Following these troubleshooting steps will methodically pinpoint any booster issues.
Common RV Antenna Booster Issues and Solutions
If your RV antenna booster isn’t working, don’t worry. There are some common ways to fix it. If your booster is built into the RV, check the manual for help, and try resetting it. Make sure all the cable connections are secure by unplugging and plugging them back in. Look at the grounding wires and connections to the TV, antenna, and power supply, and clean and tighten them if needed. For older boosters, replacing some parts inside might make the signal better.
As a last option, get a new booster if the problems continue. Make sure it has the same power and connectors as the old one. With a working booster, your TV will have a clear signal even in weak areas. Remember to test your booster regularly before camping to avoid interruptions. This way, you can have a reliable RV experience without any issues.
Recommended Testing Equipment
Upgrading to quality tools and accessories can make periodic booster testing much easier. Here are some recommendations –
Digital Multimeter
A digital multimeter with diode check and continuity beep functions will make electrical testing quick and foolproof. The Fluke 115 model offers versatile functionality with renowned accuracy.
Signal Strength Meter
Measuring antenna signal levels makes it easy to validate booster effectiveness. Meters like the Ambient Weather WS-10-IND save guesswork by displaying numerical signal readings.
Booster Cleaning Kit
Oxidation buildup can degrade signal quality over time. Booster cleaning kits use non-abrasive foam swabs to safely remove corrosion inside connectors.
Coax Cable Crimping Tool
Installing replacement coax cable is straightforward with a crimping tool like the Klein VDV226-011. It ensures uniform compression for signal integrity.
Roof Grab Handles
Installing grab handles like the Stromberg Carlson CC-275 provides safe handholds for accessing roof-mounted antenna equipment.
Troubleshooting Tips for RV Antenna Boosters
Troubleshooting your RV antenna booster involves a systematic approach to identify and address potential issues. Begin by checking the power source to ensure the booster is receiving adequate power. Inspect the connections, including cables and connectors, for any signs of damage or corrosion. Verify that the antenna is properly aligned and extended for optimal signal reception. If the booster has a dedicated switch, ensure it is turned on. Test the booster with different TVs to rule out potential TV-related problems. If the issue persists, try a different campground or location to determine if external factors, such as interference or weak signals, are affecting performance. If all else fails, consult the user manual for specific troubleshooting steps or contact the manufacturer’s customer support for further assistance.
Frequently Asked Questions about Testing and Troubleshooting
Do I need special tools to test my RV antenna booster?
No expensive specialty tools are required. A basic digital multimeter and signal strength meter are sufficient for most testing needs. The manufacturer’s manual will specify any other necessary equipment.
How often should I test my antenna booster?
Aim to test before every road trip or at least once annually. More frequent testing is a good idea if you notice deteriorating TV reception while traveling.
My built-in booster has no indicator light – can I still test it?
Yes, use your multimeter to check for proper input voltage even without the indicator light. Refer to the unit’s manual for the precise test point locations needed.
What should I do if the replacement coax cable doesn’t resolve poor signal issues?
Inspect all antenna and booster connections again for damage. Also, consider upgrading to a higher gain booster model or installing a signal-amplifying in-line coax booster as an alternative.
Is it safe to manually test an RV antenna myself?
Exercise extreme caution when working at roof height. Consider having an experienced service technician complete testing if you have any concerns about safely accessing antenna components.
Final Thoughts
Don’t let a faulty antenna booster ruin your upcoming RV adventure. Following the simple troubleshooting process outlined here will quickly reveal if your booster needs attention. Catching any issues early on makes repairs far easier. With a fully functional booster amplifying signals, you can enjoy unlimited entertainment without distraction. Just be sure to schedule periodic retesting to keep those crystal clear channels coming in trip after trip. Your favorite shows will be ready and waiting, even in the middle of nowhere!

