As every seasoned RV owner knows, reliable furnace operation stands vital for comfortable camping during chilly weather. This humble appliance circulating warm air throughout compact living spaces makes otherwise unbearable hypothermia risks enjoyable. At the heart of lighting pilot flames and modulating blower speeds lies the aptly named “sail switch” – a finicky component prone to failure.
Replacing defective sail switches before enduring bone-chilling nights is pretty important. And here, I’m about to help you by identifying common sail switch symptoms, weighing DIY replacement options, sourcing correct parts, installation steps, and testing repaired furnaces. Whether you’re handy with pliers or more inclined to hire pros, let’s keep that cozy heat flowing!
Check Your RV Furnace Warranty Before Replacing the Sail Switch
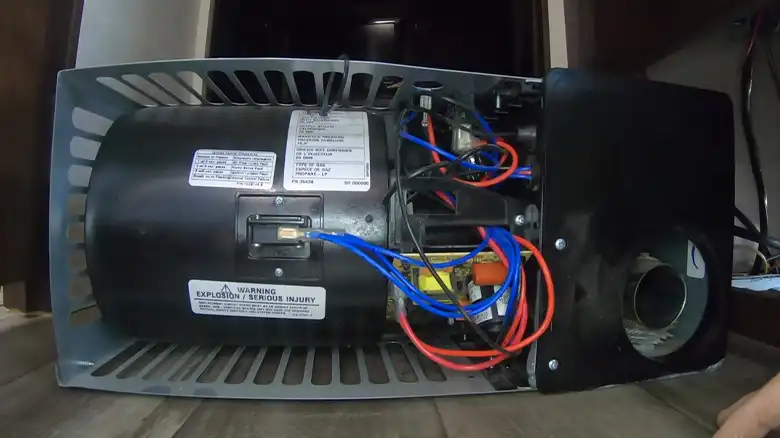
Responsible for sensing airflow and permitting gas ignition, the sail switch shuts off furnaces if duct blockages or blower failures occur to prevent dangerous gas accumulation. A temperature-sensitive bimetal switch also disables heating during overheating events. These safety mechanisms become non-functional when sail switches malfunction.
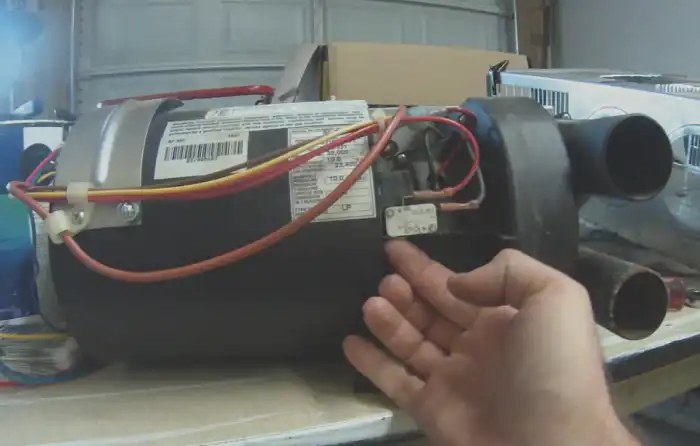
The aptly named device relies on a literal plastic sail measuring 2-3 inches long protruding into the blower’s airflow path. As the blower activates during a thermostat call for heat, airflow deflects the sail, which pivots a linked switch approving ignition. If airflow proves inadequate from obstructions, blower failure, or overloaded filters, the sail doesn’t trigger, stopping ignition.
Furnaces predominately use simple thermoplastic blade switches with adjustable sensitivity springs. More advanced electronic sail switches utilized in newer models detect exact airflow readings and temperatures, communicating digitally to control boards. We’ll focus on the common blade version found in most RVs needing periodic replacement.
DIY or Call In A Technician?
Before deciding whether to tackle replacing your furnace’s sail switch yourself or hire professional assistance, weigh several factors including your mechanical confidence working around gas appliances, the electrical complexity of your particular model, accessibility within cramped RV basements, tool availability, and part costs relative to service calls.
In general, swapping a basic sail switch involves fairly straightforward disconnecting electrical connectors and fastener removal/reinstallation with basic hand tools. For furnaces requiring substantial dismantling just to access components, paying an expert likely saves headaches. Additionally, safely handling gas and combustion means mistakes risk disastrous outcomes, so defer to experienced technicians if at all unsure.
On the other hand, component costs are reasonably inexpensive at around $25-50 for common switches. Diagnosis calls alone would exceed this amount before labor charges for simple swap-outs. For those comfortable working around electrical and gas systems, ordering the correct new sail switch and setting aside 30-60 minutes makes DIY replacement feasible. Just exercise extreme care and caution.
Check Your RV Furnace Warranty Before Replacing the Sail Switch
Before assuming all furnace repair costs yourself, check if the unit or individual parts remain under the original factory warranty or extended protection plans. Many motorhome manufacturers provide at least 1-3 years of coverage encompassing materials and workmanship defects on systems including appliances. More comprehensive extended plans through third parties like Good Sam even protect against wear and tear repairs.
While warranty coverage applies more broadly on newer model RVs, checking documentation proves worthwhile even on older systems. Read through furnished manuals to see if sail switches or blower components mention guaranteed lifespans. If unit ages exceed listed years, owners typically bear replacement costs regardless of actual operating hours accrued.
Warranty repairs also commonly require working through authorized dealer repair centers to utilize covered benefits. This means potential inspection appointments and scheduling delays if need immediate heating repairs during peak winter travel seasons. Weigh the convenience factor if opting to simply order affordable parts yourself online while troubleshooting appears straightforward.
How to Find the Right Replacement Sail Switch for Your Furnace
Seeking out an exact replacement sail switch matching your existing furnace avoids installation issues down the road. Note down the complete appliance model number printed on a sticker or metal plate most likely found on an interior panel once removing exterior vent covers. Distinct manufacturer and serial numbers assist in identifying your unit’s specifications.
Search these details online through part supplier websites or Google Image results to discover diagrams and parts breakdowns. Compare visual shapes and electrical connector styles to determine your specific sail switch requirements before purchasing anything. Some RV furnace manufacturers include Atwood, Suburban, Hydro Flame, and Intertherm.
Common online parts retailers worth browsing include pdxrvwholesale.com, amazon.com/rv-parts-and-accessories, rvpartsnation.com and rvupgradestore.com. Expect to pay between $25-60 for authentic factory replacement sail switches. Investing a few extra dollars guarantees proper furnace operation over cheap knockoff risks.
Troubleshooting Faulty Sail Switches in RV Furnaces
While dead furnaces immediately lead owners to start Googling “sail switch replacement near me”, first double-check for simpler root causes like disconnected wires, blown fuses, or routine maintenance oversights before assuming switch failures. Troubleshoot the following basic steps –
1. Inspect exterior vents and ducting for obstructions explain no airflow and ignition lockouts
2. Check blower functionality by setting the thermostat to fan-only mode
3. Remove cover panels to access furnace guts and check for loose electrical connections
4. Ensure propane tanks aren’t empty and supply valves allow gas flow
5. Remove blower assembly to clean debris or lubricate components if necessary
6. Monitor voltage at switch wire connections while operating the thermostat
If the furnace fails lighting after troubleshooting other potential issues, focus sail switch diagnosis. While running a call for heat, use product manuals to locate its position and watch closely for the airflow vane deflecting properly. If not responding correctly, replacement becomes necessary.
Professional RV technicians carry additional troubleshooting tools like multi-meters measuring exact volt readings during ignition sequences capable of indicating specific replacement parts based on any irregularities. Leave complex diagnoses to qualified pros if the simple steps above prove inconclusive.
Step-by-Step Instructions for Replacing the Sail Switch in Your Furnace
Once confirming your furnace requires sail switch replacement, ensure collecting all necessary tools before starting –
- Complete spark-proof toolbox or bag
- Non-contact voltage tester
- Needlenose pliers
- Variety of screwdrivers including Torx/Allen types
- Tacky mat for protecting existing furnace finishes
- Protective gloves, eyeglasses, ear protection
- Multimeter for testing connections
Then follow these best practice steps for safe installation –
Step 1. Turn off all RV electrical breakers and close propane valves – Any appliance repairs involving gas lines or ignition components justify precautionary total system shutdowns in case tools slip or fasteners release unexpectedly.
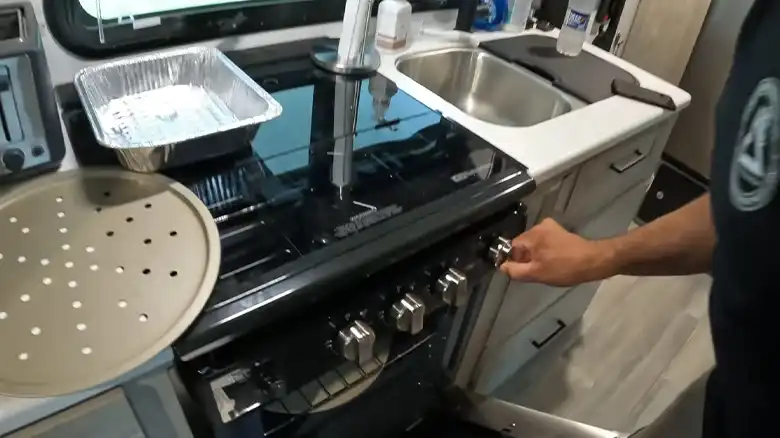
Step 2. Locate and access your furnace – Models mount in various basements, crawlspaces, or closets. Removing exterior vents, inner panels/grates or entire units sometimes proves necessary. Consult manuals for your specific chassis.
Step 3. Review wiring diagrams – Whether using digital or paper schematics, trace electrical connections from unit control boards to blower assemblies and sail switch hookups to understand your particular furnace’s wiring intricacies.
Step 4. Disconnect old sail switch – Identify connectors and use needle nose pliers to gently detach wires, labeling each grouping to ensure proper reinstallation. Unscrew or loosen any fasteners securing the switch itself without damaging surrounding components.
Step 5. Install replacement sail switch – Avoid bending electrical pins, ensure matched wire colors/gauge labels, screw fasteners snugly but not overtight, and test switch blade moves freely without scraping housing using a plastic stick.
Step 6. Reassemble loosened surrounding hardware – Replace any protective grating, close access panels, and reattach vent covers removed earlier to restore full unit integrity before testing repairs.
Step 7. Restore electrical power and propane supply – With everything reassembled safely, restore utility hookups to enable firing up the repaired furnace. Monitor closely for any issues upon first ignition.
Step 8. Test the thermostat and heat functionality – Walk through several heating cycles while carefully checking sail switch response to airflow, audible blower functionality, proper burner ignition, and shutdown sequencing to ensure flawless repairs.
Following meticulous step-by-step installation practices reduces the chances of overlooking loose connectors or making dangerous gas-related mistakes. Take things slowly and leverage all available reference materials related to your exact furnace whenever doubts arise.
Safety Tips and Ongoing Maintenance for Your RV Furnace
While sail switch upgrades make retrieving needed warmth again possible, keeping furnaces operating reliably over years of continued use requires ongoing diligence addressing other common maintenance needs simultaneously –
a) Carefully inspect propane lines and fittings for corrosion leaks before lighting pilots
b) Ensure blower assemblies spin freely without excessive noise indicating worn bearings
c) Check that high-limit temperature fuses show no signs of tripped failure
d) Remove debris around ducting external vents potentially obstructing strong airflow
e) Replace air filters as recommended to prevent straining blower motors
f) Consider installing propane and smoke alarms nearby for extra precaution
Responsible furnace handling also means understanding inherent dangers. Propane gas produces odorless carbon monoxide if exhausted incompletely through malfunctioning vents. Never ignore symptoms like headaches or lethargy during furnace operation. Always shut down units showing any signs of fuel leaks or improper combustion until technicians verify safety.
Useful Resources for RV Furnace Repair and Maintenance
Seeking further assistance identifying furnace issues, finding replacement parts, or hiring certified repair professionals means leveraging available internet resources –
Manufacturer Support Pages
Most RV appliance brands host model-specific listings with manuals, wiring diagrams, authorized dealers, and maintenance guidance assisting DIY repairs.
Online Parts Diagrams
RV parts retailers display helpful breakdown schematics with labeled components for common furnace models assisting in parts identification.
Video Tutorials
Skilled YouTubers like “AboutTheCotters” and “MyRVWorks” share step-by-step repair demonstrations on replacing various furnace parts to build confidence.
RV Technician Directories
Sites like RVServiceDirectory.com and ASAmech.com help locate certified repair professionals throughout North America specializing in complex appliance repairs.
RV Owner Forums
Active communities of road warriors volunteer detailed troubleshooting and repair advice based on their own experiences over forums seeking help identifying issues.
Bringing Back the Warmth: Completing Your Sail Switch Replacement
RVs enable exploring beautiful horizons through every season thanks to compact yet critical appliances like trusty furnaces circulating cozy warmth on demand. Ensure keeping camps comfortable overnight by addressing common sail switch malfunctions promptly before facing deep freezes. Confidently weigh DIY replacement options against hiring professional assistance using details throughout this guide. Most importantly, stay proactive on preventative maintenance for a lifetime of happy camper mobility ahead!
Common FAQs
Why does my furnace turn on but not ignite?
If the blower activates but no ignition occurs, the sail switch likely fails to detect airflow, not triggering gas flow. Verify the sail moves freely and connects properly during heating calls. Other causes can include clogged ducts, blower failures, or loose wiring.
Do all RV furnaces have sail switches?
Nearly all RV furnaces utilize sail switches for air movement and gas valve activation safety, especially models fueled by propane. However, some ultra-efficient electric furnaces instead rely on electronic speed sensors to monitor fan operation rather than physical wind vanes. But sail switches prevail across gas models.
How do I locate the sail switch inside my RV furnace?
Consult your product manual for model-specific guidance, but typically sail switches mount near blower housings to intercept air movement. Accessing them requires removing exterior venting and inner cover panels, often needing full furnace extraction. Take pictures of connections and label wiring during disassembly to simplify reinstallation.