
As an avid RVer, I’ve faced my fair share of maintenance challenges over the years. One of the most daunting tasks I encountered was replacing my RV’s water heater. I remember standing there, staring at the old unit, feeling a mix of determination and apprehension. I know how intimidating this project can seem, but I’m here to tell you that with the right guidance, tools, and a bit of patience, you can definitely tackle this job yourself.
In this comprehensive guide, I’ll walk you through my personal experience of replacing an RV water heater, sharing the tips and tricks I picked up along the way. Whether you’re dealing with an aging unit that’s seen better days or looking to upgrade to a more efficient model, this step-by-step tutorial will help you navigate the process with confidence. So, let’s roll up our sleeves and get your hot water flowing again!
Evaluating Your RV’s Water Heater Needs
Before I even picked up a wrench, I took some time to evaluate my RV’s water heater needs. This crucial first step helped me make informed decisions about the replacement process. I started by considering the age of my current water heater. Mine was pushing 10 years old, which is typically when these units start to show signs of wear and reduced efficiency.
Next, I reflected on how frequently we used our RV and any performance issues we’d been experiencing. In our case, we’d noticed longer heating times and some inconsistent water temperatures during our last few trips. These were clear signs that our water heater was struggling to keep up with our needs.
I also researched the energy efficiency of newer models. Technology has come a long way in recent years, and I was pleasantly surprised to find that newer units could potentially save us money on propane or electricity in the long run.
Another important factor I considered was the tank material. My old unit had an aluminum tank, which had served us well, but I learned that porcelain-lined steel tanks offer better corrosion resistance and can extend the life of the water heater. This discovery led me to seriously consider upgrading to a model with this type of tank.
Tank capacity was another consideration. While the standard 6-gallon size had been sufficient for our needs, I knew that larger options were available. I weighed the benefits of increased capacity against the space constraints in our RV.
Lastly, I thought about the fuel type. Our old unit was propane-only, but I looked into dual propane/electric models for added flexibility. After careful consideration, I decided to upgrade from my older Atwood 6-gallon aluminum tank to a Suburban Advantage 6-gallon model with a porcelain-lined steel tank. This choice offered better corrosion resistance and promised a longer lifespan, which I felt justified the investment.
Essential Tools and Supplies for RV Water Heater Replacement
With my decision made, I knew it was time to gather all the necessary tools and materials for the job. I’ve learned from experience that having everything on hand before starting makes the process much smoother and prevents frustrating mid-project trips to the hardware store.
For tools, I made sure I had both Phillips and flathead screwdrivers, as different screws would require different heads. An adjustable wrench and a pipe wrench were essential for dealing with various fittings and connections. I also grabbed some Teflon tape and plumber’s tape for sealing connections and preventing leaks.
A voltage tester was a must-have for safely checking electrical connections. I also included a pair of pliers in my toolkit, which proved invaluable for gripping and turning small parts. While I hoped I wouldn’t need it, I also had a pipe cutter on hand just in case I needed to adjust any water lines.
As for materials, the star of the show was, of course, my new Suburban Advantage 6-gallon water heater. I also picked up some replacement fittings, knowing that old ones might be corroded or damaged during removal. Pipe insulation was on my list to help improve energy efficiency once the new heater was installed.
I made sure to get RV-specific pipe sealant, as regular plumbing sealant might not hold up to the vibrations and temperature changes an RV experiences. Butyl tape and silicone sealant were crucial for ensuring a watertight seal around the water heater’s exterior access panel.
Lastly, I picked up some new cone washers for the water line fittings. These small rubber washers play a big role in preventing leaks, and I didn’t want to reuse the old ones.
With my toolkit assembled and materials gathered, I felt prepared to tackle the task ahead. Having everything ready beforehand gave me confidence and helped the entire process go more smoothly.
Safety First: Precautions Before Starting
Before I even thought about removing the old water heater, I knew I had to prioritize safety. Working with both water and potential gas or electrical connections means taking extra precautions to prevent accidents or damage to your RV.
I started by locating the circuit breaker for the water heater and switching it off. Even though my old unit was propane-powered, I didn’t want to take any chances with residual electrical current. For those with electric or dual-fuel water heaters, this step is absolutely critical.
Next, I turned my attention to the propane supply. I went to our propane tank and turned the main valve to the OFF position. This step is crucial for preventing any gas leaks during the replacement process. If your RV has multiple propane appliances, you might have a separate shutoff valve for the water heater – make sure to turn this off as well.
After dealing with the power sources, I focused on the water supply. I located the main water supply valve, which on my RV is near the water hookup inlet on the exterior. I turned this valve clockwise until it was fully closed, shutting off water to the entire RV. This step prevents any water from flowing into the system while you’re working on the water heater.
With the power, gas, and water all shut off, I felt much more at ease about proceeding with the project. However, I knew that even with these precautions, it was important to remain vigilant throughout the process. Safety isn’t just a first step – it’s an ongoing priority throughout any RV repair or upgrade project.
Drain Your Old Water Heater: A Guide to Smooth Removal
With all the safety measures in place, I was ready to start the actual work of replacing the water heater. The first task was to drain the old unit completely. This step requires some patience, but it’s crucial for preventing a big mess and potential water damage to your RV.
I began by locating the drain valve at the bottom of the tank. On my unit, it was a small petcock valve near the bottom corner. I attached a garden hose to this valve, making sure it was secure, and ran the other end of the hose to a safe drainage area away from the RV.
Before opening the drain valve, I knew I needed to relieve the pressure in the tank. I located the pressure relief valve on top of the water heater and carefully opened it. This allows air to enter the tank, which is necessary for the water to drain properly. I placed a bucket under this valve to catch any water that might come out.
With the pressure relieved, I opened the drain valve and watched as the water began to flow out through the hose. At first, it came out quite quickly, but as the tank emptied, the flow slowed to a trickle. I learned from experience that it’s important to be patient and wait until the tank is completely empty. Even a small amount of water left in the tank can make a big mess when you’re trying to remove the unit.
While the tank was draining, I took the opportunity to inspect the water coming out. In my case, I noticed some sediment, which is normal, especially in older units. This observation reinforced my decision to replace the water heater, as built-up sediment can reduce efficiency and shorten the lifespan of the unit.
After what seemed like an eternity (but was probably only about 15-20 minutes), the flow of water finally stopped. I gave it a few extra minutes just to be sure, then closed both the drain valve and the pressure relief valve. With the tank empty, I was ready to move on to the next step: disconnecting and removing the old water heater.
Disconnecting Your Old Water Heater Safely”
With the old water heater drained, I was ready to disconnect it and remove it from the RV. This step requires careful attention to detail to ensure all connections are properly disconnected and to prevent damage to surrounding components.
I started with the gas connection. Even though I had already turned off the gas supply at the tank, I knew it was important to properly disconnect and cap the gas line. Using a pipe wrench, I carefully loosened the gas line connection at the water heater. Once it was loose, I unscrewed it by hand and immediately capped the open end of the gas line with a flare cap to prevent any residual gas from escaping.
Next, I turned my attention to the water connections. Using an adjustable wrench, I loosened the fittings on both the hot and cold water lines where they connected to the water heater. These connections can sometimes be quite tight, especially if they haven’t been disturbed in years, so I made sure to use steady, controlled force to avoid damaging the fittings or the surrounding pipes.
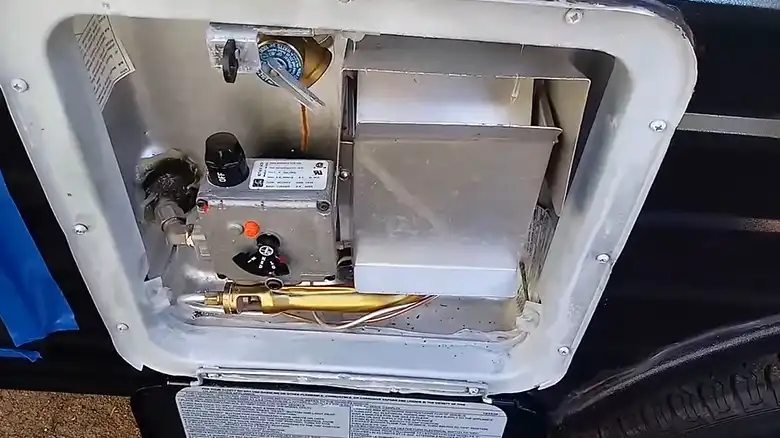
With the gas and water disconnected, I moved on to the electrical connections. In my case, there was a simple 12V connection for the igniter. I removed the cover plate to access the wires, then carefully disconnected them, making sure to label each wire so I would know how to reconnect them to the new unit later.
Before I could remove the water heater itself, I needed to deal with the exterior access panel. I removed the screws holding it in place and set it aside. Then, I used a utility knife to carefully cut through any sealant around the edges of the water heater where it met the RV wall.
Finally, I was ready to remove the water heater. I enlisted the help of a friend for this part, as the unit can be quite heavy. We carefully unscrewed the mounting screws holding the water heater in place, then slowly worked it out of the opening. It took some maneuvering, but we eventually got it free.
As we removed the old unit, I made sure to inspect the opening in the RV wall. I noticed some areas where the insulation had compressed or shifted over time, and made a mental note to address this when installing the new unit.
With the old water heater out, I felt a sense of accomplishment. But I knew the job was only half done – now it was time to prepare and install the new unit.
Preparing the New Water Heater for Installation
With the old water heater removed, I turned my attention to preparing the new Suburban Advantage unit for installation. This preparatory stage is crucial for ensuring a smooth installation process and preventing future issues.
First, I carefully unpacked the new water heater and gave it a thorough inspection. I checked for any signs of damage that might have occurred during shipping, such as dents or cracks. Fortunately, my unit looked perfect.
Next, I focused on the fittings. I removed the inlet and outlet fittings from my old water heater, as these would need to be transferred to the new unit. I cleaned them thoroughly, removing any old sealant or debris. Then, I applied a generous amount of pipe dope (thread sealant) to the threads of these fittings. Some RVers prefer to use Teflon tape for this purpose, but I’ve found that a good quality pipe dope provides a more reliable seal for water heater applications.
I carefully screwed these fittings into the corresponding ports on the new water heater, making sure they were positioned correctly to align with my RV’s existing water lines. It’s important not to overtighten these fittings – snug is good, but too tight can damage the threads or the tank itself.
Next, I turned my attention to the gas connection. My new unit came with a gas valve already installed, but I needed to make sure it was compatible with my RV’s gas line. In my case, it was a perfect match, but it’s worth noting that sometimes an adapter might be necessary.
I also took this opportunity to install the pressure relief valve that came with the new water heater. This important safety device prevents excessive pressure buildup in the tank. I applied pipe dope to the threads and carefully screwed it into place, making sure it was oriented correctly according to the manufacturer’s instructions.
Lastly, I checked that all the electrical connections on the new unit were secure. My new Suburban Advantage heater had a control board for the propane ignition system, and I made sure all the wires were properly connected and that the board was securely mounted.
With all these preparations complete, I felt confident that my new water heater was ready for installation. Taking the time to properly prepare the new unit is a crucial step that can prevent leaks and ensure optimal performance once everything is hooked up.
Installing Your New Water Heater: A Practical Guide
With the new water heater prepared, it was time for the main event – installation. This step requires patience, precision, and attention to detail to ensure everything is properly secured and sealed.
I started by addressing the opening in the RV wall where the water heater would sit. Earlier, I had noticed some issues with the insulation, so I took the time to add some new insulation where needed. This not only helps with energy efficiency but also provides a better seal against the elements.
Next, I applied a generous bead of butyl tape around the perimeter of the water heater’s flange. This creates a watertight seal between the heater and the RV wall, preventing any water intrusion. I made sure to apply it evenly and without any gaps.
With the help of my friend, we carefully lifted the new water heater and positioned it in the opening. This part can be tricky, as you need to align the unit correctly while also feeding the gas line and electrical wires through their respective openings. We took our time, making sure everything was lined up properly before pushing the unit fully into place.
Once the water heater was in position, I secured it to the RV wall using the provided mounting screws. I made sure to use all the screw holes, tightening each one gradually to ensure even pressure around the perimeter. It’s important not to overtighten these screws, as this can deform the flange and compromise the seal.
With the unit securely mounted, I turned my attention to the connections. I started with the water lines, carefully connecting the hot and cold water pipes to their respective fittings on the water heater. I used two wrenches for this – one to hold the fitting steady and another to tighten the connection. This prevents any twisting that could damage the water heater or the pipes.
Next, I connected the gas line. I carefully aligned the flare fitting on the gas line with the connection on the water heater’s gas valve, then tightened it securely using a wrench. It’s crucial to get this connection right to prevent any gas leaks.
For the electrical connection, I referred to the labels I had made earlier when disconnecting the old unit. I carefully connected each wire to its corresponding terminal on the new water heater, making sure each connection was tight and secure.
Finally, I reinstalled the exterior access panel. Before screwing it into place, I applied a bead of silicone sealant around the edge of the opening to create an additional barrier against water intrusion. I then carefully positioned the panel and secured it with screws.
With the new water heater installed and all connections made, I felt a sense of accomplishment. However, I knew the job wasn’t quite finished yet – it was time to test everything and make sure it all worked properly.
Testing Your Installation and Troubleshooting Common Issues
With the new water heater installed, it was time for the moment of truth – testing to make sure everything was working correctly and safely. This final stage is crucial and not to be rushed.
I started by turning the water supply back on. I opened the main water valve slowly, listening carefully for any sounds of leaks. Once the water was fully on, I went inside the RV and opened all the hot water taps. This helps purge any air from the system and allows the tank to fill completely. I watched carefully for any signs of leaks around the water heater connections.
Once water was flowing smoothly from all taps with no air sputtering, I closed them and did a thorough inspection of all water connections, both at the water heater and under the sinks. I was looking for any signs of moisture or drips. Thankfully, everything looked dry.
Next came the gas connection test. This is a step you absolutely don’t want to skip or rush. I turned on the propane at the main tank and used a spray bottle filled with soapy water to thoroughly coat all gas connections. I watched carefully for any bubbles forming, which would indicate a gas leak. I was relieved to see no bubbles at all.
With the water and gas connections verified, it was time to actually fire up the water heater. I made sure the tank was full, then turned on the propane switch for the water heater. I listened for the sound of the igniter clicking and the burner igniting. After a few clicks, I heard the reassuring whoosh of the burner lighting up.
I let the water heater run for about 20 minutes, then checked the hot water at the tap. To my delight, hot water flowed out, indicating that the heater was working as it should. I used a thermometer to check the water temperature, aiming for around 120°F for safety and efficiency.
During this testing phase, I kept a close eye (and nose) out for any unusual sounds, smells, or behavior from the water heater. I was pleased to find that everything seemed to be operating normally.
However, I know from experience that sometimes issues don’t show up immediately. That’s why I made a point to check on the water heater regularly over the next few days, looking for any signs of leaks, unusual odors, or inconsistent performance. I also made sure to test the pressure relief valve, as this is a crucial safety feature.
It’s worth noting that if you do encounter any issues during testing, it’s important to address them immediately. Common problems might include failure to ignite, water leaks, or inconsistent heating. Most of these can be resolved by double-checking connections, ensuring proper venting, or consulting the manufacturer’s troubleshooting guide. If you’re ever in doubt, don’t hesitate to call in a professional.
Finishing Touches: Insulation and Clean-Up Tips
With the new water heater installed and functioning correctly, I turned my attention to some final touches that would improve efficiency and complete the job.
First, I focused on insulation. Proper insulation can significantly improve the efficiency of your RV water heater, helping to maintain water temperature and reduce energy consumption. I carefully wrapped the exposed hot water pipes leading from the heater with foam pipe insulation. This helps minimize heat loss as the hot water travels through the RV.
I also took a moment to check the insulation around the water heater compartment itself. Good insulation here can help protect the unit from extreme temperatures and improve overall efficiency. I added some additional insulation where I felt it was needed, being careful not to block any vents or cover any electrical components.
Next came the clean-up phase. I gathered all the tools and materials I had used, wiping them clean before putting them away. I swept out the water heater compartment, removing any debris that had accumulated during the installation process.
I also took this opportunity to update my RV’s maintenance log. I recorded the date of installation, the model of the new water heater, and any specific notes about the installation process. This information can be invaluable for future maintenance or if I ever need to troubleshoot issues down the road.
Lessons Learned and Final Thoughts
Replacing my RV water heater was certainly a challenge, but it was also an incredibly rewarding experience. Not only did I save money on labor costs, but I also gained a deeper understanding of how this crucial system in my RV works.
One of the biggest lessons I learned was the importance of preparation. Having all the right tools and materials on hand, understanding the process before starting, and taking the time to carefully complete each step made a huge difference in the success of the project.
I also gained a new appreciation for the importance of regular maintenance. Many of the issues that lead to water heater failure can be prevented or at least delayed with proper care. Moving forward, I plan to flush my water heater regularly, check connections for leaks, and keep an eye out for any signs of corrosion or wear.
For fellow RV enthusiasts considering tackling this project themselves, I would offer this advice: Don’t rush. Take your time with each step, double-check your work, and don’t hesitate to ask for help if you need it. The satisfaction of completing this project yourself is well worth the effort.
Remember, safety should always be your top priority. If at any point you feel uncomfortable or unsure about what you’re doing, it’s okay to call in a professional. It’s better to ask for help than to risk injury or damage to your RV.
Conclusion
In conclusion, replacing your RV water heater is a manageable DIY project that can save you money and give you a great sense of accomplishment. With careful planning, the right tools, and a methodical approach, you can successfully upgrade this essential component of your RV. Here’s to many more comfortable and enjoyable RV adventures ahead, complete with reliable hot water!
Happy camping, and enjoy that well-earned hot shower in your RV!

