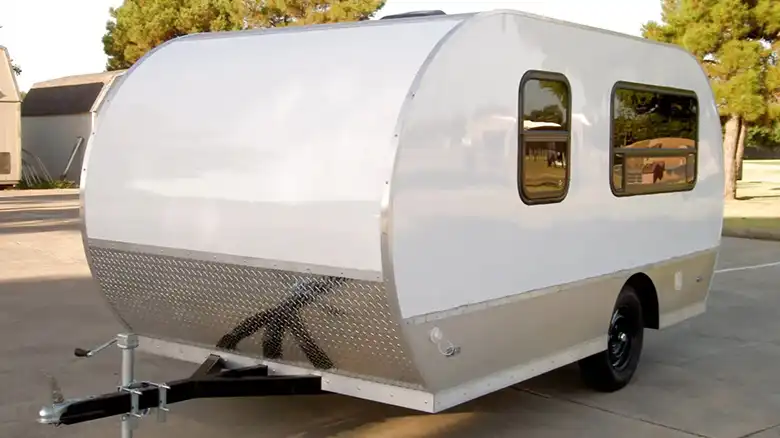
The day I received my Starlink RV kit in the mail was one of great excitement. After months on the Starlink waitlist, I was eager to finally experience the power of SpaceX’s low Earth orbit satellites. While designed for RVs and mobile use, I chose the RV option for installation at my rural home. With no access to cable or fiber broadband, the thought of having fast, reliable internet without relying on sluggish DSL or cellular hotspots filled me with anticipation.
This guide will provide a detailed, user-friendly walkthrough for installing your Starlink RV equipment for seamless connectivity at home. It covers everything from equipment needs and setup to providing speed tests and performance reviews, regardless of using a traditional portable or new in-motion configuration.
Simply put, for optimal Starlink dish performance at home, elevate it on the rooftop using a tripod stand, securing it with lag bolts and adding weight for stability. Wire the 75ft cable through a drilled hole, cable bridges, or a roof hatch. Power options include solar panels or grid power with a router switch for control. Test the connection by connecting to Starlink WiFi, monitoring metrics, and conducting speed tests for speeds ranging from 50Mbps to over 200Mbps.
Starlink RV: Essential Equipment for Home Installation
The core equipment in the Starlink RV kit contains a few key differences from the standard residential kit to account for its mobile nature. Here’s an overview of what’s included –
- Portable, compact oblong dish with enhanced GPS capabilities
- Smaller tripod mount with a wider base for added stability
- 75′ of coaxial cable to provide more length for exterior routing
- WiFi router with the ability to pause/unpause the connection
- Two adapter options – 110V/240V power supply and an RV/boater cable
The wider tripod and extended cable allow flexibility in dish placement for those using it at home. The standard residential kit lacks those mobile-friendly enhancements. Both RV and residential hardware contain the essentials like the dish, mount, router, and cables. However, the RV equipment caters to versatility and the additional demands of maintaining connections on the move.
Starlink RV Setup for Home Use: Step-by-Step
Once you unpack all the components, it’s time to set up your Starlink RV hardware for use as a home internet connection. Follow these steps for proper installation –
Choosing the Best Location for Your Starlink Dish
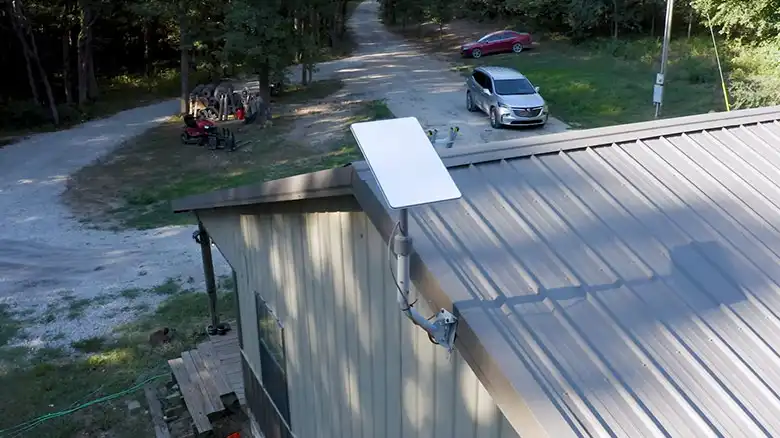
The key factor in selecting your Starlink dish location is ensuring an unobstructed view of the sky. The Starlink app provides an augmented reality view that assists with finding areas of open visibility. Positioning on a rooftop or higher elevation works best to avoid interference from trees and structures. Make sure your desired location allows the dish to face upward with no major obstructions from any direction.
Stabilizing and Securing Your Starlink Dish for Home Use
After identifying the optimal spot, place the tripod stand and securely mount the Starlink dish. Having it elevated on the rooftop is ideal, allowing you to take advantage of the wide tripod base for maximum stability. Use securing bolts on the feet if attaching to a roof or platform. The dish must maintain an upright, vertical position so it can move and tilt unhindered as it tracks passing satellites overhead.
Complete Guide to Installing Starlink RV at Home
With equipment fully prepped and dish location selected, you’re ready to install. Follow these steps to get your Starlink RV hardware successfully connected for residential use.
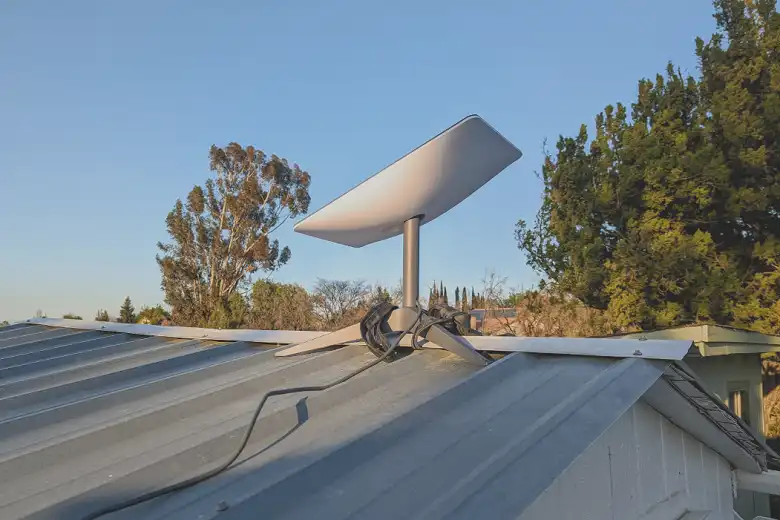
Mounting the Dish for Maximum Stability
Securing your Starlink dish in an elevated rooftop position is recommended for optimal satellite visibility. Here are some tips for mounting –
Step 1: Use the tripod stand’s built-in level to ensure an upright, vertical dish orientation. Adjust the feet as needed to find even footing.
Step 2: Secure the tripod feet once in the desired position. Use lag bolts to firmly anchor it to the roof or platform if possible. Having the base tightly attached allows the dish to tilt with minimal movement of the stand.
Step 3: Consider adding weight like sandbags or bricks if the tripod doesn’t provide enough stability on its own on a particular surface. The key is avoiding excessive motion.
If elevating the dish isn’t feasible, you can opt for alternative temporary mounting methods –
a) A patio tripod stand allows positioning flexibility and keeps the dish vertical but sacrifices elevation.
b) Sitting the tripod feet on cinder blocks adds stability and raises the dish higher when ground mounting.
c) Attaching the dish mount to a sturdy pole can provide roof-level height when a roof install isn’t possible. Just ensure it’s braced firmly.
The goal is to maximize both stability and visibility when situating your dish. Feel free to get creative within the bounds of safety and by following Starlink guidance.
Routing and Securing the Data Cable
With the dish firmly set up, the next step is routing the 75ft data cable from the roof location down into your home. There are a few options depending on preferences and house setup –
Step 1: For easy roof access, you can drill a small hole just wide enough to fit the cable through before sealing it with exterior caulk. Choose an inconspicuous spot like under an eave or near the roof edge.
Step 2: If drilling isn’t possible, roof-to-house cable bridges can cleanly route the line from roof to wall while protecting it from the elements.
Step 3: For homes with roof hatches, running the cable through the attic and down through the hatch avoids exterior holes completely. Use hangers to securely attach it overhead.
Step 4: Wall-mounted data boxes give you a weatherproof cable connection point to route inside while maintaining insulation seals.
No matter the path, take care to securely fasten the line overhead while avoiding kinks and bends in the cable. Using grommets when passing through the wall helps prevent damage. Follow all penetrations with ample weatherproof sealing to prevent moisture intrusion. Take advantage of the 75ft length when routing to give yourself plenty of flexibility.
Powering Starlink: Home Wiring Essentials
Powering your Starlink RV equipment at home requires a bit of electrical work since you’ll be using a fixed indoor power source rather than the RV or boat connections.
Step 1: For eco-friendly operation, you can use an off-grid power source like solar panels and route that to an indoor converter supplying 110V AC power. This avoids taxing your electrical system.
Step 2: Install a router switch to conveniently turn it on and off without unplugging. Allowing the system to fully power down helps maximize energy efficiency.
For grid power, plug the Starlink power supply into an indoor 110V outlet near your router location. Avoid using an extension cord to provide ample power to the system. Then connect the router’s attached power cable to the brick. Once everything is wired, fire up the router to begin the satellite search process. Having sufficient length on the cable allows finding the optimal router position in your home. With power connected, it will automatically initiate dish calibration.
Testing and Optimizing Your Connection
After completing the setup, it’s time to reap the benefits of your efforts by testing and experiencing ultra-fast satellite internet.
Step 1: On your phone, connect to the Starlink WiFi signal broadcast from the router. Then launch the Starlink app and follow the on-screen instructions to complete login and account activation.
Step 2: Once connected, closely monitor the app to view signal strength, obstruction visibility, and other metrics that provide insight into dish performance.
Step 3: Conducting periodic speed tests will also quantify performance. Tap into that low Earth orbit satellite speed and run tests at a site like fast.com or Speedtest.net to measure download and upload speeds.
Expect to see speeds ranging from 50Mbps to over 200Mbps, with sub-20ms latency in ideal conditions. Your speeds may fluctuate at first as the system optimizes connectivity. Within a day or so of calibration, you should achieve consistent, fast speeds marking a major upgrade from DSL, cellular, or geosynchronous satellite internet.
Comprehensive Starlink RV Performance Review
After several weeks of use, I’m very impressed with the performance of my Starlink RV kit for in-home internet access. The freedom to position the dish in an unobstructed rooftop location has provided near-constant uptime and consistently fast speeds.
The typical performance ranges from 50 – 150 Mbps down and 5 – 20 Mbps up. Latency stays under 30ms outside of peak usage hours when it may rise slightly. This grants the ability to stream 4K video, games online, and conduct video calls reliably. Large downloads take minutes rather than hours.
The ability to pause my connection when traveling and having it automatically resume upon returning home is also invaluable. I can maintain internet continuity between locations with no service transfer delays. My DSL and LTE backups feel archaic by comparison.
That said, there are some drawbacks to note. The connection stability may falter during congested evening hours as more satellites become overloaded with users. This causes speeds to dip periodically. Frequent firmware updates can also temporarily slow the system as new capabilities are added.
There are also the costs of the hardware kit and a $135 per month subscription to consider. While pricy for rural users lacking options, it remains far cheaper than old satellite internet services. Overall, the increases in performance and reliability outweigh any negatives, making Starlink RV an easy choice for home installation.
Starlink RV Mounting Solutions for Home
Taking advantage of your home’s design when mounting the Starlink router can lead to cleaner installs –
a) For an accessible connection, install it inside using the wall mount bracket to position it near a hatch. Run an ethernet cable from the router to your indoor devices.
b) Hatch enclosures that house the router allow passing the cables through while offering weather protection.
c) You can also mount the router outdoors close to the dish using a weatherproof enclosure. Then run ethernet inside to a switch.
Think through cable routing carefully to achieve the cleanest installation possible.
People Also Ask
Can I convert my Starlink RV service to residential later on?
Yes, you can change to a standard residential subscription at any time for no additional hardware cost by contacting Starlink support. The only change is a higher $500 equipment fee.
How long does the setup process take?
Expect the dish to complete its initial satellite acquisition and calibration in about 1-2 hours after plugging in the router. Peak speeds may take 12-24 hours to fully optimize.
What hardware differences matter for home use?
The wider tripod base, longer cable, and power supply adapters in the RV kit provide key benefits for versatility in-home installation.
Does pausing work the same if I mount at home?
Yes! Pause and unpause your service anytime without repositioning the dish. This unique feature works the same whether stationary or mobile.
End Note
Installing your Starlink RV kit for use as a home internet connection involves just a few key steps. Securely mounting the dish in an elevated, unobstructed position is the most critical task. Connecting the extended cables for power and data routing provides room for flexibility based on your home’s configuration. Once powered on, the hassle-free setup gets you connected rapidly thanks to the smart satellite tracking capabilities.
Following this guide closely as you begin your installation ensures every detail is covered. Applying these tips and tricks will have your Starlink RV equipment seamlessly providing fast, reliable satellite internet access in your home in no time. Finally, enjoy the online freedom you deserve through a simple rooftop upgrade. And with pause/resume functionality, Starlink RV allows you to stay connected to your home system anywhere.