
An RV is a pretty convenient option for long trips or camping. It has almost all the accessories and power supply to make it a mini home. In terms of power supply, an RV has power outlets and a 12V battery system. But sometimes even though the RV outlets work fine, the RV lights won’t work.
This article aims to provide a systematic approach to troubleshooting this specific issue, empowering you, as an RV owner, to diagnose and potentially rectify the problem. We will explore potential causes, outline a step-by-step troubleshooting guide, and offer valuable tips for maintaining a healthy electrical system within your RV.
Common Reasons RV Lights Stop Working Despite Active Outlets
There are a few reasons why this happens:
Checking for a Tripped Circuit Breaker
Think of circuit breakers as safety switches. If too many appliances are drawing power on one circuit, the breaker trips to prevent a fire hazard. Check your RV’s breaker panel (usually near the entry door) for a switch in the “off” position. Reset it by flipping the switch firmly back to “on.”
How to Diagnose Converter Issues
Your RV’s converter is the unit responsible for transforming incoming AC power (from the campground) to DC power that runs your lights and other 12-volt appliances. If the converter malfunctions, your lights won’t get the juice they need.
Identifying Fuse Problems
Fuses are another safety measure, designed to blow if a circuit experiences a surge. Both the converter itself and the lighting circuit might have fuses. Consult your owner’s manual to locate them (they’re usually near the converter or behind the light switch panel).
GFCI Shutdown: What It Means for Your RV Lights
Ground Fault Circuit Interrupters (GFCIs) are special outlets that shut down power in case of a ground fault, preventing shocks. If a GFCI trips, it can cut power to other outlets on the same circuit, including some lights. Look for outlets with “test” and “reset” buttons. Try pressing the “reset” button to see if it restores power.
Detailed Guide: Troubleshooting RV Electrical Issues
Ready to get those lights back on? Here’s a step-by-step approach:
- Check Breaker Panel: Start by checking your RV’s breaker panel. Look for a tripped breaker, especially one labeled “converter” or “lights.” If you find one, simply flip the switch back to “on.”
- Check the Converter: Unfortunately, troubleshooting a faulty converter can get a bit technical. If you’re comfortable with electrical work and have a multimeter, you can try checking for voltage at the converter’s output. However, for most folks, it’s best to call in a professional RV technician for this step.
- Check the Fuse: If you suspect a blown fuse, refer to your owner’s manual to locate the relevant fuse panel (it might be near the converter or behind the light switch panel). Look for a broken filament inside the fuse – that’s your giveaway. Remember, only replace fuses with ones of the same amperage rating.
- Check GFCI Outlets: Many RVs have GFCI outlets in bathrooms and kitchens. If a GFCI trips, it can affect other outlets on the same circuit, including some lights. Look for outlets with “test” and “reset” buttons. Try pressing the “reset” button to see if it restores power. If it trips again repeatedly, consult a professional.
Pro Tips
Here are some bonus tips to keep your RV’s electrical system up and running for longer:
- Your RV’s owner’s manual is a goldmine of information, including details about your specific electrical system and fuse locations. Keep it handy.
- Invest in a surge protector for your RV’s shore power connection. This will safeguard your electrical components from damaging power surges.
- Take a moment to label your RV’s circuit breakers. This will save you time and frustration when troubleshooting future electrical issues.
Advanced Troubleshooting (Using a Multimeter)
For the particularly handy RV owner, a multimeter can be a helpful tool for diagnosing electrical problems. However, always prioritize safety. If you’re not comfortable working with electrical systems, call a professional.
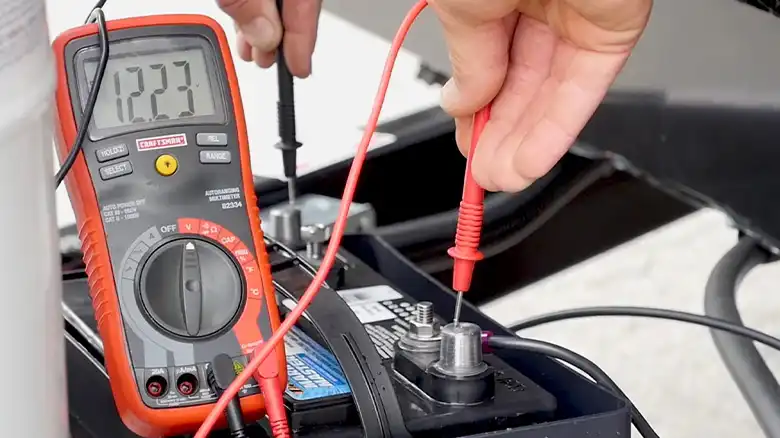
Step #1 Grab Your Multimeter: Set your multimeter to DC volts.
Step #2 Check the Converter Output: Locate the converter (refer to your manual) and find the DC output terminals. With the shore power connected and the converter turned on (if it has a separate switch), carefully touch the multimeter probes to the terminals, ensuring proper polarity (red to positive, black to negative). The reading should be around 12-13.6 volts DC. If you get a significantly lower reading or no reading at all, the converter might be faulty.
Step #3 Test the Light Circuit: Turn off all lights and locate the wires feeding a specific light fixture (again, consult your manual for guidance). With the multimeter set to DC volts, carefully touch the probes to the individual wires. You should see a reading around 12 volts DC when the light switch is turned “on.” No reading could indicate a broken wire or faulty switch.
Conclusion
By following these steps and tips, you should be well-equipped to tackle most basic RV electrical troubleshooting. Remember, a little preventative maintenance, like labeling your breakers and using surge protection, can go a long way in keeping your RV’s electrical system healthy and your lights shining bright.
Happy RVing!

