RVing is all about the freedom of the open road, but sometimes, your road trip can hit a snag. One common problem is your RV’s fresh water inlet. It’s a vital part of your journey, and when it acts up, you need quick solutions.
The main challenge is your RV’s water supply reliability. Think you’re at a peaceful campsite, but you turn on the faucet and get discolored water or none at all. This disrupts your plans and enjoyment. The second issue is potential damage from ignoring the inlet problem, leading to complex, costly repairs.
The answer is straightforward. By learning the steps and solutions for RV fresh water inlet replacement, you’ll gain the knowledge and skills to tackle any issues and ensure an uninterrupted flow of clean water during your travels.
In the following sections, I’ll provide clear steps and tips to guide you through this essential process. So, read on to discover how you can keep your RV’s water supply hassle-free and your adventures memorable.

Common Problems with RV Fresh Water Inlets
Your trusty RV is like a loyal travel companion, and like any friend, it occasionally needs some TLC. One critical aspect of its care is ensuring a reliable freshwater supply. To do that, we must first assess the problem.
When it comes to freshwater inlets, RV owners can run into a variety of common issues. It’s like dealing with those little quirks that come with your favorite old chair. Let’s take a closer look at these woes:
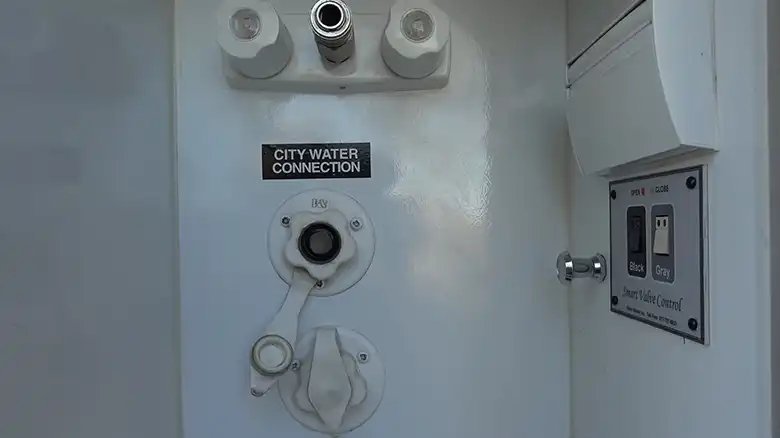
- Discuss typical problems RV owners face with their freshwater inlets: Your freshwater inlet can sometimes act up, causing problems for RV enthusiasts. Typical issues include stubborn leaks and sneaky cracks, which can be challenging to resolve.
- Leaks, cracks, and other common issues: Leaking is like a never-ending dripping faucet, causing water wastage and potential damage. Cracks, similar to wrinkles in your favorite sweater, can compromise the inlet’s functionality and overall water supply.
- The impact of a faulty fresh water inlet on the RV’s water supply: Picture this: you’re in the middle of nowhere, and your RV’s water supply isn’t up to the task. A faulty inlet can disrupt your travel plans, causing reduced water pressure, discolored water, and an inconsistent flow..
Understanding and addressing these common RV freshwater inlet issues is essential for a smooth journey. Let’s roll up our sleeves and restore your RV’s water system to top-notch condition.
Recognizing the Signs for Inlet Replacement
Your RV’s freshwater inlet is the gateway to aquatic adventures on the road. Recognize warning signs for timely replacement.
- Identifying the signs that indicate your freshwater inlet needs replacement: Your RV gives subtle clues for a freshwater inlet upgrade, such as leaks, pressure issues, or odd plumbing sounds. Be vigilant.
- Low water pressure, water discoloration, etc: Reduced water pressure and discolored water are warning signs that your RV’s freshwater inlet needs attention. Don’t ignore these hints.
- The importance of timely detection: Early detection is not just a matter of convenience; it’s a cost-saving measure to prevent water-related mishaps during your travels.
In this guide, we’ll delve into the world of RV freshwater inlet replacement, providing you with the insights you need to ensure your journeys are always awash with the purest water.
Essential Preparations for Inlet Replacement
Before diving into RV freshwater inlet replacement, gather your essentials. Just as you wouldn’t travel without packing, prep for this task.
- Tools and Materials
To start, you’ll want to gather a few crucial tools and materials. These are the nuts and bolts of your project. Here’s a simple list to guide you:
- Wrenches and pliers for those tight connections.
- Sealant to ensure a watertight seal.
- A replacement inlet (make sure it’s the right fit for your RV model).
- Screwdrivers, just in case.
- Teflon tape for secure thread sealing.
If you’re wondering where to find these items, don’t worry. You can check out your local hardware store or find them online. We have recommended some trusted sources.
- Prioritize safety. Equip yourself with safety gear: goggles for eye protection and gloves for your hands, ensuring a smooth, secure replacement.
With your tools and safety gear in place, you’re all set to embark on your RV fresh water inlet replacement journey. Let’s get started!
Why You Should Replace Your RV’s Fresh Water Inlet
Your RV’s fresh water inlet may not take the spotlight, but it’s a crucial component of your adventures. Neglecting it is like ignoring a warning light on your car’s dashboard—small issues can lead to significant problems. Cracks, leaks, and wear and tear can jeopardize your water supply and result in costly repairs.
Safety and convenience are intertwined in the RV experience. A faulty inlet can lead to leaks, creating slippery conditions inside your RV. Dealing with low water pressure and discolored water in the great outdoors is far from enjoyable.
Replacing your RV’s fresh water inlet goes beyond maintenance; it ensures a hassle-free, safe, and enjoyable journey. In the upcoming sections, we’ll guide you through the process, empowering you to hit the road with confidence and a continuous flow of clean water.
Step-by-Step Guide for Replacing Your RV’s Fresh Water Inlet
When it comes to RV maintenance, replacing your freshwater inlet might seem like a daunting task, but with the right guidance, it’s a doable project. We’ve broken it down into four easy steps, so you can tackle it with confidence:
- Step 1: Draining the System
Before you dive into replacing your RV’s fresh water inlet, it’s crucial to clear the pipes. Here’s what you need to do:
- Start by turning off the water supply to your RV.
- Open all the faucets inside the RV to release any pressure.
- Locate the low-point drains and open them to let the water flow out.
- Next, find the drain valves and open them, allowing the water to drain completely.
- Don’t forget to empty your water heater as well.
This thorough draining is essential to prevent spills and mess during the replacement process. It also ensures that you’re working with a dry system, making the next steps easier and cleaner.
- Step 2: Removing the Old Inlet
Now, it’s time to remove the old inlet safely:
- – Disconnect pipes and fittings with a wrench.
- – Remove screws holding it.
- – Gently pull it out to avoid RV exterior damage. Patience is key.
Remember, patience and a gentle touch are your best friends here to avoid any unnecessary damage.
- Step 3: Installing the New Inlet
With the old inlet out of the way, it’s time to install the shiny new one. Follow these steps carefully:
- Ensure the new inlet is the right fit for your RV’s model.
- Apply sealant to the threads of the inlet.
- Carefully fit the new inlet into place, securing it tightly.
- Double-check for watertight connections to prevent any future leaks.
Choosing the right replacement inlet is crucial for a seamless fit and proper functionality.
- Step 4: Testing the System
Now that you’ve replaced the inlet, it’s time to ensure everything is working as it should:
- Turn on the water supply to your RV.
- Run water through the system to check for any leaks or issues.
- Test all the faucets and fixtures for consistent water flow.
If you encounter any problems, don’t worry; we’ve got you covered with troubleshooting tips.
By following these four steps, you’ll have a freshwater inlet that’s in tip-top shape, ensuring a reliable and hassle-free water supply on your next RV adventure.
Key Safety Measures for Inlet Replacement
Safety is paramount during RV water inlet replacement. Ensure a smooth, accident-free DIY project by following these guidelines:
- – Familiarize yourself with the process to understand the steps and potential risks.
- – Prioritize safety with goggles, and gloves, and shutting off the water source.
- – Work in a well-ventilated area to avoid harmful fumes. Spending extra time on safety measures can prevent accidents, ensuring a secure replacement process.
Pro Tips for Maintaining Your RV’s Fresh Water Inlet
Your RV’s freshwater inlet craves TLC. Routine maintenance secures a reliable water supply, saves you money, and ensures clean water during your travels. Prioritize water quality and filtration for worry-free journeys.
Questions You May Ask
What are the signs that my RV’s fresh water inlet needs replacement?
Signs include low water pressure, water discoloration, and consistent leaks, indicating it’s time for a freshwater inlet replacement.
How often should I replace my RV’s fresh water inlet?
It depends on usage, but typically every 5-10 years is a good rule of thumb to ensure your RV’s water system stays efficient.
Can I replace the fresh water inlet myself, or should I hire a professional?
You can replace it yourself with the right tools and guidance, but if you’re unsure, a professional can ensure it’s done correctly.
Where can I buy the replacement fresh water inlet for my RV?
You can find replacement inlets at RV supply stores, online retailers, or your RV manufacturer’s service center.
What safety gear should I use when replacing the fresh water inlet?
Safety goggles, gloves, and proper clothing are essential to protect your eyes and skin from potential hazards.
How can I avoid damaging my RV’s exterior when removing the old inlet?
Be patient and gentle when removing the old inlet, using the right tools and techniques to prevent any exterior damage.
Can I reuse the old inlet’s fittings and connectors for the replacement?
It’s not recommended. Using new fittings and connectors ensures a secure and leak-free connection for your new inlet.
Do I need to drain the entire water system before replacing the inlet?
Yes, draining the system is crucial to prevent spills and make the replacement process cleaner and safer.
How do I test the new inlet after replacement to ensure it’s working correctly?
Turn on the water supply, check for leaks, and run water through the system to ensure a consistent flow and pressure.
What maintenance should I perform to extend the lifespan of my RV’s fresh water inlet?
Regular checks and cleaning, along with using water filters, can help keep your inlet in top shape and extend its lifespan.
Conclusion
To wrap up, RV Fresh Water Inlet Replacement is all about maintenance and timely action for a seamless RV journey. Keep an eye on wear and tear, stay safe, and maintain water quality for a worry-free adventure. With this approach, you not only ensure a reliable water supply but also extend your RV inlet’s lifespan. So, hit the road with confidence, knowing clean water is at your service.


