
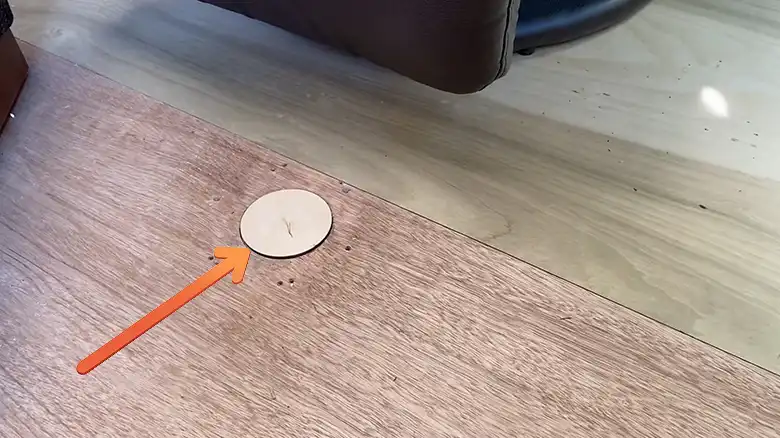
The grated metal floor of my trusty 1973 GMC Motorhome had seen better days after years of hauling adventures across North America. Rust slowly took its toll while dried-out boards began feeling spongy underfoot. But the half-dollar-sized hole gaping under the kitchen sink marked a clear sign – floors needing mending to keep journeys rolling. Perhaps you’ve noticed similar disconcerting symptoms? Buckled vinyl or soft, sagging sections indicate substantial moisture damage. But even small gaps or tears through outer layers expose vulnerable underlying structures. Catching problems early and acting decisively to repair RV floors prevents catastrophic failure down the road.
Understanding hole causes also guides appropriate repairs guarding against reoccurrence. With some inspection, planning, and elbow grease, DIYers can tackle major floor damage themselves rather than paying costly shop bills.
This article explores step-by-step processes for properly evaluating and restoring RV floors to solid, durable condition using widely available materials and standard techniques.
Identifying the Root Cause of RV Floor Holes
First of all, verify the actual source of the holes. Typically, holes manifest from three common causes –
Water Damage
Plumbing leaks around sinks, showers, and toilets soften the wooden subfloor causing eventual collapse. Vinyl flooring also bubbles up allowing dampness underneath that rots boards.
Impact Damage
Heavy objects dropped directly onto the floor can gouge or crack outer surface layers. Damage remains minor unless force reaches the wood below.
Equipment Installation
Drilling through floors to add holding tanks, appliances, and electrical or plumbing lines creates perforations. Gaps appear over time if left unsealed.
Pinpointing hole causes guides effective repairs preventing additional failures. Damaged sections must fully dry before rebuilding. Identify and fix moisture sources like leaky plumbing to avoid renewed swelling or rotting.
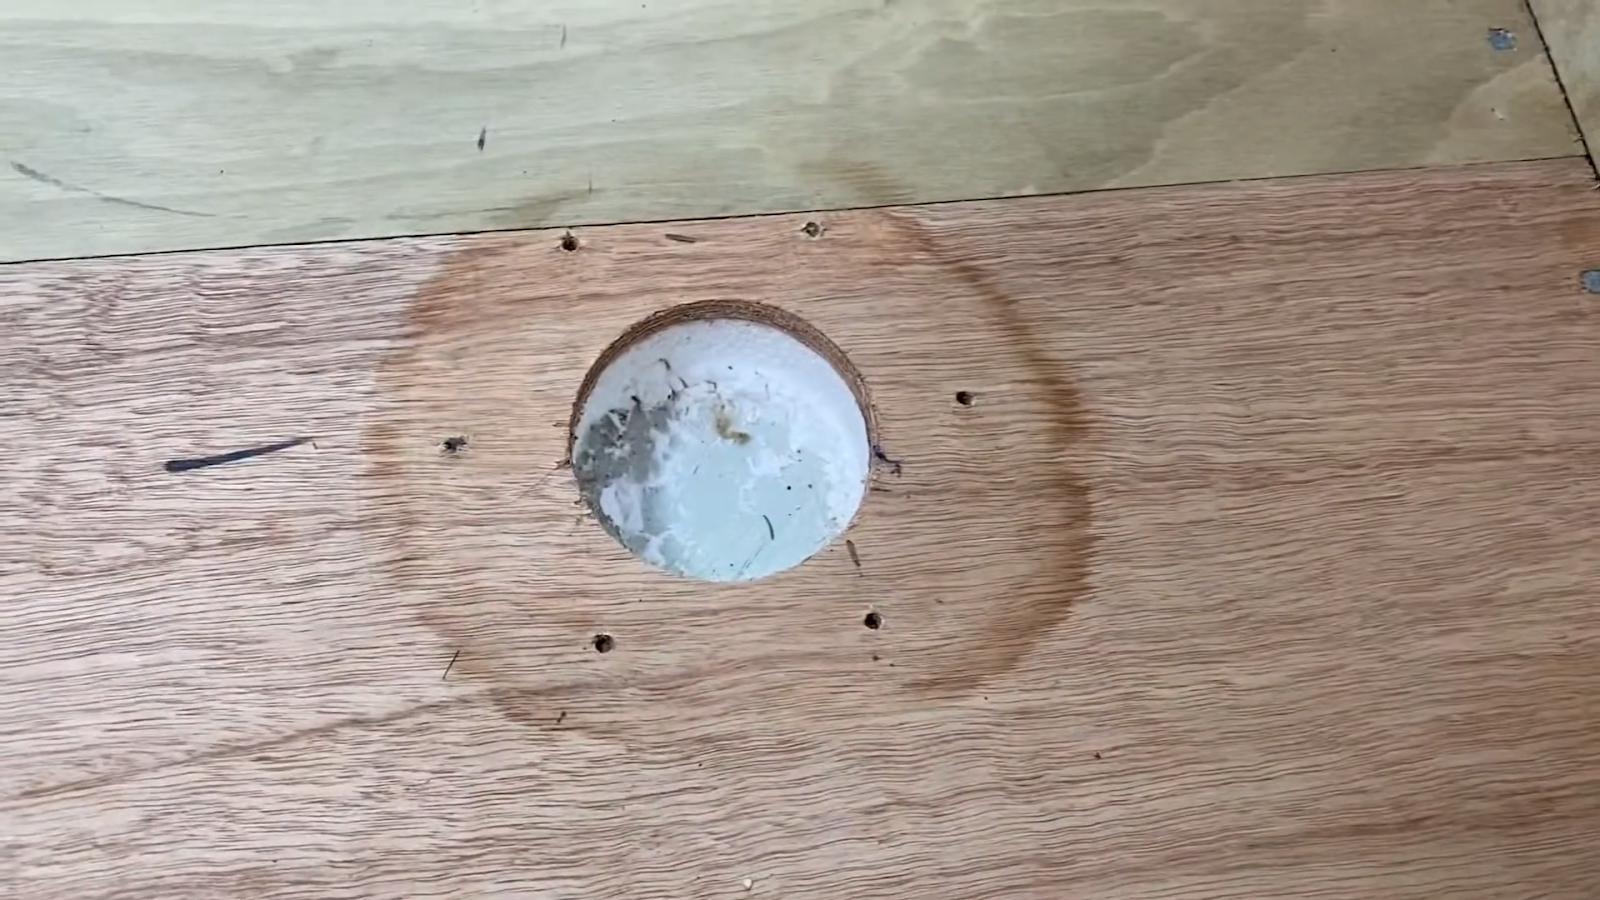
Evaluating Structural Damage in RV Floors
Holes spanning floor joists or walls risk collapsing larger sections if left unattended. Inspect the underside for visible sagging or cracks widening from the opening. Probe surrounding areas with an awl to uncover softness suggesting further unseen moisture damage.
Consider hole size in proportion to the total floor space. Small gaps less than 12 inches wide in solid areas only require patching. But major portions missing across multiple joists or larger than a square foot need whole panel replacement to regain integrity. Anything with damage visibly running under walls or cabinetry involves intricate disassembly before attempting a repair. Know when issues exceed DIY capabilities.
Step-by-Step Guide to Patch Small Holes
Smooth clean openings simplify patching –
Materials: Marine plywood, exterior poly blend wood filler, and gel coat fiberglass resin work well. Opt for exterior glues resistant to humidity and temperature fluctuations.
Preparation: Sand hole edges to create texture helping patches adhere. Vacuum debris before wiping down the repair area with cleaning solvents.
Installation: Cut plywood patches oversized to extend 2 inches past hole edges. Secure with exterior wood screws into the surrounding solid subfloor. Inject expanding filler sealing underside gaps. Apply fiberglass resin over top with fiber reinforcing mesh. Feather out mesh for smooth transitions.
Finish flush with the floor level. Top coat with protective sealants once fully cured.
Replacing Large Sections of RV Flooring
Extensive damage demands removing and replacing whole panels –
Step 1: Mark cut lines 6 inches from damage extending in all directions. Leave ample border for securing new panels.
Step 2: Pre-cut replacement pieces from matching thickness exterior plywood using hole gaps as templates.
Step 3: Carefully saw out the damaged original section.
Step 4: Secure new panels with screws into floor joists below. Consider added blocking to strengthen joints.
Step 5: Seal edges with waterproof caulking before reinstalling vinyl layers on top.
Step 6: Add screws through replacement panels into structural framing restoring rigidity.
Reinforcing Weakened Areas for Lasting Durability
It’s pretty important to brace weakened areas to prevent future failures. So –
Underneath: Sister adjacent floor joists using long wood strips bolted on each side.
Above: Bond thick plywood layers over worn single boards exhibiting deterioration.
Wall Joints: Spanning metal right angle corner braces tightly across floor-wall joints strengthens separations vulnerable to flexing damage.
Close monitoring reveals sections needing proactive reinforcement before small cracks cascade into major liabilities.
Moisture Control: Prevent Future Floor Damage
Addressing water penetration remains paramount for permanent repairs. Use mildew-resistant paints on reconstructed wood elements. Carefully reseal vinyl seams around replacement flooring areas with excess flexible caulk. On the exterior, touch-up underbelly protection coatings scraped up during work underneath. Clean debris from weep holes allowing trapped moisture to escape rather than pooling.
Leave inspection access ports for periodically checking underfloor humidity levels. Prevent another costly repair process by keeping all sealed surfaces well-maintained and leakage-free. Consider overflow drain pans under plumbing fixtures prone to drips. An ounce of prevention here prolongs the floor’s lifetime exponentially.
Final Thoughts
RV floor repair first involves careful damage assessment and determining hole causes. Match robust patching materials suitable for hole size and location. Seek professional assistance with structural deficiencies or extensive deterioration. Preventing additional moisture remains pivotal – seal openings thoroughly while regularly monitoring conditions and drainage provisions underneath. Undertake issues promptly, use quality materials, and leverage sturdy adjacent structures, and your favorite rolling sanctuary will thrive for many more cross-country tours ahead.
Common FAQs
What is the best sealing method around floor replacement edges?
Two part epoxy systems formulated for metal bonding work incredibly sealing porous wood panel edges. Epoxies resist almost all caustic fluids found in RV use while retaining flexibility crucial to vehicles subjected to twisting and vibration forces.
Can I laminate thick composite panels over damaged floors instead of replacing boards?
Bonding layers of exterior plywood or plastic composite panels make for simple upgrades. Use construction adhesives combined with short screws to avoid drilling through the entire laminate package. This helps restore strength for seriously deteriorated floors. Just keep total thickness under 1 inch to clear doorway openings.
How should I modify repairs for slide-out room floor holes?
Slide-outs introduce greater challenges working around compact spaces and mechanical links underneath. Temporary detachment allows better floor access but requires specialty jacks to keep the room properly aligned when reattaching. Seek professional assistance unless highly experienced with slide-out service. The systems prove quite intricate.

