
As a semi-retired couple that has been RVing across North America for over 20 years in our cherished Georgetown Legacy motorhome, we have logged hundreds of thousands of carefree miles exploring scenic backroads and off-the-beaten trail destinations. But Georgetown motorhomes, like any recreational vehicle subjected to harsh weather and frequent long-distance transports, face potential structural vulnerabilities that require diligent preventative inspection and timely refurbishment.
Specifically, our hard-earned experience overcoming two bouts of Georgetown sidewall failure taught vital troubleshooting and repair lessons to detect indirect indications of imminent issues, comprehensively evaluate compromised integrity, weigh repair methodology options, and proactively fortify susceptible areas.
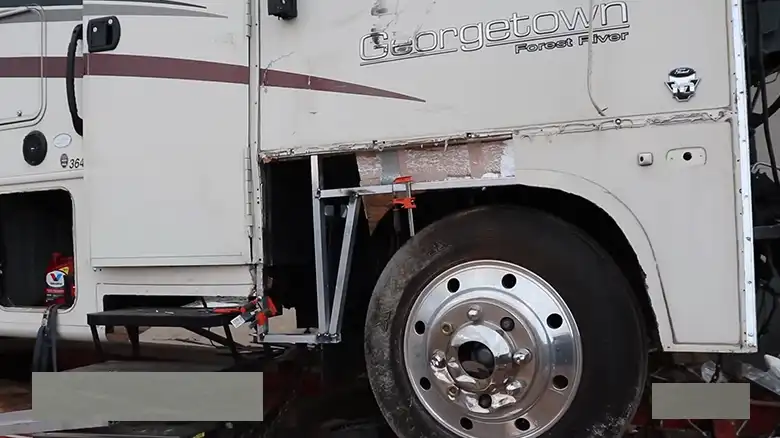
Recognizing Signs of Georgetown Sidewall Damage
Georgetown sidewall failure manifests through an array of visual deformations and functional deficiencies signaling core structural weakness. During monthly external condition checks and preventative maintenance sessions, we scrutinize for –
- Surface cracks or splits in the fiberglass or aluminum skin along the length of a sidewall. These initiate minor but can rapidly spread if left unaddressed.
- Bulging blown-out sections or sagging voids denoting internal delamination or broken supports.
- Bubbled, peeling regions with corrosion underneath dramatically lower structural integrity.
- Water stains bleed through compromised lamination bonds.
- Misaligned doors/windows indicate shifting frames requiring shimming.
- Spongy sections when tapping or signs of prior amateur patches predict impending issues.
Beyond visible red flags, degraded walls manifest functionally through leaks permeating to the interior, sticks in opening/closing doors reduced RV steadiness over uneven roads, and handling deficiencies like persistently underinflated tires despite alignments.
Any outward abnormalities or performance changes prompting concern deserve thorough investigation to determine root causes and assess repair needs before cascading damage occurs.
Causes Behind Georgetown Sidewall Failures
Several factors contribute to destabilizing the robust framed walls sandwiching densified insulation within Georgetown motorhomes over years of heavy use –
Inherent Manufacturing Defects: Shortcuts like low-quality adhesives or thin fiberglass skins cut production costs but compromise longevity.
Moisture Permeation: Leaky roofs, windows, or plumbing conduits enable water to infiltrate the sidewall fuselage and degrade integral structural bonds over seasons.
Vibration Stress: Hundreds of miles of uneven pavement induce metal fatigue and flex crack formation.
Major/Minor Collisions: Any direct frontal or sideswipes can misalign the body framework and warp the flatness of the sides.
Owner Neglect: Lack of routine maintenance permits incremental damage accumulation weakening integrity.
Pinpointing probable failure triggers guides optimal repair methodology selections and preventative fortification adjustments on restored motorhomes.
Assessing the Impact of Sidewall Failures
Before determining repair scopes, comprehensively evaluate how severely the compromised area has expanded. Key assessment procedures encompass –
Mapping Visible Deformations: Detail all cracks, bulges, leaks, separations, and collateral impacts across the whole side. Photos capture odd angles. Include date/location context.
Tapping for Hidden Voids: Use light hammer taps moving methodically across the entire surface to identify regions that sound “hollow” implying interior air pockets signaling delamination from frame separation.
Measuring Deformity Depth: For cracked, bubbled, or warped zones, utilize calipers to quantify the deformation magnitude from the original plane.
Pinpointing Internal Saturation: Scan suspect areas for moisture using specialized detector pins. Note any elevated readings implying water-damaged areas.
Document all inspection findings to simplify sharing failure mode details with repair shops for cost estimates.
DIY Georgetown Sidewall Repair Tips
Based on our journey recovering from two separate catastrophic side failures, homeowners can self-remedy some repairable exterior damage scenarios with the proper materials, tools, time, and perseverance –
Minor Crack Repair
After thoroughly cleaning and smoothing the affected surface, apply protective sealant strips along each crack edge to waterproof then fill using reinforced epoxy resin suitable for metal and fiberglass bonding. Sand once fully cured.
Focused Delamination Fixes
For peeled regions smaller than 20 inches across, inject new aerospace adhesive via syringe both around the peel perimeter and through drill holes within the compromised area. Clamp rigidly until the bond sets. Monitor for recurrence.
Moisture Barrier Applications
Prevent future water incursion and sidewall degradation by coating the entire motorhome exterior using high-quality protectant sprays or sheet seals tailored for RVs. Reapply annually or per manufacturer specifications.
However significant implications accompany DIY repairs – assessing repair quality proves difficult for amateurs, strength matching OEM wall durability is unlikely, warranty coverages likely evaporate, and problems can worsen attempting repairs without proper techniques. Weigh risks before forgoing professional services.
Professional Restoration for Georgetown Sidewall Damage
For major sidewall calamities involving tears longer than 3 feet, bulges wider than 1 foot, or anything impinging interior living space, properly restoring integrity necessitates dismantling damaged sections down to base frames and rebuilding using specialized equipment. RVs incorporate an intricate blend of structural components, insulation material, climate barriers, and surface laminates demanding well-equipped facilities and expert technicians to emulate original strength and sealing.
Seeking multiple repair shop opinions before committing allows for comparing capabilities. Request photos of prior jobs rebuilding similar motorhome sides and clarify what specific bonding agents, lamination practices, structural bracing, and seals properly engineered for RVs are utilized. Quality refurbishment materials share equal importance to workmanship. Discuss warranties on labor and supplies. While costs often eclipse $4000, the longevity regained over DIY attempts proves worthwhile.
Preventing Future Georgetown Sidewall Failures
Beyond promptly addressing detected side degradation before catastrophic collapses occur, employing preventative maintenance practices preserves the integrity and function of the entire motorhome –
a) Wash the RV at least monthly using mild cleaners followed by protective wax to inhibit sun damage and moisture invasion.
b) Inspect sealants around windows, doors, and roof penetrations annually and reapply fresh compound at the first sign of cracks.
c) Fix minor leaks immediately and trace water incursion sources rather than just masking visible damage.
d) Check for exterior sidewall damage after any impacts or demanding drives over rough terrain.
Conclusion
Proactively identifying and correcting small issues before they compound preserves the safety and comfort of Georgetown motorhomes essential for enjoying carefree journeys.
With advanced awareness around where vulnerability hides within these impressive RVs, applying preemptive maintenance practices, properly leveraging repair techniques for diverse failure modes, and understanding limitations on restorations, owners can manage inevitable Georgetown sidewall wear to maximize durability no matter how many more miles the open road holds. Please use the comments area below to share your own lessons learned addressing side issues so we all RV informed!
For additional resources, check out the Georgetown RV sidewall failure subforum with tips from fellow owners and technicians or Forrest’s RV repair guide featuring step-by-step instructions for structural rehabilitation.
Frequently Asked Questions
Can I temporarily patch a small Georgetown sidewall failure?
For minor cracks under 6 inches, applying waterproof gorilla tape tightly over the crack can temporarily protect the sidewall integrity for a couple of months until permanent epoxy repairs can be completed. But do not neglect cracks as they can rapidly expand across panels.
What is the typical cost for professional Georgetown sidewall replacement?
Depending on the total square footage requiring replacement, professional full sidewall removal and installation with custom fabricated panels matching the RV model averages between $4000-$8000 in labor and materials. Shop multiple certified repair centers for the best pricing.
Is Georgetown sidewall failure covered by warranty?
Unfortunately, sidewall issues stemming from accidental damage, improper repairs, long-term wear, or neglect will not qualify for Georgetown’s limited structural warranties. Only manufacturing defects in the first several years may warrant claim submissions or negotiations on goodwill assistance given maintenance records.

