
Hooking up gear and decoration on your RV to make it feel homey is something most of us wanna do. But before you start drilling or sticking stuff all willy-nilly to the outside, you gotta think about a few key points first. Like, how heavy is that object and what material is your rig made of so you don’t damage it. And is this thing staying on temporarily or for good? Asking these questions upfront will set you up for success picking the right way to hang stuff that’ll keep it secure in the long run.
Key Factors to Consider Before Attaching Items to Your RV
Attaching items to the outside of your RV allows you to customize it for your needs and style. However, before attaching anything, there are some key factors to consider first. These will ensure you select the right attachment method for maximum safety, security, and aesthetics.
Determine What You’re Attaching
The first consideration is the size and weight of the item you want to attach. Is it a lightweight decoration like a flag? A bike rack or awning that requires medium support? Or a heavy solar panel or cargo carrier? The item’s physical specs determine how and where you can attach it.
Understand Your RV’s Exterior Material
You also need to consider your RV’s exterior construction. Most modern RVs have an outer skin made of fiberglass, aluminum, or other composites. If your RV has a rubber roof or special coatings, this may limit your attachment options. Knowing the exterior specs prevents damage during installation.
Decide on Temporary or Permanent Attachments
Determine if this is a temporary or permanent fixture. For short-term additions, non-damaging adhesives or tie-downs will suffice. But for something staying put long-term, more rugged mechanical fasteners are better to stand up to weather and motion over time.
Choose the Right Attachment Method Based on Your Needs
Once you’ve answered those preliminary questions, you’re ready to select the proper attachment system. We’ll overview options for lightweight, medium-weight, and heavyweight accessories:
For Lightweight Items (flags, decorations)
If you just need to affix a couple of banners or festive touches, lightweight solutions like command strips, Velcro, or specially designed RV attachment strips get the job done with no tools or drilling required.
Command strips

Command strips are adjustable, removable adhesive strips that can hold most decorative lightweight items on the rig exterior. Measure first and follow the application instructions carefully for best results.
- Clean the mounting surface on the RV with an alcohol wipe and let fully dry.
- Separate strips – peel the red liner off the back of one strip, and press the adhesive firmly to the RV surface.
- Peel the liner off the second strip and adhere it to the back of the item.
- Press the item with a strip onto the companion strip on the RV exterior for 30 seconds and apply firm pressure.
- Check bond after 1 hour, re-press if needed.
Velcro
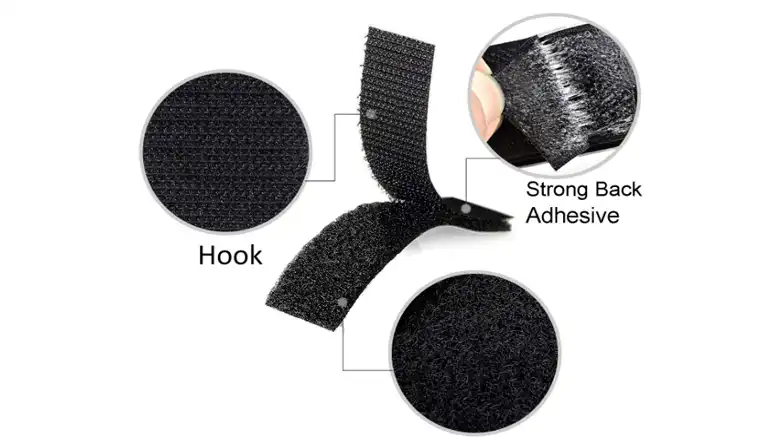
Velcro tape offers adjustable, non-damaging attachment too. Just stick one side firmly onto the RV surface, then press the companion tape to the item for easy fastening and removal later on.
- Clean and dry mounting surface on RV.
- Cut strips of loop tape to fit onto the item being mounted. Peel & stick to the item.
- Cut strips of hook tape to attach to the RV exterior. Peel the liner off to expose the sticky adhesive.
- Press hook tape strips very firmly onto the RV surface for 30 seconds or more per inch. Smooth down edges thoroughly.
- Allow Velcro to cure overnight before attaching the item.
- Simply press the mounted item onto Velcro strips on the RV exterior to secure it in place. Pull apart to detach.
For Medium-Weight Items (bike racks, awnings)
Step up your attachment game when suspending bigger loads like bike racks, awnings, or storage baskets off the exterior. Screws or sturdy adhesives provide more gripping power and stability.
L-brackets and screws
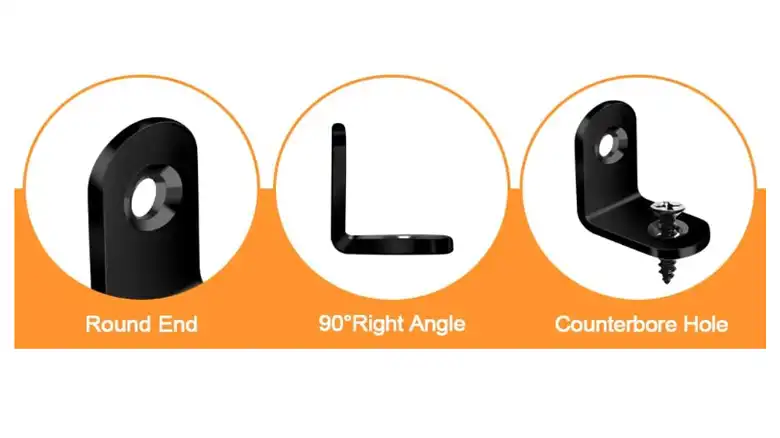
Stainless steel L-brackets combined with exterior-grade screws are a popular choice. Determine proper length screws so you don’t puncture too deeply through the RV skin. Predrill pilot holes to prevent cracking fiberglass or tearing rubber roof membrane materials.
- Measure and mark with pencil the exact bracket locations on the RV exterior.
- Tape brackets into position with painter’s tape and recheck alignment.
- Pre-drill pilot holes slightly smaller than screw diameter if drilling into fiberglass/metal exterior panels.
- Attach L-brackets in marked locations using exterior-grade screws, washers, and drill drivers.
- Secure the cargo carrier, bike rack, and storage basket using additional screws/bolts through vertical bracket holes.
Adhesive mounts
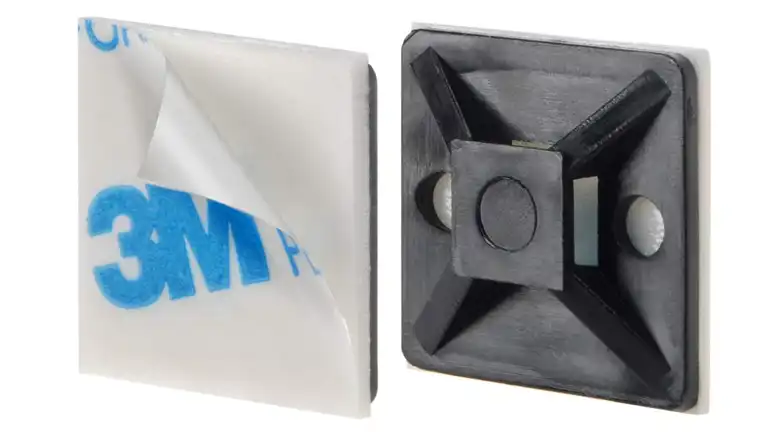
Heavy-duty adhesive mounting bases let you glue on racks, cases, extension arms, and more without drilling holes. Use manufacturer prep, primer, and installation directions for optimal bonding.
- Wipe down the RV mounting area with alcohol, and let fully dry.
- Peel back adhesive disk liner 1 inch. Press that sticky section firmly on the RV exterior.
- Gradually peel the liner completely off as you adhere to the entire pad. Press very firmly.
- Allow to cure for 24-48 hours before attaching accessory.
- Use the manufacturer’s recommended screw size to bolt items through pads into the RV exterior.
For heavy-weight items (solar panels, cargo boxes)
When managing big components like solar systems or cargo carriers on the roof or rear, robust mechanical fasteners like bolts provide the strongest, most immutable anchor.
Bolts
Grade 8 bolts screwed into roof rails or side mounting bars offer the most secure attachment framework. Using flat washers helps disperse load strain. Carefully measure and space bolts evenly to balance weight distribution across the entire contact area.
No matter what system you utilize, always do a final tightening check and visual inspection to verify everything feels snugly anchored all around. Reconfirm fit after the first road test trip too. Practicing sound installation fundamentals makes every type of attachment more durable and crash-resistant.
Final Steps
So there ya have it – the need-to-know basics for decking out your recreational vehicle without a hassle. Give some of these attachment methods a test run and enjoy personalizing your space to escape in on wheels! Drop a comment below if you’re still scratching your head over any part of the process. Happy hanging!

