
Upgrading a trailer’s existing incandescent lighting to more modern and energy-efficient LED lighting can provide multiple benefits. However, correctly installing new LED lights in trailers equipped with a four-wire electrical system requires an understanding of each wire’s function and adherence to proper electrical safety protocols.
Below, I will explain the four-wire trailer electrical system, detail the steps for safely installing LED trailer lights, and provide troubleshooting advice for common trailer lighting issues.
Understanding the 4-Wire Trailer Electrical System
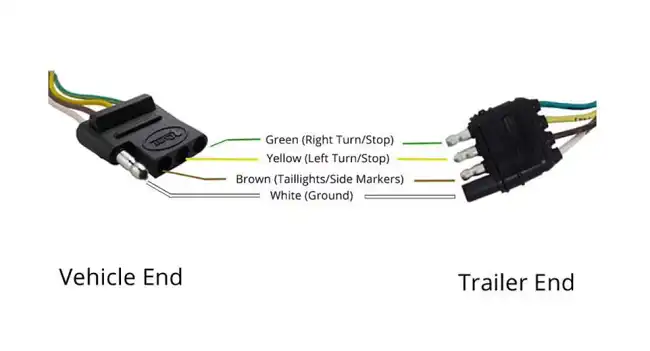
Most modern trailers utilize a four-wire electrical system for lighting and turn/brake signals. Each wire serves a distinct purpose:
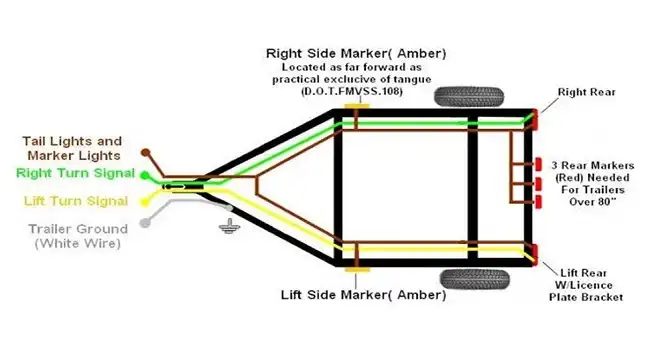
- White Wire – Ground: Connects to the trailer frame to complete the circuit path. Ensures stable electrical connectivity.
- Brown Wire – Running Lights: Provides constant power for side marker and license plate lights when connected. Improves trailer visibility when in transit.
- Green Wire – Right Turn Signal and Brake Light: Controls the right turn signal and brake light on the trailer. Flashes for turning, illuminates steadily when braking.
- Yellow Wire – Left Turn Signal and Brake Light: Controls left turn signal and brake light. Mirrors the operation of the green wire on the opposite side.
Tools and Materials Needed for LED Trailer Light Installation
Installing new LED trailer lights in a four-wire system requires the following tools and supplies:
- Wire strippers – for removing wire insulation
- Crimp connectors and crimping pliers – for attaching wiring
- Heat shrink tubing and heat gun (recommended) – protects connections
- Electrical tape – insulates connections
- Multimeter (optional) – confirms connectivity
- Replacement LED lights with color-coded wiring
- Protective equipment – safety glasses, gloves
Step-by-Step Guide to Installing LED Trailer Lights
With all the required equipment gathered, the installation procedure is as follows:
Locate Trailer Wiring Access Point – Consult trailer documentation to find the central wiring access location. This allows connection with the new LED wires.
Disconnect Power – Shut off the trailer battery connection before beginning wiring work. Ensures safety.

- Access & Prepare Wires – At the trailer wiring access point, cut back and strip insulation from each wire (white, brown, green, yellow) to expose 1/2″ of metalcore. Strip the same amount from the color-coded leads on the new LED lights.
- Connect LED Light Wires – Following the color coding, securely crimp each new LED wire lead to its corresponding trailer wiring access point wire. Confirm the integrity of each connection.
- Protect Connections – Once crimped, seal metal connections with heat shrink tubing if available. Alternatively, wrap thoroughly with electrical tape for insulation. Prevent moisture damage.
- Reconnect Ground Wire – Secure the white ground wire lead to the trailer frame with a crimped ring terminal and mounting screw. Complete the circuit.
- Verify Operation – Restore trailer battery power connection. Test brake lights, turn signals, and running lights for proper operation before reassembling panels.
Common LED Trailer Light Issues and Troubleshooting Tips
While LED lights last significantly longer than conventional incandescent bulbs, issues can still occasionally arise:
Dim lighting – Check wire connections for corrosion and crimps for tightness. Faulty grounding can also reduce brightness.
Inoperable lights – Use a multimeter to diagnose severed wiring or malfunctioning LEDs. Check vehicle charge connection.
Mixed turn/brake signals – Ensure green and yellow wires are properly matched with no reversed connections.
Routine electrical inspection of all wires and connections can identify deterioration before outright component failure occurs, maximizing LED lifespan. Resealing exposed sections with electrical tape or heat shrink tubing prevents corrosion over years of service.
Final Thoughts
Utilizing proper precautions, materials, tools, and the above procedural steps allows safe and effective replacement of conventional incandescent trailer lighting with long-lasting, power-efficient LED alternatives. Understanding each wire’s discrete function enables making the correct connections to maintain full lighting functionality. Taking steps to protect completed wiring installations ensures lighting reliability during long-term trailer operation.

