
4-pin, 5-wire connectors are commonly found on many small utility trailers. Though simple in appearance, correctly wiring these connections is essential for allowing proper trailer lighting and functionality while towing.
This guide will provide an overview of 4-pin, 5-wire trailer wiring, including:
- Wire functions and circuit diagrams
- Installation guidance
- Troubleshooting tips
I’ll simplify trailer wiring so your rig remains fully illuminated and road-ready. Let’s get started!
Understanding the 4-Pin, 5-Wire System
The standard 4-pin flat connector has four pins arranged in a flat row that supplies power for the following trailer lighting functions:
- Pin 1 – Left Turn/Brake Signal
- Pin 2 – Right Turn/Brake Signal
- Pin 3 – Taillight/Marker Light
- Pin 4 – Ground
An additional blue wire typically runs from pin 4/ground and senses when the trailer becomes disconnected while towing. This activates emergency breakaway brake lighting powered by the trailer battery.
Hence the term “4-pin, 5 wire” – 4 pins on connector plus separate blue breakaway detection line.
While not designed to handle additional auxiliary lighting that some trailers may have, the basic functions are wired to ensure safe road operation.
Step-by-Step Installation of 4-Pin Wiring
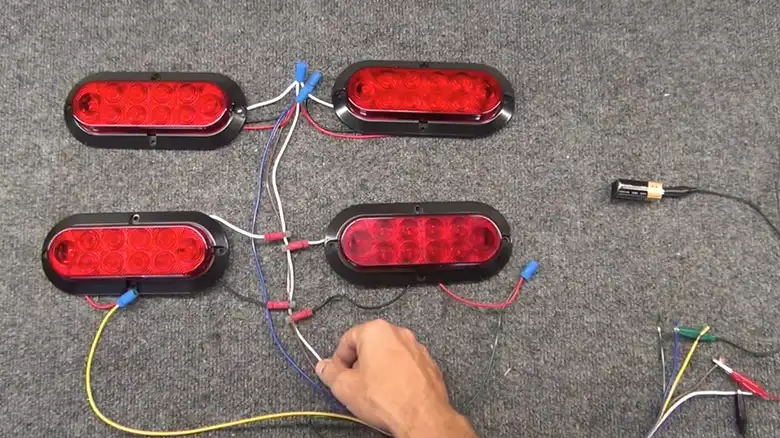
Several key components are needed for 4-pin trailer light wiring: a 4-flat connector wiring harness to run from the vehicle to the trailer lighting; butt connectors for splicing wires; heat shrink tubing to protect the splices; and cable ties for securing the harness wires along the frame. Now let’s start with the installation process.
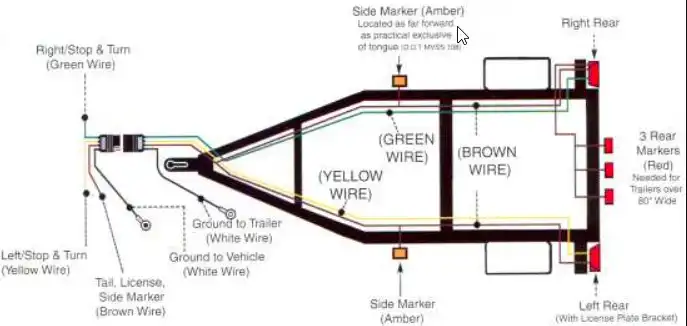
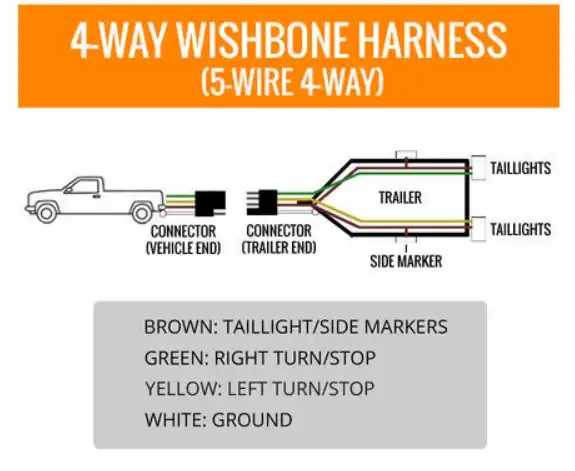
Route the wiring harness from the connector plug near the front hitch to the rear trailer lights. Then, connect the color-matched wires to the corresponding lighting via splicing: join the white ground wire to the common trailer lighting ground wire; connect the green wire to the right turn signal wires; connect the yellow wire to the left turn signal wires; connect the brown wire to the brake/taillight wires.
Slide heat shrink tubing over all the splice connections and apply heat to seal the splices. Use cable ties as needed to securely fasten the harness wires to the trailer frame, avoiding loose hanging wires or attachments that could get ripped.
Finally, attach the main connector plug to the trailer frame near the hitch and connect the white ground wire to the trailer chassis to complete the ground circuit.
Once fully wired, connect the trailer 4-flat to the vehicle to test proper lighting activation when signals or brake pedals are activated. Since the connector can only fit one way, this confirms that the pins are matched correctly.
Troubleshooting Common Trailer Wiring Issues
If the trailer turn signals or taillights are not working properly after wiring up the 4-flat connector, there are a few key things to check:
- Inspect the ground connection on the trailer wiring plug and the splice where the white ground wire connects to the frame/body ground wire. Make sure there is clean, solid metal-to-metal contact with no paint or corrosion in the way. This is the most common cause of lighting issues.
- Wiggle the wires and connectors while the lights are powered on to check for shorts in the system. Repair or replace any damaged wires, connectors, or splices as necessary.
- Use a circuit tester to verify the correct wires are connected to the proper lights, especially on homemade trailers. Signals can get accidentally crossed.
Taking the time to properly diagnose and repair any electrical shorts or bad grounds with a 4-flat wiring system will allow your trailer lights to operate reliably for the long haul and keep your towing setup safe.
Summary of Key Points
- 4-pin connectors use 4 pins to power basic trailer lighting functions, plus an additional ground wire for the breakaway battery.
- Following wiring diagrams to connect matched colors to proper lighting circuits is critical.
- Ground connections should be to bare metal framing to avoid lighting issues.
- Use quality splice connections sealed with heat shrink for robust reliability.
- Test all functions after wiring to confirm proper operation before towing.
Final Thoughts
Wiring trailer lights with 4-way flat plugs is one of the easiest vehicle-trailer electrical connections. But attention to detail is still important, especially properly attaching grounds and sealing splices. Testing the turn signals, brake lights, and taillights prior to each trip can save headaches…or dangerous situations.
We hope you feel ready to confidently wire up your trailer lighting system after reading this guide. Please reach out with any other 4-pin wiring questions that come up! Safe travels!

