
Over time, the constant vibration of travel, extreme temperature changes, and exposure to moisture and UV rays take a toll on RV furniture. You may start to notice cracks, peeling, and flaking of the vinyl or fabric on your chairs, sofas, and tables. While this can detract from the look and comfort of your RV, the good news is that with some basic supplies and techniques, you can restore peeling RV furniture to look great again.
Assessing Damage: Start Here
Start by thoroughly examining the RV furniture to determine the extent of the peeling and damage. Look to see if it is just limited to the surface finish peeling off, or if the actual wood or vinyl is warped, gouged, or coming apart. Lightly running your hand over the surface can help reveal how much of the coating is loose or peeling up. This assessment will determine how much repair work needs to be done before applying a new outer finish.
For surface level flakes and peels, light sanding and a fresh coat of protective finish may do the trick. But for RV furniture where the wood veneer or vinyl is warped, cracked or coming loose, more extensive repairs will be needed before refinishing. Making notes and taking pictures of the damage will help you track the repairs needed on each furniture piece.
Prepping Furniture for Repair
Once you have thoroughly examined the RV furniture and determined the extent of the damage, prep work can begin. Start by lightly sanding any loose, cracked or peeling areas of the finish with a fine grit sandpaper. Be careful not to dig into the wood veneer or vinyl, just focus on roughing up the surface a bit and removing any loose material. Wipe away all dust with a tack cloth. Then tape off any fabric or cushions with painter’s tape to protect them from drips and overspray when you apply the new finish.
Repairing Damaged Surfaces
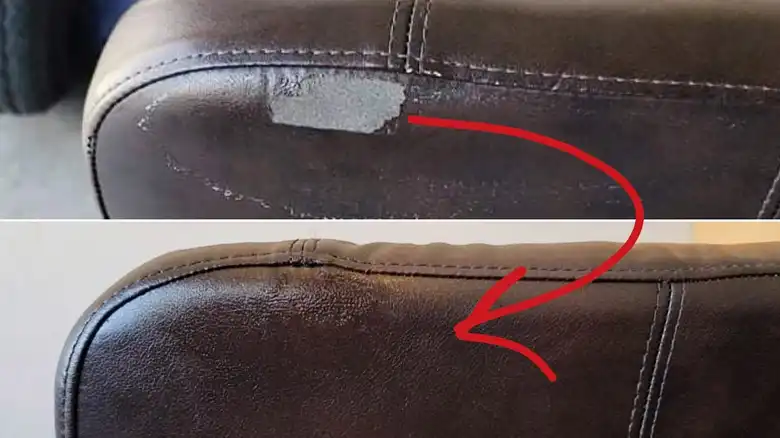
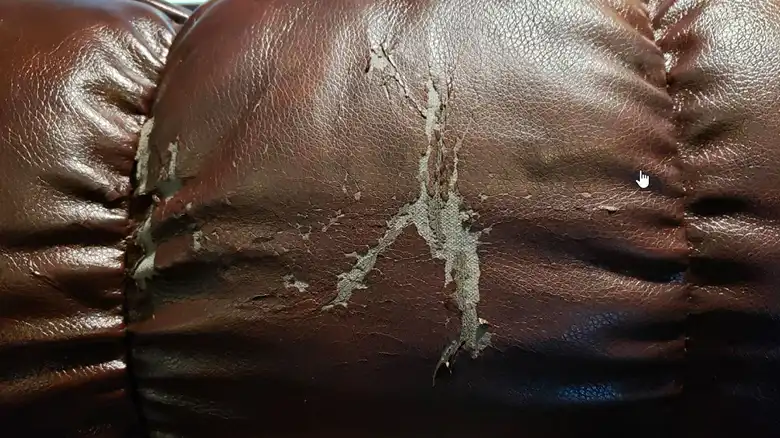
For furniture with cracks, gouges, or missing pieces of wood veneer or vinyl, repairs will be needed before applying a fresh coat of paint or dye. Fill any small dents, divots or holes with wood filler, allowing it to fully dry as directed. Once dry, sand the patches smooth and level with the surrounding surface. For vinyl that is cracked or peeling, use a vinyl adhesive patch to bond any loose sections back down before refinishing.
If the damage is beyond surface level, you may need to replace damaged upholstery or cushions. There are kits available online for reupholstering RV furniture. For wood furniture, you can use adhesive veneer sheets to replace damaged or missing veneer pieces. Sand and shape them to blend seamlessly with the existing veneer before refinishing.
Applying a Fresh Outer Finish
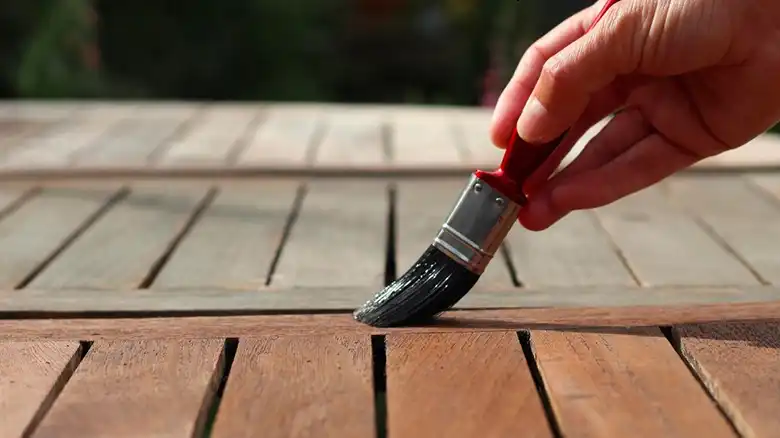
Once any repairs are complete, the furniture is ready for a fresh coat of protective finish. For the most uniform, durable results, opt for spray lacquer, varnish or paint in the color that matches or complements your RV’s existing décor. Work in a well-ventilated area like outdoors or in a garage, tenting cardboard around the furniture to avoid overspray. Apply thin coats, allowing each to fully dry before adding another layer to build up the finish. Two to three coats is generally sufficient for good coverage and protection.
For vinyl and leather upholstery, use leather and vinyl paints and dyes specifically designed for flexibility and durability. Carefully follow the brand’s application instructions. Applying several thin coats will help achieve a smooth, consistent color without any drips or streaks in the finish.
Replacing Hardware and Final Assembly
Before applying any refinishing product, be sure to remove any hardware from the furniture, including handles, latches or hinges. Set the hardware aside until the paint, varnish or dye has fully cured. The drying times will vary based on humidity and ventilation, but expect at least 24 hours between coats. Once the finish has hardened, reattach all hardware pieces using a drill or screwdriver.
Finally, carefully bring the refinished furniture back inside the RV, assembling any pieces that were disassembled for the refinishing process. Now you can enjoy the revived look of your RV’s furniture, protected and looking like new!
Maintaining Your Newly Finished Furniture
To get the longest lasting results from your furniture makeover, be diligent about maintaining the new finish. Keep it clean by promptly wiping up any spills and regularly dusting. Parking your RV in covered storage and installing sun shades in windows will help shield it from UV rays when not in use. Applying a thin coat of acrylic sealer annually will also prolong the finish. Follow the manufacturer’s tips for cleaning products safe for use on the finish. With proper care, your freshly refinished furniture will stay beautiful and durable for years of RVing adventures.
FAQs About Refinishing RV Furniture
How long does it take for paint or varnish to dry and cure?
Most finishes will be dry to the touch within 1-2 hours but require up to 7 days to fully cure and harden before replacing furniture or adding weight. Oil based products generally take longer than acrylics or latex paint.
What kind of paint adheres best to vinyl and leather?
Look for vinyl and leather paints or dyes designed with flexibility in mind. Avoid standard wall paints which can crack when flexed. Always do a test patch first.
What is the best way to achieve an even finish without drips?
Applying multiple thin coats allows each layer to fully dry flat before adding another. Thick coats are more prone to drips and uneven drying.
Can I change the color when refinishing furniture?
Yes, you can update the color by choosing a different shade of paint, stain, dye or varnish that suits your style. Just be sure to use the right product for the furniture material.
Should surface repairs be made before or after stripping old finish?
It’s best to make any repairs after removing the existing finish but before applying new stain or paint so the patch blends seamlessly into the new outer coating.
Does refinishing require disassembling the furniture?
If possible, breaking furniture down into individual pieces makes the refinishing process easier to access all surfaces thoroughly. Just be sure to label parts for reassembly!
How do I get rid of odors from paint and varnish?
Keep air circulating with fans pointed away from the furniture while drying. Baking soda or activated charcoal can help absorb lingering odors faster once cured.
What finish is best for high traffic areas?
Highly durable options like two part epoxy paints or commercial grade varnishes and polyurethanes provide extra protection from scrapes and scratches.
How often should I reapply a protective finish?
Annually inspecting furniture and touching up any worn areas will help maximize the lifespan. Fully refinishing will be needed less often, depending on usage.
Can I refinish cabinets, walls and other RV surfaces?
Yes, the same processes and products for refinishing furniture work well on many interior RV surfaces. Always test on a small hidden area first.

